IJC Plugin tutorial: MyColourRenderer plugin
Overview
This tutorial shows how to create a renderer for Instant JChem. A renderer controls
the formatting of a field type used to display data. For example, a renderer can
set the alignment and font of integers, which can be different to the alignment
and font of floats. Each renderer is capable of rendering only some type
of data and therefore can be use for rendering only certain field types.
For each field it is possible to choose a renderer from the list of
renderers available for this field type.
This tutorial assumes that you have worked through
IJC Plugin: Quick Start
and IJC Plugin: Hello World!
tutorials and that you are familiar with the
concepts and instructions described therein. As before, you will
use NetBeans IDE to create the example plugin that will extend Instant JChem.
Contents:
Exploring 'Renderers' plugin example
Before we begin, let's look at the sample that we will build in this tutorial.
-
Start
api-examples-suite project as described in
IJC Plugin: Quick Start
-
In the started Instant JChem create a new IJC project by going to the
main menu
'File' -> 'New Project...' and choosing
'General' -> 'IJC Project (local database with demo data)'
in the 'New Project' wizard.
-
In the 'Projects' explorer open
'localdb' -> 'Pubchem demo' -> 'Pubchem grid view'
view.
-
In the grid view r-click a header of the 'LogP' column and choose
'Customize widget settings'. The table widget settings dialog will open.
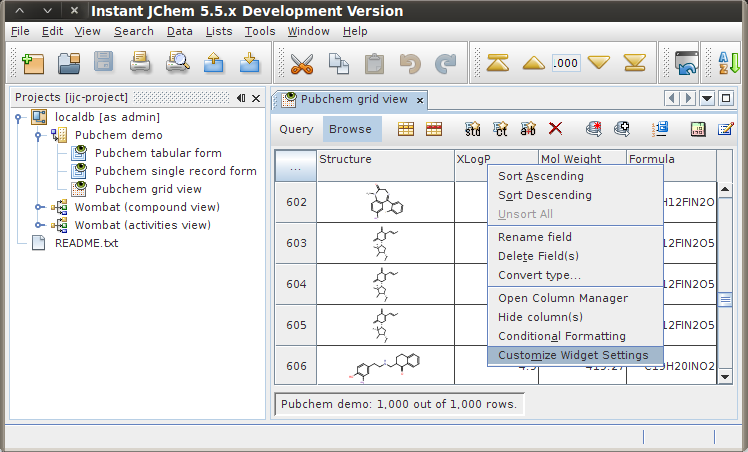
Instant JChem with the demo project - customizing the table widget
-
Look in the
'Cell Renderer' drop-down list, which is
the first item under 'Column properties'.
You should now see the following:
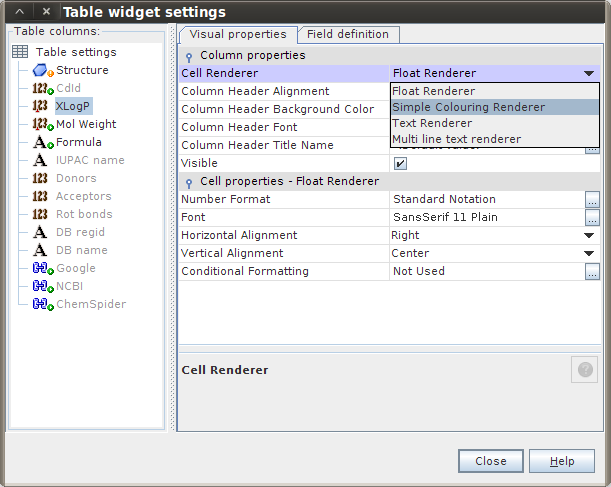
Instant JChem with the demo project - cell renderers available for 'LogP' column
The list shows different renderers that are available for rendering 'LogP'
column values. One of them is called
'Simple Colouring Renderer'. This is the renderer
that we will create in this tutorial.
-
Select
'Simple Colouring Renderer' and you will see its
properties.
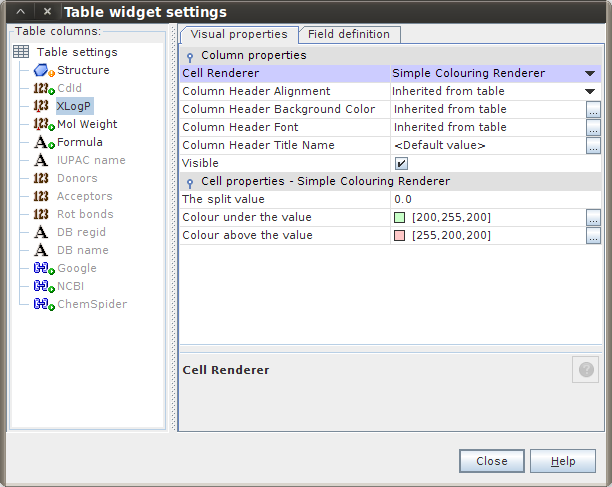
Instant JChem with the demo project - Simple Colouring Renderer's settings
-
Close the settings customizer and the related column now has green/red
cells, depending on whether the value is above or below the split value
in the previous dialog:
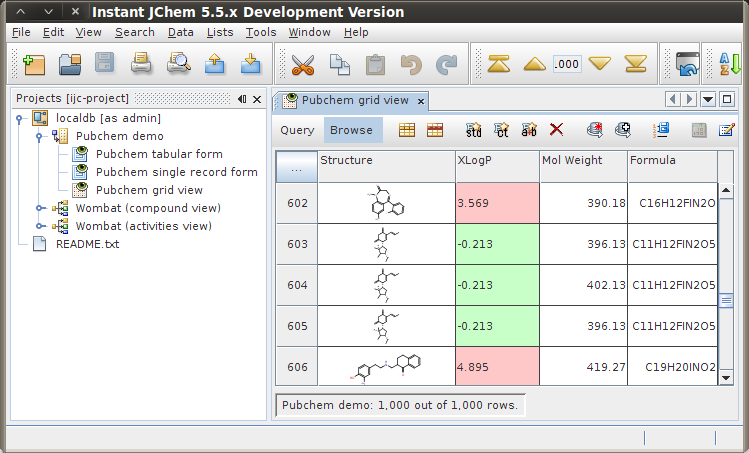
Instant JChem with the demo project - Simple Colouring Renderer in action
Now that you are familiar with the feature that we are going to create
in this tutorial we can dive straight in.
Creating MyColourRenderer project
If you followed the IJC Plugin: Hello World!
tutorial you should have 'IJC Extensions' module suite and 'HelloWorldPlugin'
module already available. Open 'IJC Extensions' suite project in NetBeans IDE,
we will add a new module to it.
In your IDE go to main menu 'File' -> 'New Project...' and create a
new 'NetBeans Modules' -> 'Module' project. Call the project 'MyColourRendererPlugin'
and don't forget to add it to 'IJC-Extensions' module suite.
As the module's 'Code Name Base' enter org.myorg.mycolourrendererplugin
and tick the 'Generate XML Layer' checkbox, leave the default location offered for
the 'XML Layer' file.
New 'MyColourRendererPlugin' module project in NetBeans IDE's 'Projects' explorer
Setting up module libraries
Our next step is to specify which APIs we want to
use. Each API is provided by a module. Some of the APIs
belong to the NetBeans API,
while others belong to the Instant JChem API.
Because our module is deployed to Instant JChem (ie. 'IJC Platform' that we set up earlier),
which itself makes use of all NetBeans and Instant JChem APIs that we need,
we can simply just set dependencies on modules available in 'IJC Platform'.
-
In 'Projects' explorer r-click the 'MyColourRendererPlugin' project's node
and in the popup menu choose 'Properties'. The 'Project Properties'
dialog will appear.
-
In the 'Project Properties' dialog go to
'Libraries' -> 'Module Dependencies'
and click 'Add Dependency...' button to specify modules
that 'MyColourRendererPlugin' module will use.
-
In the 'Add Module Dependency' dialog choose the following modules:
Commons - UI and Graphics,
DIF API, DIF Core Implementation,
Instant JChem Core, Library - JChem,
Lookup, UIWidget Renderers, Utilities API.
-
Click
'OK' and close the 'Properties' dialog.
The list of module dependencies in the 'Project Properties' dialog should
look like this.
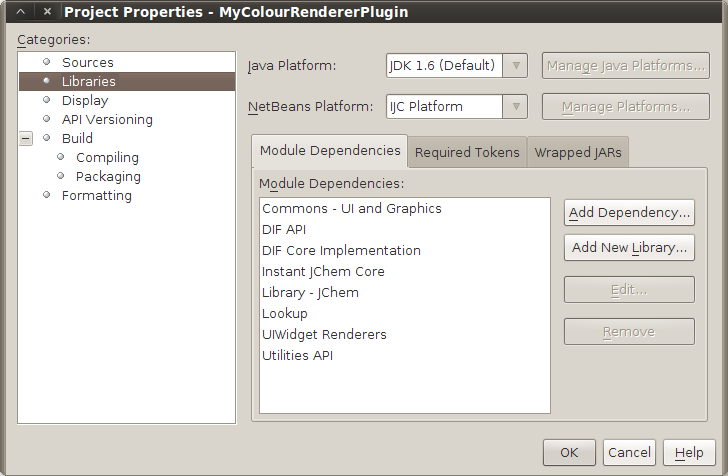
'MyColourRendererPlugin' module dependencies
The dependencies we have just added as well as reasons for adding them
(i.e. the classes these modules provide in their API) are summarized in the
following table.
| Module |
Description |
Classes that we need |
DIF API
DIF Core Implementation
(Discovery Informatics Framework)
|
Provides the data model and persistence tiers for applications that need
to use chemical and biological data.
|
- DFFieldIntegerCapability
- DFFieldStructureCapability
- JChemBaseEntityCapability
- DFEntity
- DFField
- DFEntityDataProvider
- DFTermExpression
- DFFeedback
- DFNewType
- DFNewTypeOptions
- DFNewTypeWellKnownOptions
- SortDirective
- DIFUtilities
- MarvinStructure
- CancelException
- UIBackgroundRunnerRW
|
|
Instant JChem Core
|
Provides the basic user interface for Instant JChem and through
its API it provides the ability to extend the IJC user interface.
|
|
|
Library - JChem
|
Provides the data model and persistence tiers for applications that need
to use chemical and biological data.
|
|
|
Utilities API
|
Provides a set of utility classes covering general infrastructure points
in the NetBeans Platform.
|
|
Creating the Renderer Factory
First, let's begin by creating an implementation of
RendererFactory.
This interface creates a renderer, depending on the level of suitability of the renderer
for the field. Suitability is determined by the
RendererFactory.getSuitabilityFor()
method. The suitability level is an int between 0 (not supported) and 100 (best renderer for
the given field). Below, if the field is an integer or a float, the suitability of the
renderer is set to 30. As a result, it will most likely not be the default renderer, because
other renderers are likely to have higher suitability levels.
Of the three types of widgets available, we will make our renderer applicable
to table cells and IJC widget texts.
-
In the main package,
org.myorg.mycolourrendererplugin,
create a Java class called ColouringRendererFactory.
-
Replace the generated code with the following:
Registering the Renderer Factory
Add the following to the layer.xml file. These entries create a new folder
called IJC, with a subfolder called RendererFactories.
Within that folder, we register our implementation of the RendererFactory interface.
Creating the Renderer
Let's create the renderer.
-
Again, create a java class called
ColouringRenderer
in the main package org.myorg.mycolourrendererplugin.
-
Replace the generated code with the following:
-
Go back to
ColouringRendererFactory class that you created
earlier and change the body of createTableCellRenderer()
and createWidgetTextRenderer() methods. Return a new
instance of ColouringRenderer class as shown below.
Code snippet - ColouringRendererFactory class, createTableCellRenderer()
and createWidgetTextRenderer() methods.
Creating the Bean Info
Let's create the bean info class.
-
Next, create a new java class called
ColouringRendererBeanInfo.
-
Replace the generated code with the following:
-
Add the following strings to the
Bundle.properties file:
Persisting the Renderer
Add the following code to the IJC folder in the layer.xml:
Code snippet - layer.xml file
The new persistence folder that you need to add, as shown above,
contains registration entries for writer-factories and reader-factories
that store or read UI object settings. When a JavaBean is to be written,
Instant JChem looks up a writer (persister), using the class name (obj.getClass().getName())
to write the state to XML format. If such a persister is not registered, the
persister for the superclass is tried, etc. A Beaninfo-based Persister is
registered for java.lang.Object, so each Object
is ultimately written, but the object's class name is stored in the XML file,
and all such objects create the element <ijc:simpleBean> in the XML.
Therefore, if possible, you should register the persister for a class,
in order to get a nice XML element with a tag composed of "namespace":"localName",
which looks better. But, mainly, the reason you need to do
this is to give Java Class names (which are implementation details that may
change from release to release) "abstract" XML element names. You are free
to change the implementation classes, provided that a Persister
is registered to the element xmlns:localName in a future Instant JChem releases
and assuming you will still be able to read old data.
There is boilerplate support for persisting (reading/writing) Beans
implemented in the FSPersisterFactory class, which gets the BeanInfo
for the persisted object and stores properties described by the BeanInfo,
using BeanInfo-published get and set methods. Primitive values are stored
as attributes, Object values are saved (read) using Persister for the type
declared in the BeanInfo (or the actual type). Therefore, for simple objects,
the simple declaration shown above is fine. For this basic support, these
attributes are necessary:
localName/namespace - name of the XML elementimplClass - the class which should be created when the object is read
For writing Beans, the Persister must be registered as follows:
/persistence/classes/class-name-with-dots-replaced-by-underscores.
For reading Beans, the Persister must be registered as follows:
/persistence/xmlns/namespace-with-nonalphanum-replaced-by-underscores/localname-with-replaced-nonalphanum.
You are recommended to register these using .instance
DataObjects (using the .instance extension and instanceCreate and class
attributes), since this is what is directly supported by the NetBeans platform.
This Colouring Renderer example has a BeanInfo class that
declares three properties. One of them is a 'float' type (a primitive). There is
also a common Persister for the java.awt.Color class available,
which encodes the Color object as an attribute that contains a hexadecimal color value.
In other words, the FSPersisterFactory, as declared above, will follow
the BeanInfo, serialize (or read) the splitValue as an attribute,
and the lowerColor and higherColor using
the Color persister. In effect, the ColouringRenderer
is serialized as something like this (xml namespaces and implementation detail
attributes are omitted for clarity):
<renderer splitValue="1.0" higherColor="#ffffff" lowerColor="#00000"/>
Building and running the plugin
If you've followed this tutorial closely you should now have all files
in your 'MyColourRendererPlugin' project ready. The project in NetBeans
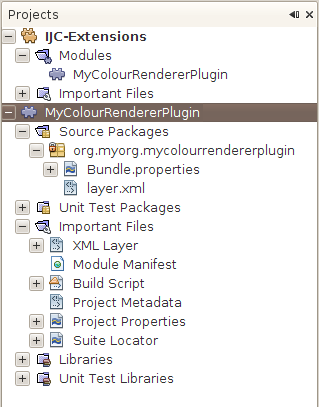
IDE's 'Projects' explorer should look like the picture below.

Complete 'MyColourRendererPlugin' project in NetBeans IDE's 'Projects' explorer
You can now r-click the project's node and build the project by choosing
'Clean and Build' and then run it by invoking 'Run' from the same popup
menu. Instant JChem will start with MyColourRendererPlugin installed and the
renderer that we have created will be available in the table widget settings
customizer.
Conclusion
Congratulations, you have created your first renderer for InstantJchem.
In this tutorial you have learned:
- How to implement a renderer and register it in
layer.xml.
- How to create a beaninfo for the renderer implementation class.
- How to persist objects to XML.
For other IJC plugin development related tutorials please see their complete
list here.