Editing Entities
Creating a New Entity
Data from a database table is represented in IJC by an Entity. To create a new database table you create an IJC Entity for that type of table. IJC currently supports two major types of entity:
|
|
These use normal database tables can be used to store normal numeric and textual data and offer only basic query functionality. |
|
|
These use JChem structure tables to allow chemical structures to be stored and offer a rich structure search features. |
|
|
Since Instant JChem 5.12 there is a possibility to create an entity, which is based on a SQL SELECT statement rather than on a physical database table or view. This type of entity is called SQL Entity. |
It is also possible to add existing tables (standard, JChemBase and JChem cartridge) that are already present in your database to IJC by "promoting" them to Entities.
If your are using an Oracle database and the Oracle schema that you are connected to has had the JChem cartridge enabled then you can choose between 3 different types of structure entities:
|
|
These are the normal JChem tables that are also present in the non-Oracle databases. When using this table type all processing (including searching) is taking place inside IJC and is using memory in IJC. For large structure tables (100,000 structures or more) you may need to ensure that you have additional memory allocated to IJC. |
|
|
These are standard (non-JChem) database tables that contain a column containing structures and have had a JChem cartridge index applied to that structure column to allow it to be searched in a chemically intelligent manner. All operations are performed using SQL operations in the Oracle database and there is very little processing or memory requirement in IJC. For this reason very large tables (multi-millions of structures) can be searched in IJC with only normal memory requirements. |
|
|
These are JChem database tables that have had a JChem cartridge index applied to the cd_structure column to allow it to be searched using Oracle SQL operations. This type of entity is a bit of a hybrid between the first 2 types. Whilst searching is performed in Oracle some other operations such as addition of chemical terms fields are performed using the JChemBase API. Because of this there is a much more strict requirement on the same JChem version running in the Oracle cartridge and in IJC, and if the JChem versions are different some features of this table type will be disabled. For this reason the cartridge entity using standard tables are preferred. |
If you are not using an Oracle database or if your Oracle database schema does not have the JChem Cartridge enabled then you will only see the first of these three types. Details of how to administer the JChem Cartridge for IJC can be found in the administration guide .
When creating an entity it is often useful to create a data tree for it too as views (grid view or form view) belong to data trees. An entity can either be created on its own or it can be created with its new data tree.
To create an Entity with a new table along with a new Data Tree:
either: In the Projects window, right-click the Schema node (  ) and choose 'New Data Tree and structure entity (table)', 'New Data Tree and standard entity (table)' or 'New Data Tree and SQL entity (virtual view)' from the popup menu.
or: open the Schema Editor and switch to the 'Data Trees' tab. In the Schema Editor toolbar select either the 'New structure entity' icon (  ) or the 'New standard entity' icon (
  ).
).
or: open the Schema Editor and switch to the 'Entities' tab. In the Schema Editor toolbar click on the 'New Entity with Data Tree' icon (  ) and then select 'New data tree with new structure entity (table)', 'New data tree with new standard entity (table)' or 'New data tree with new SQL entity (table)' as appropriate.
These operations are also present in the right click popup menus that are available in many places.
The New Entity dialog opens to guide you through the process (see below), but as well as the entity being created you also get a data tree that will be added to the schema editor and the projects window.
To create just an entity without a data tree:
In the schema editor switch to the 'Entities' tab and click on the 'New entity' button in the toolbar (  ). In the popdown menu choose 'New structure entity (table)', 'New standard entity (table)' or 'New SQL entity (virtual view)' as appropriate.
Specifying the settings for the New Entity
Step 1. New Entity Selection:
If you chose to create a new standard table
-
Enter a name for the new entity in the Display Name text field.
-
In the Database Table Name text field, specify a name for the table in the database (this should match the Entity name to avoid confusion).
-
Click Finish. A new standard entity is created in your project, and the database table created. If you requested a new data tree to be created as well the node for a simple Data Tree (
 ) will also be displayed under the appropriate database connection in the Projects window and in the 'Data Trees' tab of the schema editor.
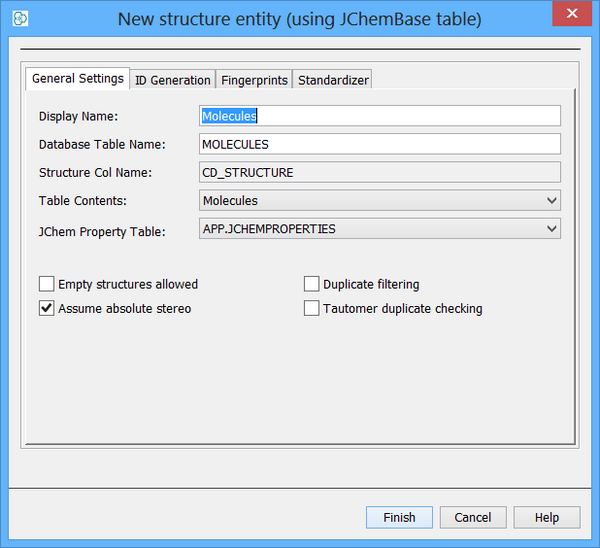
If you chose to create a new structure table:

If you are using an JChem Cartridge enabled schema then you will be able to choose between the different available types of structure table and the options will differ slightly for the cartridge tables
-
Tab 1: General Settings
-
In the Display Name text field, enter a name for the new entity.
-
In the Database Table Name text field, specify a name for the database table (this should match the Entity name to avoid confusion).
-
Use the Table Contents drop-down box to specify the structure types to be included in the JChem Structure Table. Choices are:
-
Molecules: discrete structures only
-
Reactions: single step reactions
-
Query structures: structures with query features
-
Markush libraries: structures with Markush features
-
Any structures: all types of structures (including reactions, query structures and Markush structures)
If 'Any structures' is selected, structure type-specific search functionality (e.g. reaction searching) will be disabled
Markush Libraries requires Markush Enumeration and Markush search licenses
-
-
Specify the settings for the JChem property table and the handling of:
-
Absolute stereo: are chiral structures to be treated as having absolute stereochemistry (the MDL chiral flag option)
-
Empty structures allowed: are empty structures allowed in the table.
-
Duplicate filtering on/off: is duplicate filtering currently enabled.
-
Tautomer duplicate checking: does duplicate filtering consider tautomeric structures (has no effect if the previous option is set to off, but does affect how the table is created).
-
-
-
Tab 2: ID Generation
-
Specify details for the primary key column and how the values for this column are generated. For JChemBase settings this is all handled automatically by JChem and there are no user definable settings. For JChem cartridge indexes on standard tables you need to define detail of how the IDs are generated.
-
See the section on primary keys for more details.
-
-
Tab 3: Fingerprints
-
Optionally set details for the fingerprint settings. These define the details of the chemical hashed fingerprints that affect the performance of the structure searching. The default fingerprint settings are dependent on the table type (e.g. fingerprints for reaction table type are longer than for molecules. The default settings are probably OK for most cases. For specific details of fingerprint settings consult the JChem Administration Guide.
-
-
Tab 4: Standardizer tab
-
Optionally set details for the standardizer. Default standardization will be used if no custom standardization is specified. Default standardization involves conversion to aromatic form and removal of explicit hydrogen atoms. See the section on standardizing structure files for details of using the standardizer editor or the JChem Query Guide for a discussion of standardization and structure searching. Note that most of the standardizer actions require a standardizer license, and will be disabled without one.
-
-
Click Finish. A new Entity is created in your project, as well as a JChem table in the database. A new data tree node for a simple Data Tree (
 ) displays under the appropriate database connection in the Projects window and the 'Data Trees' tab of the schema editor.
For more details regarding the JChem structure tables, please view the JChem Administration Guide
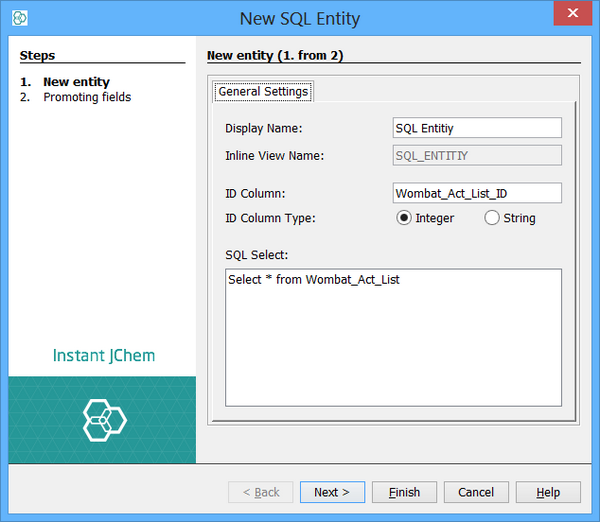
If you chose to create a new SQL entity:

-
Tab 1: General Settings
-
In the Display Name text field, enter a name for the new entity.
-
In the ID Column text field, enter a name of the column with ID values. The ID column has to contain unique non-null values. This column will become the ID field in the new entity.
-
Choose correct data type for values in the ID column. Instant JChem supports numeric or textual ID fields, see About primary keys and value generators .
-
In the SQL Select text area specify a SQL SELECT statement that will define the new SQL entity. This SELECT must produce columns that will contain the ID column specified in ID Column text field.
-
Press Next button and continue with promoting fields.
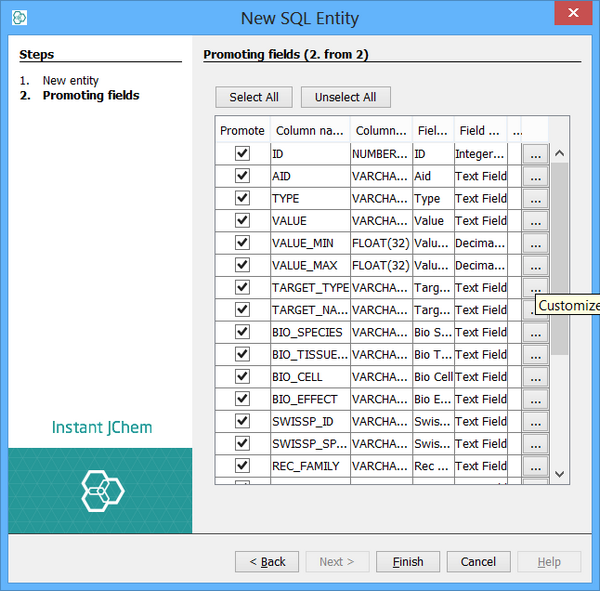
-

-
Tab 2: Promoting fields
-
All columns produced by the SQL SELECT statement entered on General Settings tab are listed on Promoting fields tab and offered for promoting as fields in the new SQL Entity.
-
In this step you can specify which columns you want to promote to fields. You select or deselect the columns using the checkboxes alongside each column, and can specify the parameters for each column in the other columns of the table. This lets you easily promote all the columns you want in one go. If you miss some you can promote them individually at a later stage.
-
Column aggregation and table pivoting
On Oracle database, it is possible to use functions LISTAGG and PIVOT respectively inside of the SQL entity definition.
LISTAGG
Given a table:
|
Value |
registration_NO |
Date |
|
value1 |
1 |
Jun 1, 2015 |
|
value2 |
1 |
Jun 3, 2015 |
|
value3 |
1 |
Jun 2, 2015 |
|
value4 |
2 |
Jun 4, 2015 |
|
value5 |
2 |
Jun 5, 2015 |
We want to aggregate the values with the same registration_NO and sort the values according to the date. It is possible with the following SQL statement:
SELECT registration_NO as ID, LISTAGG(Value,',') WIHING GROUP (ORDER BY Date) "Aggregated Values"FROM tableNameGROUP BY registration_NOThis will result in the following:
|
ID |
Aggregated Values |
|
1 |
value1, value3, value2 |
|
2 |
value4, value5 |
PIVOT
Given a table:
|
registration_NO |
value |
assay_id |
|
1 |
10 |
N1 |
|
1 |
20 |
N1 |
|
1 |
30 |
N1 |
|
2 |
30 |
N1 |
|
2 |
35 |
N1 |
|
3 |
35 |
N2 |
|
4 |
37 |
N2 |
We want to pivot the table in such a way, that we see the sum of the values for all entries with the same assay_id value. You can achieve this with a similar SQL statement:
SELECT * FROM( SELECT registration_NO as ID, value, assay_id FROM TableName ORDER BY registration_NO)PIVOT( SUM(value) for assay_id IN ('N1','N2'))The outer select shows the data from the pivoted table, the inner select defines what fields want to pivot and also defines the ID field needed for IJC's SQL entity to work properly. Inside of the PIVOT clause, you define the desired analytical function and pivot condition inside of the for loop. Oracle specifically needs a list of distinct values, so you can not pivot a table dynamically. You have to know the values beforehand. This SQL statement will result in the following table:
|
ID |
N1 |
N2 |
|
1 |
60 |
|
|
2 |
65 |
|
|
4 |
|
37 |
|
3 |
|
35 |
Support for database views
Entities can be created using a view in the database in addition to tables. A view contains no actual data, but can be considered as a virtual table in the database that provides a "window" over existing tables (or even other views). A view can combine data from multiple tables and provide an alternative representation of the data residing in the database. A view is created in the database using a SELECT statement that defines the data that is visible through the view. For instance a trivial view would be created as follows:
CREATE VIEW v_foo AS SELECT * FROM foo This would create a view that is effectively identical to the original table, and so in this case is of little use. However the SELECT statement would typically perform some more useful operation such as combining data from multiple tables, filtering out unwanted data, or pivoting data into a more understandable representation. Consult your DBA for more information.
In this context a view is not to be confused with a grid view or form view in IJC which are visual reports of data.
Support for views is very similar to that for tables, with the following limitations:
-
Entities that use views in IJC are currently always read-only
-
Views must currently be created in the database and cannot yet be created directly in IJC
-
Views are only supported for standard entities, not for structure entities.
We hope to remove these limitations as far as is possible in the future.
Views are displayed in the 'Views' tab of the schema editor. They behave in the same way as tables, other than the limitations described above.
Editing an Entity
You can edit some of the settings of an entity from the schema editor. Not all settings are editable once the entity has been created. For instance fingerprint settings can only be specified when the structure table is being created, not afterwards.
When you edit a structure entity you will see a fourth tab named Statistics. Clicking on the Generate button will calculate some descriptive statistics for the contents of the JChem table. These can be helpful in determining the optimum fingerprint settings to use. More information about chemical hashed fingerprints can be found here.
Deleting an Entity
In the Schema Editor right click on the Entity and choose 'Delete...' from the popup menu. You are presented with a dialog informing you of the other changes that this deletion would cause, and with the option of not deleting the actual database table (removing the entity from IJC but leaving the table in the database). Review the settings and click on the 'OK' button to perform the deletion.
You can also delete a data tree from the project explorer and you will be asked whether you want to delete all entities that are used by that data tree and not used by any other data tree.
Promoting an Entity
The database may contain some tables that are not currently used by any Entity. These might have been in the database before it was used by Instant JChem, or might have been created by Instant JChem and then the Entity was deleted without the corresponding table being removed. To see these unused table use the 'Tables' tab of the Schema Editor. For more information on using existing tables in the database see the Using existing database tables help page. Also, for Oracle databases tables from other database schemas can be accessed and promoted. See the support for multiple database schemas help page for more details.
 Standard entities
  Structure entities
  Structure entity (using standard table)
  Structure entity (using JChem base table)