R-group
An R-group query can involve several derivatives which differ in one or more substituents (fragments).
-
R-group label
-
R-group attachment point
-
R-group definition
For R-group search, some conditions (so-called R-logic) can also be set to the R-group query.
You can also watch a video tutorial here , or you can meet the Smart R-group tool here .
How to create R-group labels
by Smart R-group tool

Select Smart R-group tool. Click on a clear place on the canvas, or on the right place in the molecule (sprout drawing is also possible).
In this case, the default set is that the auto numbering is active, which means that R1, R2, ...etc. groups will automatically appear in the place of the clicking in the right order.
by Keyboard shortcut
R+Space shortcut:
Opens the R-group dialog window, where you can set the number of the R-group (or you can leave the field empty to get an R-group without any number).
After closing the window, the chosen R-group will appear on the tip of the mouse pointer and this can be added to the root structure in the same way as atoms are inserted.

r keyboard shortcut:
Typing "r" results that "R" will appear on the tip of the cursor; it can be placed on the canvas with a left-click or pressing Enter as many times as you need.
How to edit R-group labels
-
There is an option to add or change R-groups to the required number by clicking on an R-group (when the Smart R-group tool is active). Clicking on an existing R-group opens the R-group dialog window, here you can turn off the auto numbering by unchecking the box and set the number of the R-group. When you check the auto numbering box again, numbering will carry on from the first number that is not yet represented on the canvas.
-
To change other symbols to R-group label (without number), hover over an atomic symbol or select it by the Selection tool, and type "r".
-
Atom Properties menu
Existing atoms can be replaced by R-group labels using the Atom properties dialog as well, where the 'R-group' type should be chosen instead of 'Element'. In this case you can set the number, alias or map to the R-group.
Adding Attachment points
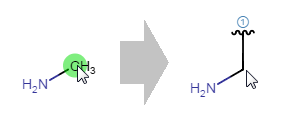
How to add an attachment point by R-group attachment point button
Select the
R-group attachment point button and then click on the atom. You can add more attachment points by clicking successively on the selected atom(s).
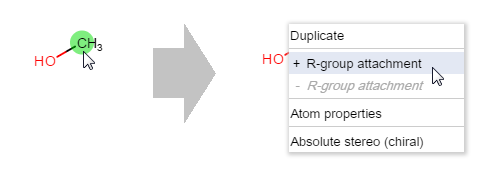
How to add an attachment point via context menu
Right-click on the selected atom then choose + R-group attachment from the menu.
The attachment points on every separate fragment are automatically numbered beginning with "1".
Edit the Attachment points

How to change the bond type of the attachment point
The bond type of the R-group attachment points can be changed using either the R-group attachment point tool or any of the bond tools.
How to create R-group definitions
In order to create the definition for an R-group, draw the substituents from which the R-group should stand for, then you can choose from two options.
R-group definition import and export are supported only in ChemAxon Marvin Document (MRV) format in Marvin JS; besides, you can choose other formats if the relevant web service is available.
Smart R-group tool
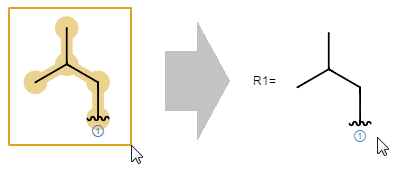
Selecting with the Smart R-group tool results that the R-group label will be given to the fragment (or fragments), which appears on the canvas. When there is more than one R-group in the scaffold, the label of the fragment will get the smallest R-group number, which hasn't got a definition yet.
R+Space keyboard shortcut
Select the substituent(s) by one of the Selection tools, and then type R+Space shortcut. The R-group dialog opens, and you can set the relevant R-label.
Adding/Removing elements to/from the definition
Add
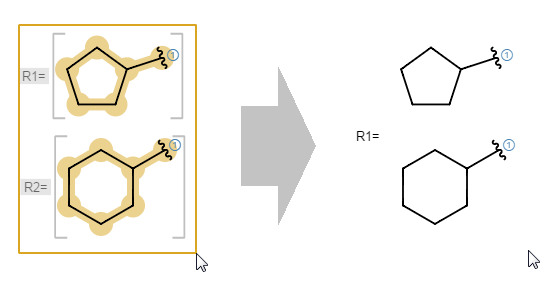
Smart R-group tool
Selecting the substituents together with the Smart R-group tool results that the same R-group label will be given to the fragments.
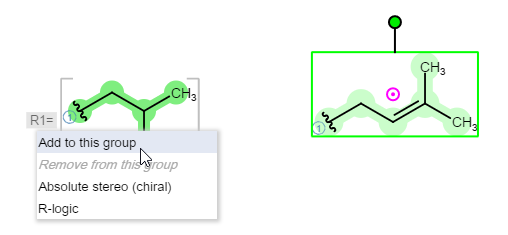
Context menu
If you want to add one or more fragments to an R-group definition, select these fragments (with the Selection tool), right-click on the relevant R-group label, then choose the Add to this group option.
Remove

Smart R-group tool
You can remove fragments from the definition by selecting it with the Smart R-group tool. In this case, the selected element will get a new label.

Context menu
In order to remove a fragment from a group, select this fragment, right-click on the R-label of the group and select Remove from this group option.
Ungroup or Delete
If you do not wish to have an R-group definition any longer, you have some options to get rid of them.
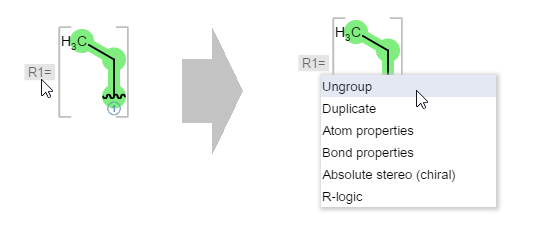
How to ungroup an R-group definition
Ungrouping the definition results that the fragments will not be erased, but they will not belong to an R-group definition any longer.
Right-click on the R-group label, and use the Ungroup option in the pop-up menu.
Delete
In that case, the definition and all of its contents will be erased from the canvas. Deleting the definition can happen as with any other objects, by the Delete tool, or by the Delete keyboard button.
How to add R-logic

Right click on the label of the R-group definition, then select the R-logic item from the context menu. Set the appropriate values and press OK. R-logic data appears on the top left corner.
Edit, Remove R-logic
Via R-logic dialog.