Using File Import
The File Import wizard is a simple and fast way for you to import data into IJC. You can import a file into a schema in an already opened project. You must have sufficient access rights for the schema to do this, but you should always have this in a local derby database.
Supported file formats
IJC supports most of the commonly used file formats:
|
Format |
File extension |
Comments |
|
MRV |
*.mrv |
ChemAxon's XML based Marvin file format that contains structures plus data fields for those structures. This format is recommended when transferring data from other ChemAxon software as it support all the Marvin structure features. |
|
SDF |
*.sdf |
MDL's SD file format that contains structures plus data fields for those structures. This format is recommended for transfer from most other non-ChemAxon software as it supports the most structural features and is supported by a wide range of other software. |
|
JC4XL XLS |
*.XLS |
It is possible to import a JChem for Excel XLS file directly into Instant JChem. This feature allows for perfect inter-operability between ChemAxon desktop products. From the import dialog you can specify your XLS and it will be imported and mapped directly to an IJC entity. If any of the "Chemistry Object", SMILES or IUPAC exists in the source XLS, then a Structure entity is created with that source used to create the internal structure column. |
|
|
|
PDF's that contain chemical trival names and formal nomenclatures can now be parsed and imported into chemical structure tables. Every instance of a recognised chemical name in a PDF document will be converted to a single record in the table. Please see the supporting script named pdf_trawler which shows this new feature in action processing multiple input files. |
|
RDF |
*.rdf |
MDL's RD file format that contains structures plus data fields for those structures. This format is like an extended, but less well defined, version of the SD file format and is commonly used for containing reactions and/or relational (hierarchical) data. Standard import only imports this data as flat (non-relational) data, but the RDF import provides a way to import relational data. |
|
Smiles, smarts |
*.smi, *.smiles, *.smarts |
Daylight's smiles and smarts file formats that just contains structures as a text string, one structure on each line of the file. This format is very lightweight as it does not contain 2D or 3D coordinates and so is suitable for transferring very large numbers of structures in small files. As coordinates are not present they will be generated on-the-fly when being displayed so performance will be slightly slower. The smiles format allows additional data to be provided on each line after the structure definition. IJC will generally support these extra fields, but it does depend on how they are supplied. Importing as TAB or CSV format files is usually better in this case. |
|
Cxsmiles, cxsmarts |
*.cxsmiles, *.cxsmarts |
ChemAxon's extended smiles and smarts file formats that extends the Daylight formats to include Marvin features that are not supported by the Daylight format. This extra information is supplied in a way that is compatible with the Daylight syntax. |
|
InChi |
*.inchi |
IUPAC's InChi file format which contains only structure definitions (no data fields). |
|
Text files |
*.csv, *.tab, *.txt |
Delineated text file formats usually containing text and numeric data, but possibly also structures in a format that is compatible with the "single line" nature of this format (this effectively means it is limited to smiles and the various variants of smiles). The fields in the data file are separated by a constant separator (TAB, comma, space, colon and semi-colon are supported). Field names of sometimes included as the first line of the file, and there is an option to use this first line for field names should this be the case. |
|
IUPAC name |
*.name |
IUPAC names can be imported and converted to structures using the Name2Structure calculator plugin. This option is only available if you have a license for this calculator plugin. The required format is a text file with each structure name on a separate line. |
|
Markush DARC |
*.vmn |
Thomson Reuters Markush DARC (*.vmn) files contain Markush structures extracted from patents. This is the "Derwent patent database", now owned and distributed by Thomson Reuters. These files are particularly useful when imported into a JChem table of type Markush libraries as you can search the table of Markush structures using substructure or exact structure searches. |
To use the File Import wizard:
You can open the File Import wizard using any of the following methods:
-
Start by choosing Import File into IJC under the Quick Start heading from the Dashboard.
-
Right-click a Schema node (
 or
or  ) in the Projects window and choose File import.... This allows you to import your file into a new database table directly within the selected schema.
 -
Right-click a Data Tree node (


 ) in the Projects window and choose File import.... Alternatively, choose File -> File Import... from the main menu.
 -
Choose File import... from the File menu or from the main toolbar when you have a view (e.g. the Grid View ) selected. The file will be imported into a new database table directly within the schema in which you are currently working. .
Import supports two distinct scenarios:
-
Import into a new database table (entity)
-
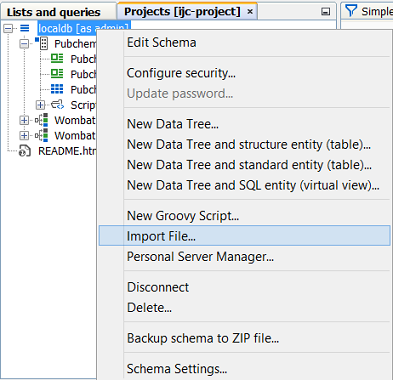
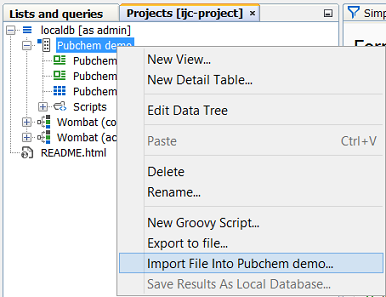
Import into an existing database table, adding the data from the file to the data that already exists. The distinction is important, and in IJC 2.4 we made a change to how the import action works to avoid the risk of importing data into an existing table by mistake. Normally import works by creating a new table and importing the data into it. The File menu items, the toolbar icons and the right click menu item on the schema node in the projects window all work in this way. If you want to import data into an existing table you must use the 'File import...' action in the right-click menu on the data tree in the projects window. Note the two screenshots below. In the left hand one we are importing a file into the localdb schema as a NEW table, whilst in the right hand one we are importing the file into the EXISTING Pubchem demo table.
|
|
|
Step 1. Project and Connection Selection:
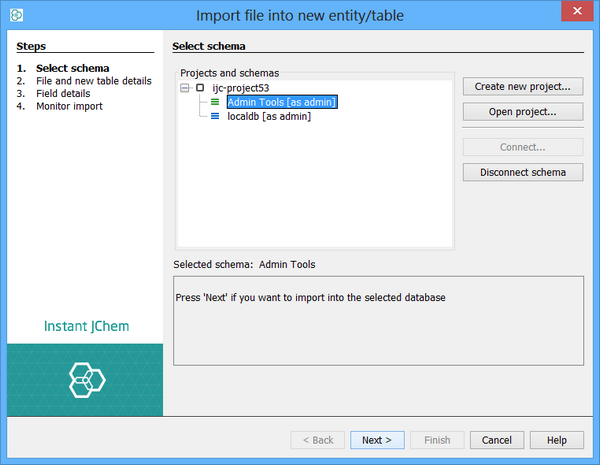
This step will only appear when you have started the import without a context being defined (e.g. from the Dashboard), or you do not have sufficient access rights to import into your currently selected schema. You may not yet have connected to any schemas so this screen will help you through the process of selecting and/or connecting to your database. When the connection or database table is specified by the way in which you open the import wizard, this step is automatically skipped.
Step 2. File and Table Details:
Specify the details of the file and the database table by working from the top to the bottom of this screen.
-
Specify the file by clicking the button to the right of the File to Import field.
-
The type of file should be automatically detected and the appropriate parser selected in the next combo box. If this is not correctly specified then you will need to change the selection. You may also need to change some of the parser options which can be done using the '...' button next to the parser selector. These options differ for the different parser types. Amongst the most useful options are:
-
Option to convert 3D structures to 2D before import
-
Option to set the chiral flag for the imported structures (for structure formats using old-style MDL stereochemistry)
-
Option to treat the first line of comma or tab separated format files as the field names and not as data
-
-
The table type should be automatically detected, but if this is not correct you will need to specify it manually in the next combo box. You might also need to adjust the table options by clicking on the '...' button next to the table selector. For JChem tables there are several important options that can affect the import as well as your options for structure searching and many of these can only be specified when the table is created, not afterwards.
If importing into an existing database table these options are disabled as they have already been specified
-
Click Next. The database table you specified will be created (if using a new table).
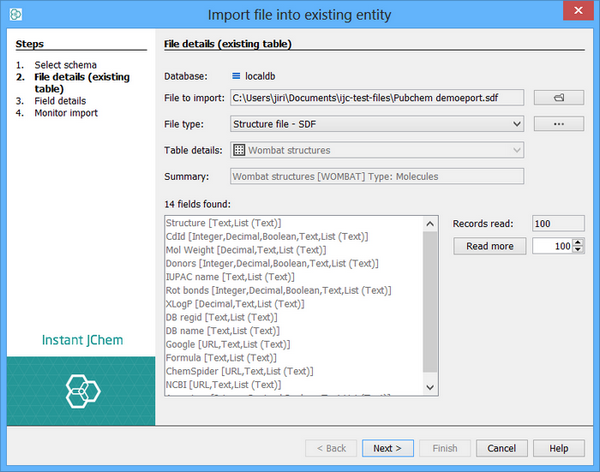
The wizard automatically reads the records from the file and shows you the data fields that have been found. There may be a slight delay as this happens, depending on the speed of your computer and the amount and type of data contained in the file. The fields will be re-read if you change the file, the processing options or the table type.
As the file is read, the details for the new table will be updated accordingly. For example, if empty structures are found, the setting for the JChem table will be updated to allow empty structures, and if the file is found to contain only reactions then the table type will be changed to be specific for reactions.
The 'Records Read' text field indicates the number of records that have been read so far, and the data fields found in those records are displayed. By default the file is read until no new records are found once 100 new records have been read. This process continues until no new fields are found. Whilst this usually gives a good indication of the contents of the file, it is possible that some new fields will be found later in the file, or that a reaction will be found as the last record of a file that otherwise contains only normal molecules. Use the 'Read more' button to read extra records if you think that this may be the case; you may need to read many, sometimes all, of the records. Set the Read More value to zero to read the whole file.
Although the automatic detection of the file contents usually works well it cannot be expected to work for all files. You should check that the settings on this page and the next one for field details are what you expect.
Step 3. Field Details:
In this step you specify how the fields found in the file should be handled. This step is very powerful as it lets you specify the type of new fields being created, the mapping between fields in the file and those in the database, and whether some fields should be used as 'merge fields' (see Merging Data for details on how to do this).
However, although it is powerful, in the usual case of importing a file into a new database table the settings are automatically detected and you typically only need to click Next to start the import.
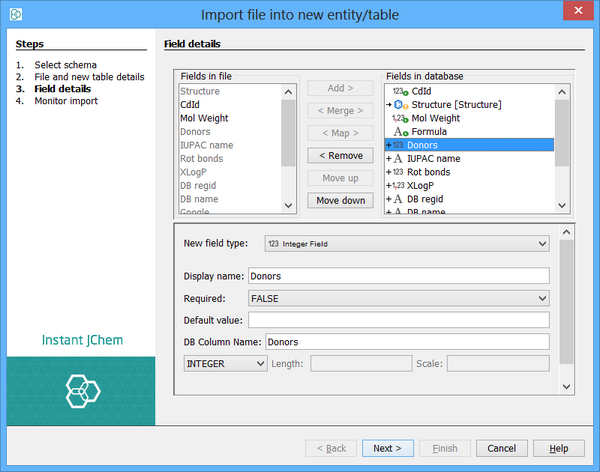
This screen is divided into 3 regions:
-
A list of fields from the file that is displayed in the top left.
-
A list of fields from the database table that is displayed in the top right.
-
Options for the selected database field that is displayed at the bottom.
The key component is the one with the fields in the database table which is displayed in the top right corner. This lists the fields that are already present in the table (either were in the table before we started the import or were default fields created when the table was created). Below these are the new fields that will be added to the database as part of the import (indicated by the + symbol next to the field and the new field icon).
By default, all fields found in the file are specified as needing to be added to the table as new fields. If some of these are not needed, select them from the list on the right and click the 'Remove' button. The field will then become enabled in the list on the left side, signifying that it can be added to the list of database fields to create by clicking the 'Add' button.
The order of the added fields can be adjusted using the 'Move down' and 'Move up' buttons.
If instead of wanting to add the field as a new field you may want to use an existing field in the table (this only applies to existing tables that have had extra fields added). You can specify this by selecting the file field and the database field and using the 'Map' button. Similarly you can use the 'Merge' button to specify that you want to merge the data using this field. Merging is described in more detail in Merging Data . Mapped and merged fields are indicated by the single and double-headed arrow symbols.
When a field is selected from the database list, its options are displayed in the lower panel. For new fields, you can specify the options for the new field. For existing fields there may be the option to specify a default value to use if the field is not mapped or does not have a value in the file when mapped.
Step 4. Monitor import:
The import starts. The whole file is read and the fields specified in the previous step will be imported, along with the structures. Any records in the file will be written to an errors file and you will be notified of this. If a new database table was created then a new Data Tree and Grid View will be created so that you can immediately see the results of your import. You can specify that this should be displayed once the import finishes by clicking the Display Data When Finished checkbox.
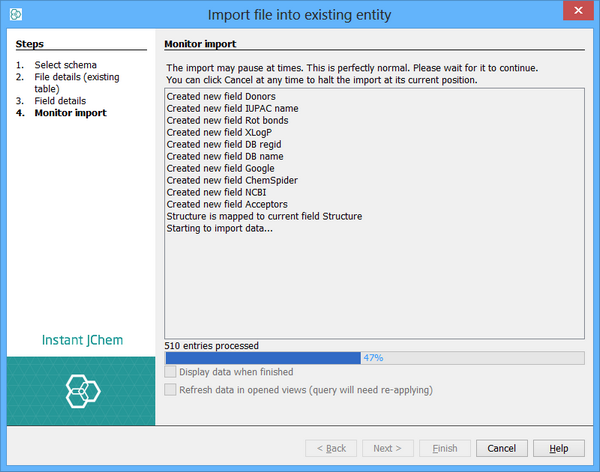
The import can be terminated at its current position at any stage by clicking the Cancel button.
Importing file containing secondary structures
Although only one structure field is supported in standard JChem table, secondary structure (and even more) can be present in the text field. There are some limitations in usage and deviations from standard procedure you need to follow when importing such a file.
-
Text-fields have the default length set to 1000 and it is not enough for the structures. Extend the length of the secondary structure field, 10000 should be sufficient for most cases. The usage of CLOB type instead of VARCHAR2 is also possible.
-
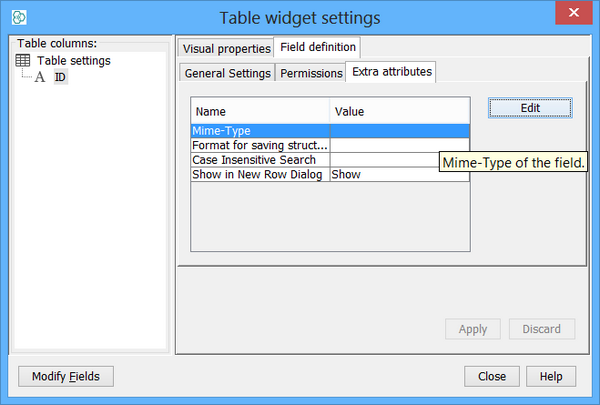
Set Mime-Type of the field to text/structure as seen in the figure. This is particularly very important for compatibility of exported RD files containing secondary structures. It also determine the chose of the renderer in newly created views (or widgets like sheet or table) in the way that structure renderer is used.
-
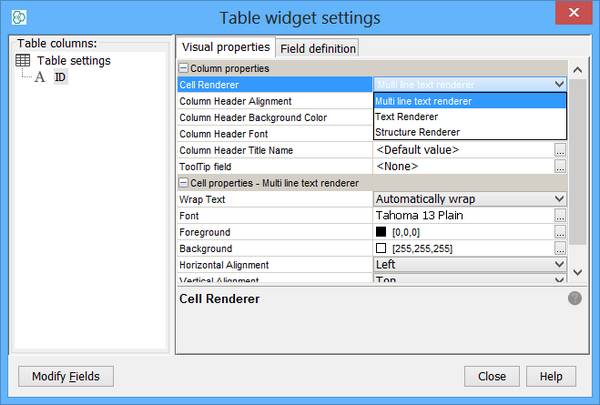
If you use Sheet or Table widget, change the Cell Renderer to Structure Renderer. Molecule pane can be bound to that field without any additional work. Please refer to Renderers page for more details.
