How to deploy Instant JChem using Java Web Start on your server
This document describes how to deploy the Java Web Start version of Instant JChem to your own server. This is relevant to administrators, not end users. If you also want to use shared projects and shared urls you should read How to access data in Instant JChem using URLs .
There are several potential reasons:
-
You have control over when the new versions are deployed to your users
-
You can test a new version prior to deploying to your users
-
You have control over the timing of the JChem table regeneration
-
Users have faster download speeds when updating In addition, you can also deploy pre-configured projects and database connections to your users, so that they do not need to configure anything themselves. Databases, forms, queries and lists will magically appear for them without them needing to do anything. See here for details.
The Java Web Start version of Instant JChem can be deployed to a standard web server. Your users will run Instant JChem by launching it via a link on a web page on that server. You must have an IJC enterprise license to deploy to your own server using Java Web Start.
Setting up
1. Download the IJC zip file
All the files you need are provided in a zip file that is located in the directory on the ChemAxon server that provides the publically available Java Web Start version of IJC. Download this file from here .
2. Unzip the files to your web server
Unzip the files to the location on your web server that you want to deploy from. For illustration purposes we assume you have unzipped to a directory that is called IJC that is accessed from your web server as http://myserver.mycompany.com/ijc
3. Edit the file master.jnlp
The file master.jnlp is the file that contains the JNLP deployment information. You MUST change the codebase definition on the second line so that it refers to the correct location on your web server. e.g.
codebase="http://myserver.mycompany.com/ijc"You can optionally edit the descriptions and icon if you want to change what your users see.
You may also edit the settings in the shortcut element. By default the online attribute is set to false to allow users to access the program when they don't have a network connection. But this means that users can potentially not get any updates immediately which can result in different versions being in use at the same time. If it makes no sense for your users to use IJC in offline mode (e.g. they will be using networked databases) then you are recommended to set this to true so that users will pick up updates immediately.
Additionally you may want to set memory restrictions for Java Virtual Machine for both 32 and 64 bit versions as shown in example bellow.
<application-desc main-class="com.im.ijc.jnlpinstaller.Main"> <argument>-J-Xmx512m -J-Xms128m</argument> <argument>--on64bit</argument> <argument>-J-Xmx1024m -J-Xms256m</argument></application-desc>For other settings look at:
4. Edit the file info.properties
In this file edit the property "__ijc_version". This defines the name of the directory that the IJC application is installed into as well as the name of the user directory that contains the user's settings. By default this is set to a value containing the version of IJC (e.g. 2.2.0). This would result in new directories being used for each version, and users would lose all their settings when this happened. This is generally a bad thing, so we recommend changing this to a fixed value. The convention used for the publically available version is to include the server name as part of this to ensure that versions and settings remain distinct between different versions (e.g. one loaded from chemaxon.com and one from your server). If you follow this convention you will use a value like this:
__ijc_version=myserver.mycompany.com_stablebut you can use any value you like here, but choose carefully.
When IJC launches these directories will be created in the .instantjchem directory which is located in the users home directory.
Inside info.properties, there is a commented out section allowing you to define deprecated installations and user directories, specified by IJC version. These values are supposed to be comma separated, as in the following example:
obsolete_versions=5.4,5.5Specified versions will get deleted upon new JWS installation. Users will be asked for approval by a confirmation dialog.
This setting is generally not needed, as new versions usually don't collide with the later ones.
5. Edit the file index.html
This is the web page from which your users will launch IJC. Edit this as you wish, but retain the link to the master.jnlp file that launches IJC.
6. Set up webserver mime-types
A webserver needs to know a mime-type of all file types that it serves in order to correctly fill in HTTP headers in its responses. This is typically done by defining a mime-type for each file extension known to the webserver. IJC JWS installation contains several different file types. Their extensions and mime-types are listed in the table below. Please make sure that your webserver recognizes these extensions and is able to map them to their mime-types. The IJC JWS deployment will not work without setting up these mime-types correctly in your webserver. Please refer to your webserver's documentation for specific instructions on configuring mime-types.
|
File extension |
Mime-type |
|
.cxl |
application/xml |
|
.ijp |
application/xml |
|
.jar |
application/java-archive |
|
.jnlp |
application/x-java-jnlp-file |
|
.properties |
text/plain |
|
.zip |
application/x-zip-compressed |
7. Test it
Point your browser to http://myserver.mycompany.com/ijc/ and check it all works.
If you find problems or have any questions then please report them to the IJC forum .
Updating
When an updated version of Instant JChem is available you will need to update your version. These are the steps:
1. Test the updated version
Test the updated version to confirm that it meets your needs. You control the deployment to your server so you can make sure that the new version works the way you want prior to updating. You can test the Java Web Start version that is present at ChemAxon
2. Download the IJC zip file
Download the updated version file from here .
3. Unzip the contents to a separate directory
Unzip the contents of the zip file to a separate directory. You will need to make changes to the files before updating the contents of your server.
4. Edit the contents
Modify the contents of the files as follows:
|
File |
Edit |
Deploy |
|
frame.gif |
You can provide you own custom icon if you wish |
No need to re-deploy this file unless it has been updated |
|
index.html |
You probably already have your own index.html so do not need this file |
Keep you own index.html and not deploy this file |
|
info.properties |
You must edit this file to update the __ijc_version to the value being used on your server. e.g. in the example above: __ijc_version=myserver.mycompany.com_stable |
You must deploy this file |
|
instantjchem.zip |
Do not modify this file |
You must deploy this file |
|
JNLPInstaller.jar |
Do not modify this file |
You must deploy this file |
|
master.jnlp |
You may have customized this file during your last deployment, if this is so and you wish to retain the changes, you can roll it forward to new IJC home, if this is a different folder then codebase will need to be edited. |
In some cases, you might want to deploy the new master.jnlp, in which case again, please see point 3 above and the mandatory edit of codebase attribute which defines your IJC home. |
5. Deploy the updated files
Update the appropriate files on your server. See the comments in the previous section about which files should be deployed.
Plugins
You may want to serve IJC extensions with the JWS version. This requires some configuration tasks that will be covered in the following points. How to build a module that you want to extend IJC with, see MyAddField as an example.
when the module is successfully built we need the following two files:
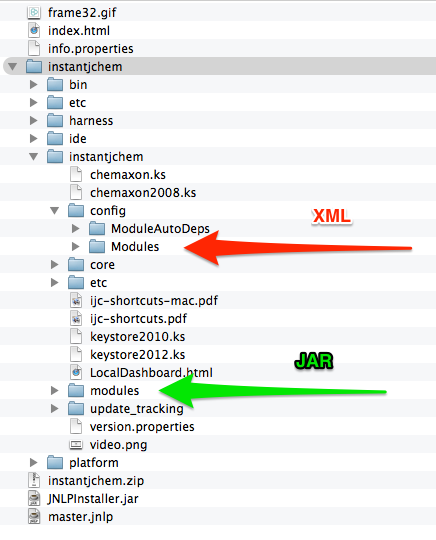
api-examples-suite/build/cluster/modules/com-im-ijc-examples-addfield.jarapi-examples-suite/build/cluster/config/Modules/com-im-ijc-examples-addfield.xml1. Copy desired modules to instantjchem.zip file
If you have compatible standalone module plugin developed against IJC platform you need to include the content of two folders to instantjchem/ folder in instantjchem.zip file:
Those folders are usually located in ${module_path}/build/ if you develop the module.
Another possible location is ${api-examples-suite}/build/cluster when using IJC API examples package.
Plugins distrubuted via update center can be also copied from the userdir:
${IJC-userdir}/ (usually on Windows C:/Users/Username/AppData/Roaming/.instantjchem/ijc-version/)if you have them installed in the local version. All needed config and module files can be found analogically in the three folders mentioned above.
As it is indicated in the previous screenshot, copy the files from the built module into the distribution folder:
-
JAR file into instantjchem/instantjchem/modules/
-
XML file into instantjchem/instantjchem/config/Modules/
2. Modify instantjchem.zip property in info.properties file
In the last step we have to update CRC32 of a new instantjchem.zip in the info.properties configuration. It is recommended to update file size and creation time but it is not mandatory (just some warnings are displayed). However, if you choose, you can find the creation time on Windows with stat -c %Y and on Unix systems with stat -r
One possible solution of how to obtain the CRC32 checksum is to run JWS version with original value. IJC will be unable to run but you can read the checksum in the Java Console window as seen in the figure.
Comparing checksum from info.properties file and actual checksum of downloaded zip file is case sensitive, so please use the small capitals.

Other possibility to find CRC32 is using some windows utility such as this one, or command line:
$ crc32 instantjchem.zip 893d789aUpdate the CRC32 in instantjchem.zip :
# zip file with InstantJChem = file size, timestamp, crc32instantjchem.zip=216959352,1409579282000,893d789aWhere new_instantjchem_size is the new size of the instantjchem.zip file, new_timestamp is any number larger than previous value and 893d789a is an example of a new CRC32 checksum of the instantjchem.zip file.
Update the CRC32 sum in the info.properties file and see how it works.
Changing IJC user directory
There is only one way how to change IJC userdir for JWS installation. There is IJC_JWS_USER_HOME environment variable which determines the path of IJC userdir. This system variable has to be set on the client machine.