How to deploy a project configuration for all your users
This document describes how to deploy shared projects to your users from a single central point. This will automatically provide the project and connection information to the users and avoid the need for them to configure these.
Important : The project (as a directory on disk) is designed for single user only. It should never be opened by more than one user even if it is located in a shared disk. This document describes how to achieve sharing of projects correct way.
A project is deployed by placing it on a web server and configuring IJC to access it. The project will be copied into IJC and opened. For reasons that should be obvious the most common use would be for connections to remote databases. Local databases can also be included, and the entire local database will be copied to each users computer as a local copy. This is less useful as if you wish to update the database then the updated version will be copied to the users computer and all the local changes (including forms, lists, queries etc.) will be lost. Also note that local database files will be quite large, so only consider this approach for small databases.
Each user can still create their own local databases in the project (or connect to other remote databases) but other users will not see these databases.
Why might you want to deploy projects?
There are several potential reasons:
-
Users can start work as soon as IJC starts, without needing to set up projects or database connections.
-
Project configurations can be updated by the administrator
-
Centrally configured projects can include predefined (shared) forms, queries and lists providing the administrator with additional options for pre-configuring the environment the users see.
Steps
2. Prepare the project zip file and .ijp file.
2.1 Using the wizard.
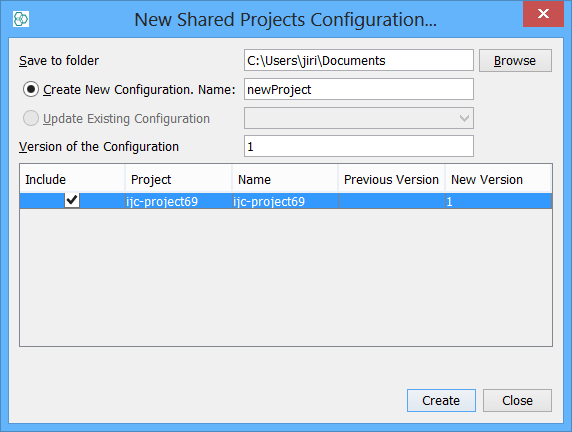
A wizard is available to prepare the shared project files:
-
Right click in the empty space at the bottom of the projects window and choose 'New shared projects...'.
-
The wizard will open
-
Specify a directory which will contain the generated files.
-
Specify a name for the shared project configuration e.g. 'projects'.
-
Specify a version number for the configuration. This should be increased if you are updating an existing configuration.
-
Click on the 'Create' button. There will be a small delay as the files are prepared. They will be located in the directory you specified. 2.2 Manual preparation.
-
Alternatively the .ijp and .zip shared project files can be prepared manually:
-
Locate the project directory that was created in step 1 and make a copy of the directory and all its contents.
-
Locate the .config directory and rename it to .server.
-
Create a zip file of the project contents (e.g. project1.zip). The contents should look like this
-
./.wbproject./.wbproject/project.properties./.server./.server/test./.server/test.ijs
Create the deployment configuration file which should have a .ijp extension (e.g. projects.ijp) which should look something like this:
<?xml version="1.0" encoding="UTF-8"?> <!-- prj_configuration attributes: codebasename - URL where is the configuration file deployed (useful if you deploy already downloaded file) version - change it on configuration update, you don't need to use it <prj_configuration codebasename="http://yourserver.com/ijc-projects/projects.ijp" version="1"> <!-- prj attributes: url - relative URL with zip file, the zipfile contains packed project with .server configurations name - name of project version - change it together with version configuration if project is updated --> <prj url="project1.zip" name="project1" version="1"/> </prj_configuration> An example file can be found here .
Problems?
If you find problems or have any questions then please report them to the IJC forum .