IJC Hello World Plugin
Overview
Welcome to Instant JChem plugin development!
This tutorial will guide you through the process of installing and setting up tools required for Instant JChem plugin development and creating your fist IJC plugin.
Instant JChem application is built on top of NetBeans Platform, which means that the application consists of many small modules (plugins) that each implement part of the application's functionality. All these plugins are bundled together alongside with NetBeans platform binaries in one bundle called Instant JChem application.
Developing an Instant JChem plugin is simply a process of creating a new module and adding it to the existing Instant JChem application. In principle it is the same process as what IJC developers do to create Instant JChem application.
Contents:
Instant JChem installation
Since we are going to extend Instant JChem application in this tutorial it comes with no surprise that we need to have Instant JChem application installed. If you have not done so, please install it now.
Instant JChem application can be downloaded from Chemaxon website's download area. Please download an installer appropriate for your operating system and follow its instructions.
NetBeans IDE installation
For developing IJC plugins you can use any Integrated Development Environment (IDE) that supports java development and Ant, however, since IJC plugins are essentially NetBeans modules the NetBeans IDE is best suited for the task. It's also what all IJC developers use for developing Instant JChem. We recommend to use NetBeans IDE unless you are a seasoned java practitioner skilled in using Ant.
NetBeans IDE can be downloaded from here. The version we used in this tutorial was NetBeans IDE 6.9.1 and we downloaded its 'Java' bundle. The 'Java' bundle includes support for web services development as well as Glassfish and Apache Tomcat web servers. Although it's not required for this tutorial, please choose to install Apache Tomcat web server.
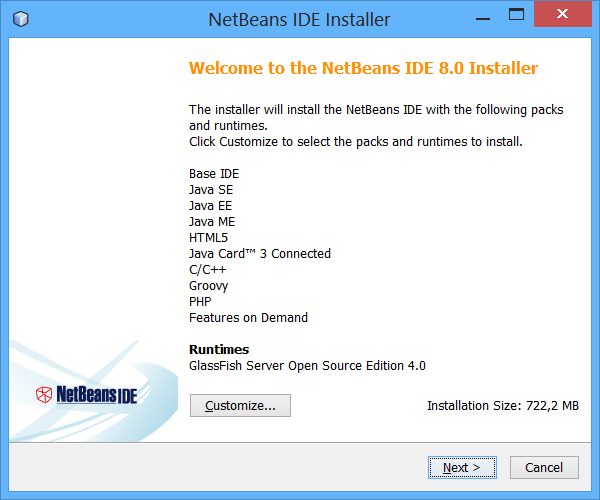
NetBeans IDE 6.9.1 installation wizard - select Apache Tomcat as a runtime to install
Setting up NetBeans IDE
If you just downloaded and installed NetBeans IDE and this is the first time you run it, you might be surprised that the IDE's main menu is suspiciously empty and that virtually all actions are disabled. This is NetBeans default behavior. All the features that you have downloaded and installed with the IDE are in place, but not yet active. The IDE will activate them when you need them or if you explicitely tell it.
Although this is not the usual usage pattern we are now going to explicitely turn on the features that we will need for IJC plugin development. This will make things a little bit easier and less confusing for the first starters.
Please go to main menu 'Tools' -> 'Plugins' and open the 'Plugin Manager'. Click on 'Installed' tab to see all installed features. Among the features you should see 'Base IDE', which has already been activated and 'Java SE', which is inactive. Please tick the checkbox next to 'Java SE' and press 'Activate' button, follow the wizard and let it activate the feature. When active close the 'Plugin Manager.
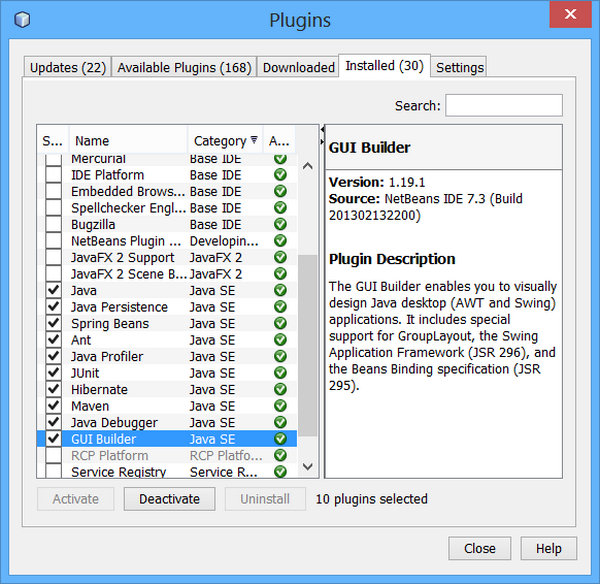
Plugin Manager - activating 'Java SE' features
Since all IJC plugins that we develop will run as part of Instant JChem application, which we installed at the beginning of this tutorial, we will have to tell NetBeans IDE where our Instant JChem application is installed so that it could correctly compile and deploy our plugin projects.
In order to do that we will set up the Instant JChem application as a 'NetBeans Platform'. In general, any java application built on top of the original NetBeans Platform can be used as a basis for further development and as such can itself serve as another NetBeans Platform. Therefore the Instant JChem application that we installed at the beginning can be used as a new NetBeans Platform and can be extended by additional plugins.
Adding a new NetBeans Platform in the IDE is simple. Just go to the IDE's main menu 'Tools' -> 'NetBeans Platforms' and in the 'NetBeans Platform Manager' click the 'Add Platform...' button. This will open a wizard that will guide you through the whole process.
In the first step select the folder where you installed your Instant JChem application. When selected you will be able to click 'Next' button and proceed to the next step, where you can specify your new platform's name. You can choose any name you like, but we suggest you call your platform IJC Platform, which matches the platform name used in the api-examples-suite project (see IJC Plugin Quick Start tutorial for details). Click 'Finish' button to close the wizard and create the new NetBeans Platform.

First step - select the folder where you installed Instant JChem application
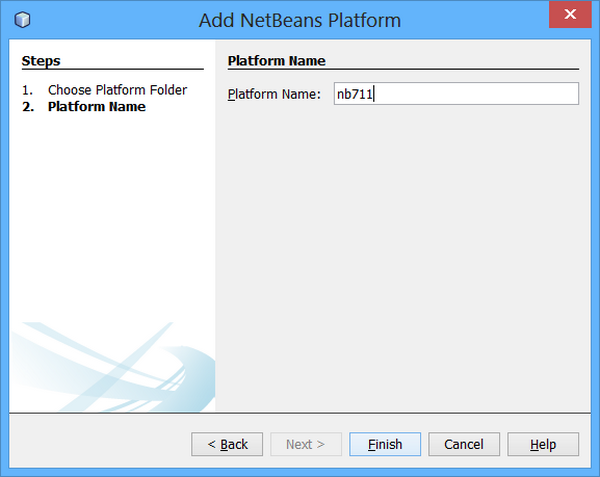
Second step - choose 'IJC Platform' as a name for your NetBeans Platform
Creating module suite
Now when we have all tools installed and set up we can start creating our new IJC plugin. The first step is to create NetBeans module suite. This can be done using the new project wizard from the main menu'Files' -> 'New Project...'.
On the wizard's first page select 'NetBeans Modules' category and 'Module Suite' project and click 'Next' button. The second page lets you enter the name of your module suite project, its location on the disk and most importantly the 'NetBeans Platform' that the project will be based on.
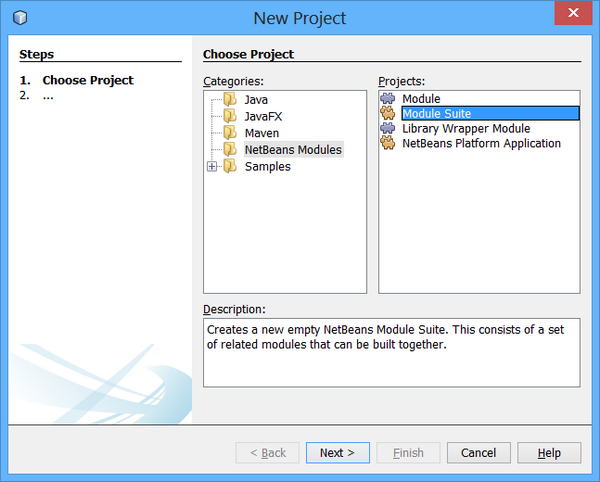
First step - select 'Modules Suite' project in 'NetBeans Modules' category
We called our suite simply 'IJC-Extensions' and let the IDE place it in the default location. We also selected 'IJC Platform' as a 'NetBeans Platform' to use for our plugin development. It is important to select the platform that you set up earlier in this tutorial. If you leave there the default 'NetBeans IDE 6.9.1' platform your plugin will be compiled and deployed directly to NetBeans IDE. This would be fine if you were developing an IDE extension, but we want our plugin to be deployed as part of Instant JChem!
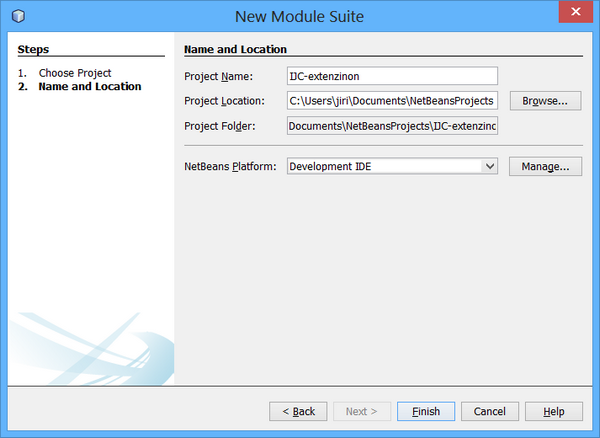
Second step - enter module suite's name, location and select 'IJC Platform' as your development platform
When the wizard finishes you should have the 'IJC-Extensions' module suite project ready for further development and visible in the IDE's 'Projects' explorer. As you can see the suite contains no modules and a bunch of configuration files. In the next step we are going to create a new plugin module and add it to the suite. But before that let's finish configuring the 'IJC-Extensions' module suite.
Open Project Properties file in the editor by double clicking its node in 'Projects' explorer. When the file opens add the text bellow to it. It sets several runtime options that are needed for launching Instant JChem from your development environment.
run.args.extra=--branding instantjchem -J-Xms48m -J-Xmx512m -J-XX:MaxPermSize=196m \
    -J-Dderby.system.home=derby -J-Dnetbeans.logger.console=true -J-ea \
    -J-Dorg.netbeans.ProxyClassLoader.level=1000 -J-DuseGtk=false
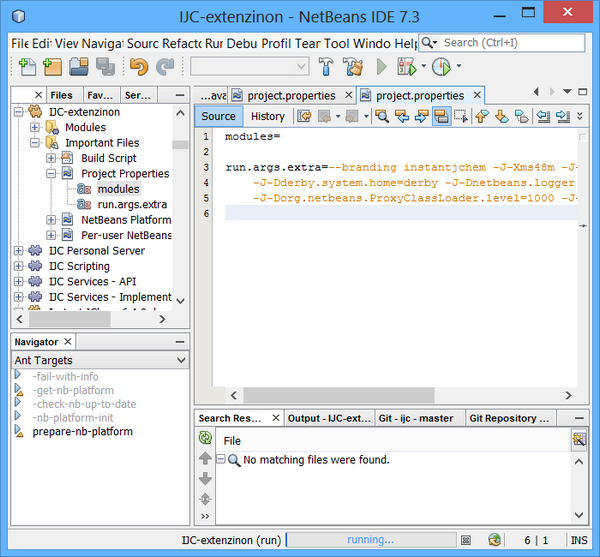
NetBeans IDE's 'Projects' explorer showing our new 'IJC-Extensions' module suite project
Please save the Project Properties file and close it before proceeding further.
Creating plugin module
As for creating module suite projects the entry point for creating a module is the new project wizard. You can find it in the main menu 'File' -> 'New Project...' or click the cube symbol in the IDE's toolbar or simply press its shortcut 'Ctrl+Shift+N'.
When the 'New Project' wizard pops up select 'Module' project from 'NetBeans Modules' category and press 'Next' button.
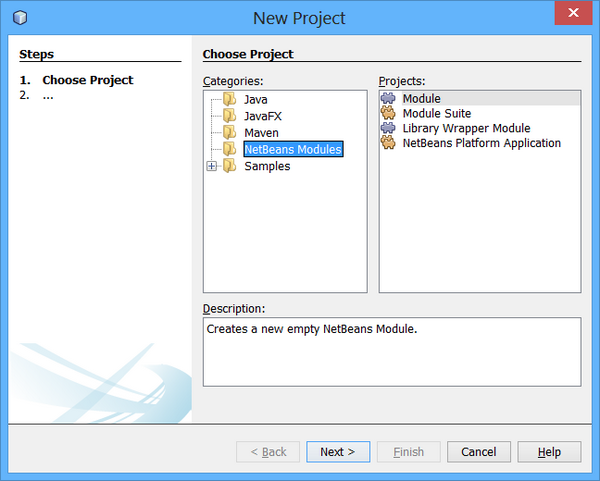
First step - choose 'Module' project from 'NetBeans Modules' category
In the next step please enter the name of your plugin module project. We called our project 'HelloWorldPlugin' and let the IDE to create it in the default location. Also tell the wizard to add the new module to the 'IJC-Extensions' module suite that we created before. When done press 'Next' to proceed to the final step.
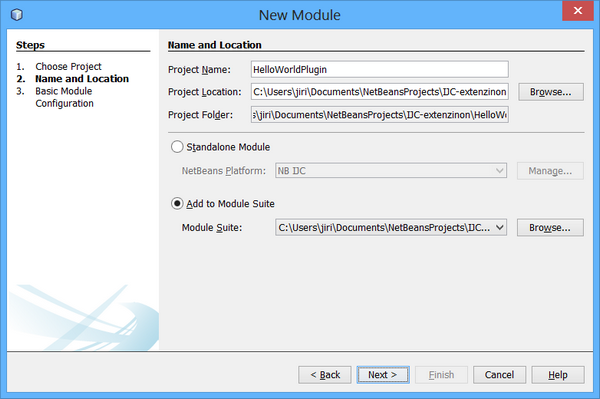
Second step - enter 'HelloWorldPlugin' as the module name and add the module to 'IJC-Extensions' module suite
In the last step you will enter the essential information about your plugin module - its code name base and display name. The code name base is simply a java package where your module's source code will be placed and the display name is whatever text you like that will uniquely identify your module to the users. Complete the wizard and press 'Finish' button.

Third step - enter 'org.myorg.helloworldplugin' for code base name and 'HelloWorldPlugin' for display name
When the wizard creates 'HelloWorldPlugin' project you will see it in the IDE's 'Projects' explorer alongside the 'IJC-Extensions' module suite project. The 'HelloWorldPlugin' project will also appear under the 'IJC-Extensions' module suite's 'Modules' node to indicate that the module is part of the suite.
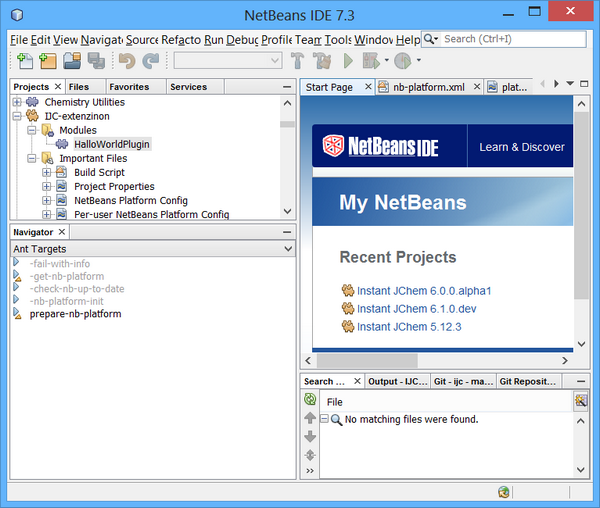
NetBeans IDE's 'Projects' explorer showing our new 'HelloWorldPlugin' module project
Coding "Hello World!"
So far we have created a module suite and added new module to it. The module, however, is empty and does nothing. In order to test it we will add some very basic functionality to it. We are going to create an action that will print "Hello World!" text and place it in the Instant JChem's main menu 'Chemistry'.
Right click the org.myorg.helloworldplugin package node in the 'Projects' explorer and in the popup menu select 'New' -> 'Action'. This will start a 'New Action' wizard that will help us generate all necessary files.
On wizard's first page we have to choose the type of our new action. We want it to be a simple action, which is always enabled and can always be used. Choose 'Always Enabled' and click 'Next'.
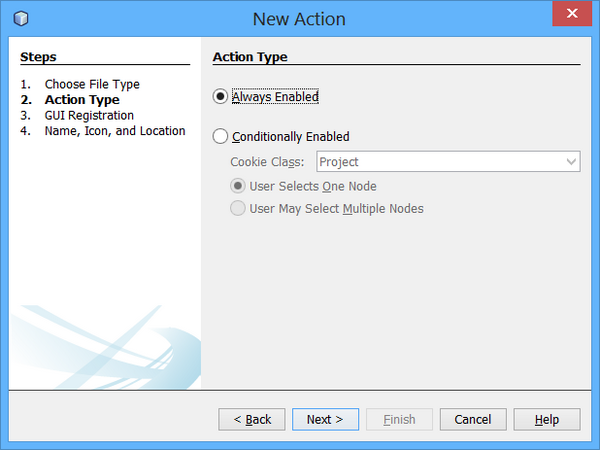
First step - select 'Always Enabled' action type
On the next page we will specify where in the menu the action will appear. In the 'Menu' combobox select 'Tools | Experimental'. The combobox contains all Instant JChem main menu folders (containers, sub-menus) suitable for placing an action. For each sub-menu there are actions already placed in that sub-menu listed in the 'Position' combobox. By selecting an action in this combobox you can specify where exactly our new action will be placed.
Let's select the last action in the 'Position' combobox and tick the 'Separator Before' checkbox. This will place our action at the bottom of Instant JChem's 'Chemistry' menu and separate it from the above menu items with a separator.

Second step - position the action as the last item in 'Tools | Chemistry' menu
After clicking next the last page is shown, which allows entering the action's java class name, display name, icon, etc. In order to keep things simple we will just enter the class name and display name and leave the other options as they are.
Let's call our action's class 'HelloWorldAction' and set its display name to 'Hello World!'. The display name is a string that will be displayed in Instant JChem's menu when we run our plugin.
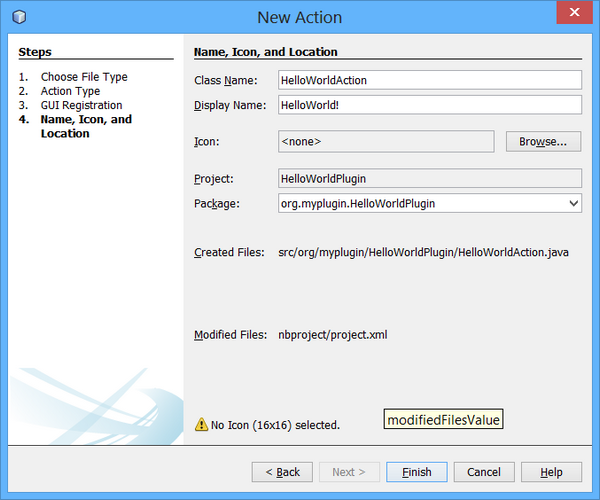
Third step - enter 'HelloWorldAction' for action's class name and 'Hello World!' for its display name
When you finish the wizard and let it generate the source files you will see HelloWorldAction class open in the IDE's source code editor. There will also be new layer.xml file in org.myorg.helloworldpluginfolder and new entry in Bundle.properties.
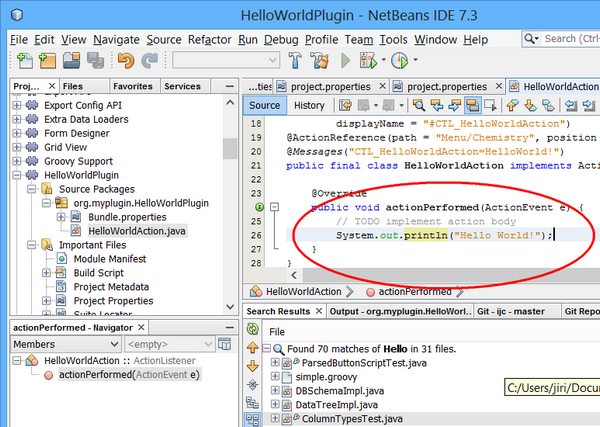
HelloWorldAction.java in the source code editor
Finally, we will add some code. In the source editor find actionPerformed method in HelloWorldAction class and add System.out.println("Hello World!"); to its body. In the 'Projects' explorer go to 'IJC-Extensions' suite project node, right click it and in the popup menu choose 'Clean and Build All'.
Launching the plugin
In order to launch the plugin as part of Instant JChem you simply right click the 'IJC-Extensions' project node and choose 'Run', which will deploy the plugin and start Instant JChem. When started you should see 'Hello World!' action in the main menu at the bottom of 'Chemistry'.
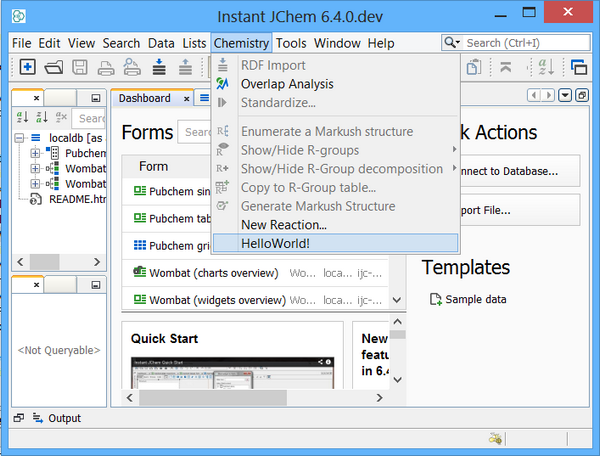
'Chemistry' -> 'Hello World!' action in Instant JChem's main menu
When you click the action seemingly nothing happens. That's understandable, because the only thing that our action does is that it prints "Hello World!" message to the system output. In Instant JChem application the system output stream is diverted to the application's log file, which can be displayed directly from running Instant JChem application by going to main menu and choosing 'View' -> 'Instant JChem Log File'.
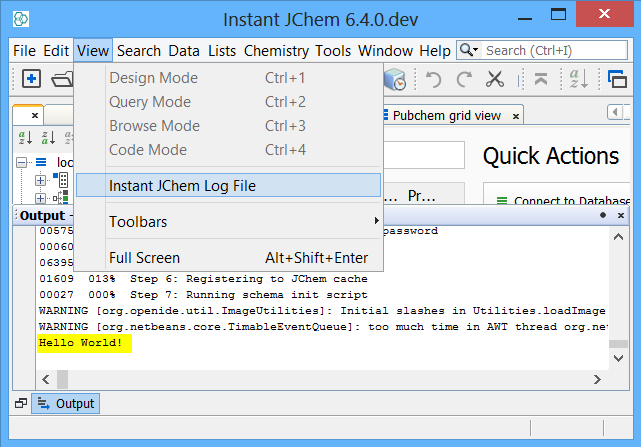
'View' -> 'Instant JChem Log File' will show the 'Output' window with the application's log file
The log file opens up as part of 'Output' window. If all went well it should now contain the "Hello World!" message at its very end.
Conclusion
Well done! You have just successfully built and launched your first IJC plugin. In this tutorial you have learned:
-
What development tools you need for developing Instant JChem plugins
-
How to install NetBeans IDE 6.9.1 with Apache Tomcat webserver
-
How to add existing Instant JChem application as a NetBeans Platform in NetBeans IDE
-
How to create a module suite and a plugin module
-
How to create a simple action and install it in Instant JChem's main menu
-
How to launch Instant JChem with your plugin and where to find the application log file
For other IJC plugin development related tutorials please see their complete list here.