IJC Plugin tutorial - MyAddField plugin
Overview
This tutorial will introduce you to the basics of IJC plugin development and using Instant JChem APIs. It will walk you step by step through the process of creating 'Add Field' IJC plugin included in IJC API Examples suite.
In this tutorial we expect that you have made yourself familiar with the development tools and set up your environment as it is described in IJC Plugin: Quick Start and IJC Plugin: Hello World! tutorial. If you haven't done so, we strongly recommend you to read these two tutorials first before you proceed with the 'Add Field' plugin tutorial.
During this tutorial we are going to create our own version of the 'Add Field' plugin, which is available as part of IJC API Examples suite. This gives you chance to choose how exactly you want to follow this tutorial. You can either recreate the plugin step by step as described here or you can use this tutorial as a guide for exploring the 'Instant JChem API Examples - Add Field' project that you have downloaded as part of api-examples-suite in IJC Plugin: Quick Start tutorial.
By the end of this tutorial, you will understand the basic process of creating new extensions for IJC and you will also have been introduced to various resources that you can use to further develop your knowledge and skill in extending IJC. In particular, in this tutorial you will learn the following:
-
how to add a context-aware menu item and toolbar button
-
how to create and open new dialogs
-
how to create new fields in a JChem table
-
how to read data from a JChem table
-
how to write data to a JChem table
-
how to use asynchronous tasks running in the background
Contents:
-
Using the IDE's Wizards
-
Coding the Module
Exploring 'Add Field' plugin example
Before we begin creating our module, let's look at the sample that we will build in this tutorial. Once we have tried it out, we will know for ourselves what the result of this tutorial will be.
-
Start api-examples-suite project as described in IJC Plugin: Quick Start
-
In the started Instant JChem create a new IJC project by going to the main menu 'File' -> 'New Project...' and choosing 'General' -> 'IJC Project (local database with demo data)' in the 'New Project' wizard.
-
In the 'Projects' explorer open 'localdb' -> 'Pubchem demo' -> 'Pubchem tabular form' view.
-
Now, add the atom count field by selecting the 'Add Atom count field' menu item in the main menu 'Help' -> 'API Examples'.
-
You should now see the new 'Atom Count' field added to the JChem table, as shown below:

The new 'Atom Count' field added to the table.
Note: In the bottom right corner of the screenshot above, you can see a progress bar, with the text "Filling data". In this tutorial, you will learn, among many other things, how to create a progress bar to enable asynchronous tasks to run in the background, so that the user interface remains enabled while the field is being added to the table.
In this tutorial we are going to implement the same functionality from scratch.
Creating MyAddField plugin
If you followed the IJC Plugin: Hello World! tutorial you should have 'IJC Extensions' module suite and 'HelloWorldPlugin' module already available. Open 'IJC Extensions' suite project in NetBeans IDE, we will add a new module to it.
In your IDE go to main menu 'File' -> 'New Project...' and create a new 'NetBeans Modules' -> 'Module' project. Call the project 'MyAddFieldPlugin' and don't forget to add it to 'IJC-Extensions' module suite. As the module's 'Code Name Base' enter org.myorg.myaddfieldplugin.
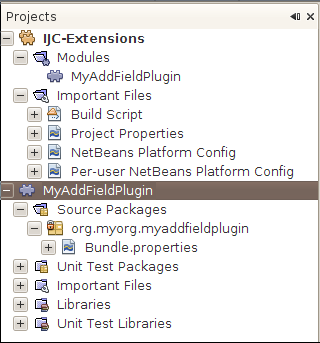
New 'MyAddFieldPlugin' module project in NetBeans IDE's 'Projects' explorer
Setting up module libraries
Our next step is to specify which APIs we want to use. Each API is provided by a module. Some of the APIs belong to the NetBeans API, while others belong to the Instant JChem API. Because our module is deployed to Instant JChem (ie. 'IJC Platform' that we set up earlier), which itself makes use of all NetBeans and Instant JChem APIs that we need, we can simply just set dependencies on modules available in 'IJC Platform'.
-
In 'Projects' explorer r-click the 'MyAddFieldPlugin' project's node and in the popup menu choose 'Properties'. The 'Project Properties' dialog will appear.
-
In the 'Project Properties' dialog go to 'Libraries' -> 'Module Dependencies' and click 'Add Dependency...' button to specify modules that 'MyAddFieldPlugin' module will use.
-
In the 'Add Module Dependency' dialog choose the following modules: Commons - Generic IM Commons, Commons - NB dependent, Dialogs API, DIF API, DIF Core Implementation, Instant JChem Core, Library - JChem, Nodes API, UI Utilities API, Utilities API.
-
Click 'OK' and close the 'Properties' dialog.
The list of module dependencies in the 'Project Properties' dialog should look like this.
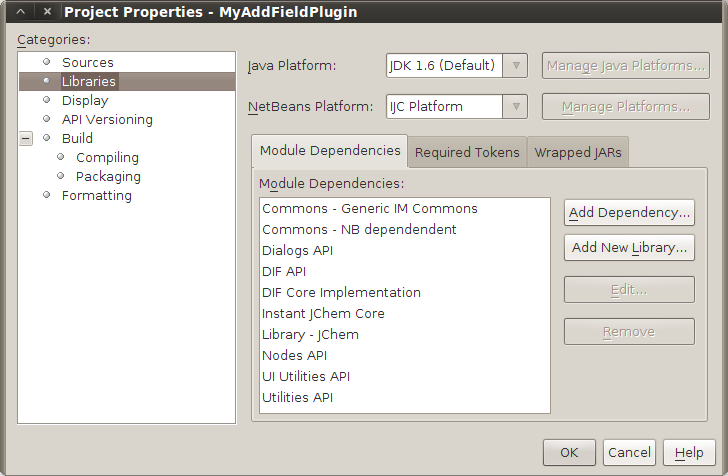
'MyAddFieldPlugin' module dependencies
The dependencies we have just added as well as reasons for adding them (i.e. the classes these modules provide in their API) are summarized in the following table.
|
Module |
Description |
Classes that we need |
|
Provides miscellaneous general classes, especially relating to the handling of user notifications and the displaying of dialogs and wizards. |
|
|
|
DIF API |
Provides the data model and persistence tiers for applications that need to use chemical and biological data. |
|
|
Provides the basic user interface for Instant JChem and through its API it provides the ability to extend the IJC user interface. |
|
|
|
Provides access to ChemAxon's Java toolkits that let you perform sophisticated chemistry and database operations in Java code. |
|
|
|
Provides support for NetBeans Platform design patterns, called 'cookies', which are used to add behavior to existing data objects and nodes. |
|
|
|
Provides a set of utility classes covering general infrastructure points in the NetBeans Platform. |
|
Creating the Context-Aware Toolbar Button and Menu Item
In this section, we use the New Action wizard to create a menu item and toolbar button that will be context-aware, which means that they will only be enabled when needed. In this tutorial's scenario, the menu item and toolbar button will only be enabled when a table, also known as an 'entity', is selected in IJC. Once we have completed the wizard, we will have a skeleton "action", which the user will be able to invoke either from the menu item or from the toolbar button, if enabled. Later on we will fill out this action with additional functionality needed for this module.
-
Right-click the module project node in the Projects window and choose New > Action.
-
In the first panel, specify that you want to create a conditionally enabled action that will be sensitive to entity cookies, which represent tables in IJC, as shown here:
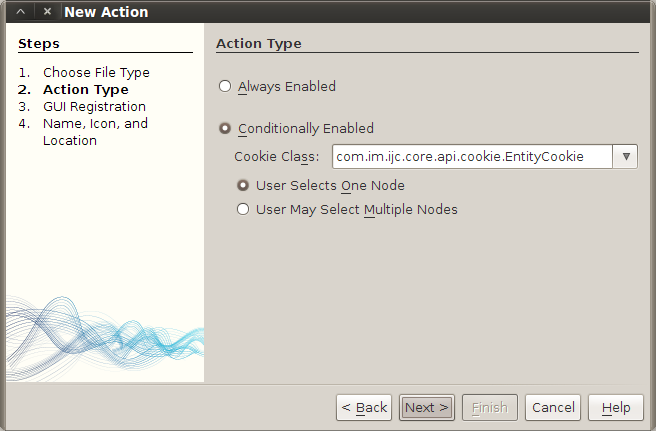
New Action wizard - choose 'Conditionally Enabled' action type
Click Next.
-
In the next panel, specify that the action will appear in the Edit menu and in the Edit toolbar, as shown below:
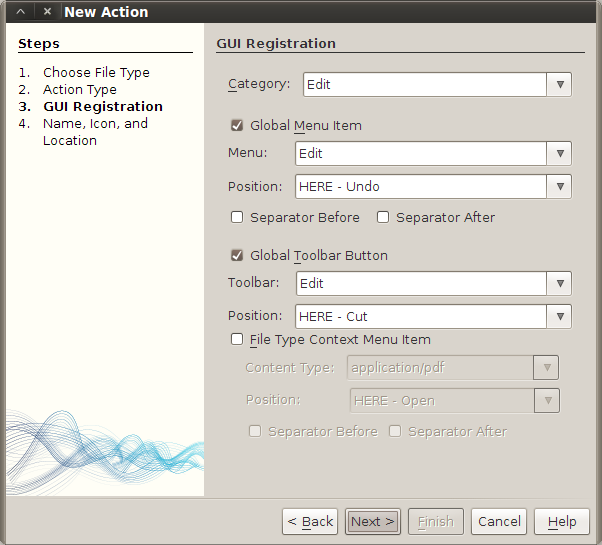
New Action Wizard - choose where the action will appear in UI
Click Next.
-
In the final panel, type 'AddAtomCountFieldAction' in 'Class Name'. Type 'Add Atom Count Field' in 'Display Name'.
-
In 'Icon', browse to a 16x16 pixel icon, which will be displayed in the toolbar button. If there is a 24x24 pixel icon with the same name scheme, the IDE will recognize it. For example, if the first icon is named 'icon-16.png', the IDE will assume the second icon is named 'icon-24.png'. Ideally, you will have a small icon (16x16 pixels) and a large icon (24x24 pixels) available. If not, here are two icons that you can use for this purpose:
-
16x16 icon -

-
24x24 icon -

-
-
Finally, specify the package in which the new action class will be created by the wizard.
You should now see the following:
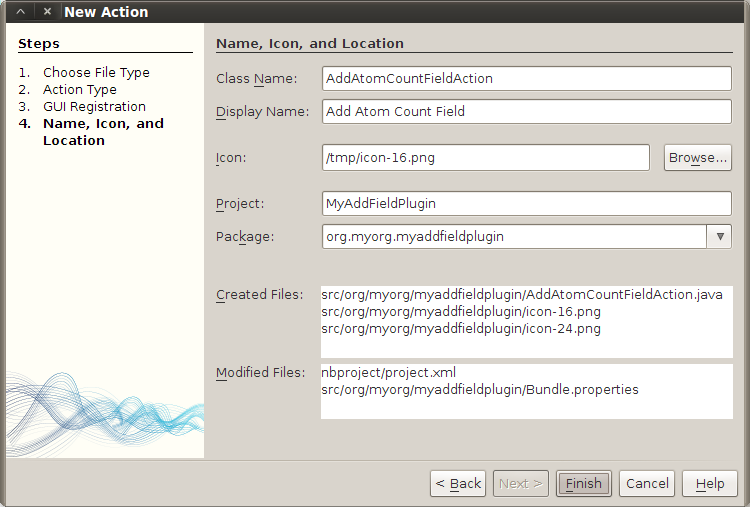
New Action wizard - enter class name, display name and choose package for the new action
-
Click Finish.
The wizard creates a new action class and uses the layer.xml file to register it as a menu item and toolbar button. In addition, the icons are copied into the module. You should see the action class in NetBeans 'Projects' explorer:
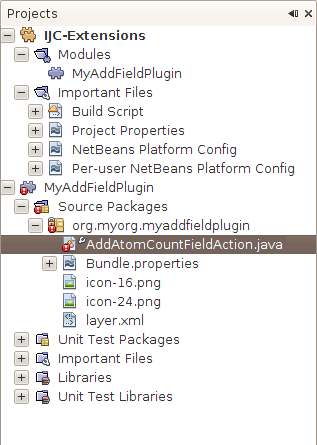
The new 'AddFieldAction' class
As you can see the action class and its parent nodes are marked with the error badge. This indicates that something is broken in the class. Let's open the class and examine it. You will notice that the line referring to EntityCookie is underlined in red, which means that the java compiler does not know EntityCookie class. In this case, we need to add an import statement for the EntityCookie. Right-click in the editor and choose Fix Imports (Ctrl-Shift-I). The IDE adds the import statement and the red underline disappears.
'AddFieldAction' class with no errors
Running the Module
We can now try out the module and see if the action works. The action's menu item and toolbar button should be enabled and disabled depending on what is selected in Instant JChem.
-
Right-click the 'MyAddFieldPlugin' project's node and choose 'Run'. The IDE will deploy the plugin and start Instant JChem. You should see the action's toolbar button and also the 'Add Atom Count Field' menu item in the main menu 'Edit'.
-
Open an IJC project or create a new one if you don't have any (use localdb with demo data).
-
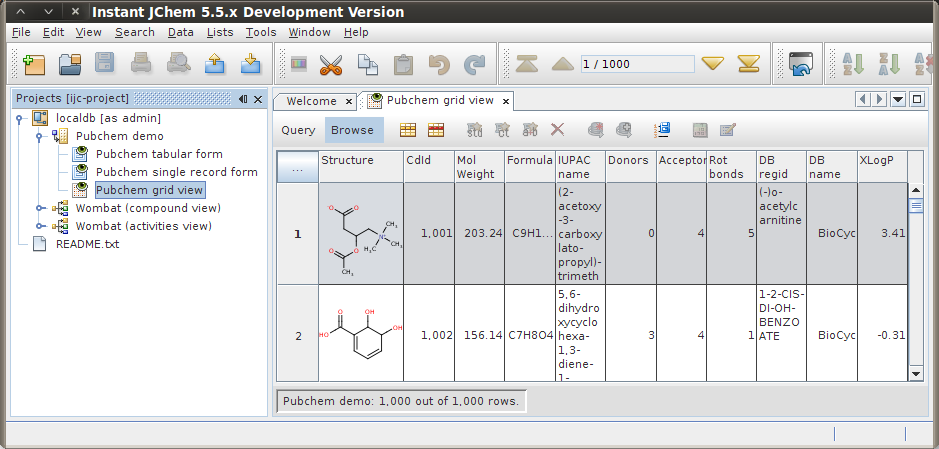
In the IJC project open 'Pubchem demo' -> 'Pubchem grid view' and both the toolbar button and the menu item for our action should become enabled.

Instant JChem with MyAddFieldPlugin - 'Add Atom Count Field' toolbar button enabled
-
If you click back to Instant JChems 'Projects' explorer and select its 'Pubchem demo' -> 'Pubchem grid view' node the button and the menu item will become disabled. This is because the selected node does not provide the EntityCookie while the opened 'Pubchem grid view' editor provides this cookie.
Instant JChem with MyAddFieldPlugin and the AddAtomCountFieldAction's toolbar button
-
Click again to 'Pubchem grid view' editor to enable the button and try pressing it. Nothing will happen, because we haven't added any code to AddAtomCountFieldAction.performAction() method yet.
Examining the Generated Code
Before continuing with the coding of our module, let's examine the artifacts that the New Action wizard generated for us.
Examining the Action Class
The generated action class looks as follows. Note that comments that briefly explain each method are found highlighted inline below.
AddAtomCountFieldAction.java source file
Examining the Layer File
The layer.xml file contains the user interface registration for our action. Notice that there is a top-level element called "filesystem", containing the sub-elements "Actions", "Menu", and "Toolbars". The "Actions" element determines where the action will be registered in the Options window, the "Menu" element determines where the action's menu item will be found, and the "Toolbars" element specifies the toolbar where the action's toolbar button will be located.
layer.xml source file
Coding performAction() method
Currently, when the toolbar button or the menu item are clicked, nothing happens. In this section, we fill out the performAction() method so that a dialog is shown when the action is invoked.
-
Write the following code in the performAction() method:
Code snippet - AddAtomCountFieldAction class, performAction() method
-
Add the following strings to the Bundle.properties file:
Code snippet - Bundle.properties file
-
If you run the module again and invoke the action you will notice the following dialog:
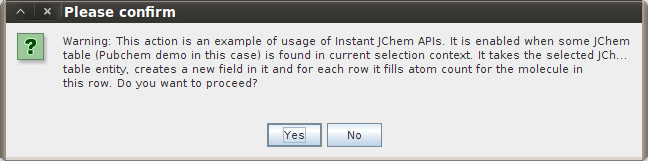
Instant JChem with MyAddFieldPlugin - dialogs shown from 'Add Atom Count Field' action
-
Confirm the above dialog by clicking "Yes" and you will see another dialog with the "Hurray!" message. In the next section, we will replace the "Hurray!" message with some meaningful code for adding a field to a JChem entity.
Creating the Field
In this section we are going to create a field by using asynchronous tasks running in background.
-
Declare our variables, which we will learn about later:
Code snippet - AddAtomCountFieldAction class, static fields declaration
-
Add a utility method for identifying a field in a JChem table:
Code snippet - AddAtomCountFieldAction class, findStructureField() method
-
Next, we will add code for creating a new field, which in IJC's case is a database column in the specified entity, which is a database table. Then we will invoke a method that fills all the rows with data.
Code snippet - AddAtomCountFieldAction class, createNewField() method
-
Now we need to fill data.
Code snippet - AddAtomCountFieldAction class, fillData() method
-
Add the following strings to the Bundle.properties file:
Code snippet - Bundle.properties file, adding string resources
-
Finally, replace the code for showing the "Hurray!" message with the following line:
<MyAddFieldPlugin Project>/src/org/myorg/myaddfieldplugin/AddAtomCountFieldAction.java
createNewField(entity);
Trying Out the Plugin
The plugin is now done! Let's try out if it works.
-
Run the module again, as described in Running the Module.
-
Make sure 'Pubchem grid view' is open in the editor area.
-
Click the new toolbar button or invoke 'Edit' -> 'Add Atom Count Field' menu item. It will add a new field called "Atom Count" to 'Pubchem demo' entity and will fill it with the actual atoms count for each structure.
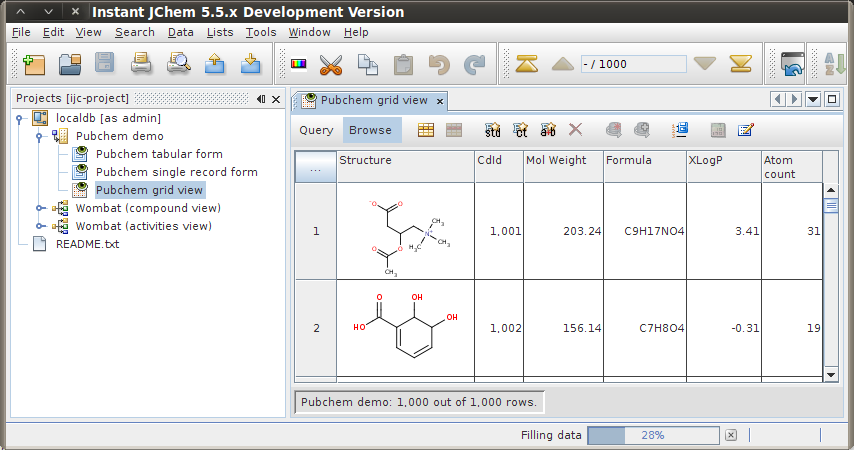
Instant JChem with MyAddFieldPlugin - creating 'Atom Count' field and filling it with dataNote: In the bottom right corner of the screenshot above there is a progress bar there that lets asynchronous tasks running in background give feedback to users. The user interface remains enabled while the field is being added and filled with data.
Conclusion
Congratulations! You have successfully completed an IJC plugin that adds a new field to an existing entity and fills it with the atom count for each structure in the entity. In this tutorial you have learned:
-
How to create a conditionally enabled action and install it in Instant JChem's UI.
-
How to find an existing structure field in an IJC entity.
-
How to add a new field to an existing entity
-
How to read data from and write data to fields in an entity.
-
How to create a background task and use the progress bar to give a user feedback about the task's progress.
For other IJC plugin development related tutorials please see their complete list here.