Installation and System Requirements of Plexus Suite
Hardware and software requirement
Plexus Suite is a web-based application with the following software requirements:
On the server side:
-
Any database compatible with Instant JChem (i.e., Oracle, MySQL, Microsoft SQL, Derby);
-
Web server: Jetty 8 or Tomcat 7.0. Please note that this requirement is optional because the application is bundled with Jetty;
-
Java 8 distributed by Oracle;
-
Minimum memory required: 2 GB.
On the client side:
-
JavaScript enabled web browser. The currently supported browsers are: Google Chrome, Mozilla Firefox, Microsoft Edge, Internet Explorer 10 or higher and Safari 7 or higher.
For administrators:
-
The same version of the Instant JChem desktop application as an administrator tool (managing user accounts and the relational database, creating form and grid views...).
License requirement
A valid license file containing Plexus Connect and Instant JChem Enterprise licenses has to be placed in the ${HOME}/.chemaxon/licenses/ (in Unix systems) or in the %USERPROFILE%\chemaxon\licenses\ (in Windows systems) folder, where ${HOME} (or %USERPROFILE%) means the home directory of the user running the web server.
The Plexus Connect license covers the basic functionality of Plexus Suite (opening forms and table, running queries...). For additional features you might need the Plexus Design license.
Marvin JS, the default chemical editor integrated into Plexus Suite requires a Marvin JS license, which needs to be added to the same folder in a separate license file.
Please consult our sales team ([email protected]) if you would like to require a license for Plexus Suite or if you need help in handling your license file.
Preparing for Installation
Download Plexus Suite
Plexus Suite is available as a single .war file. In order to download the installation package, please navigate to the download page of Plexus Suite on the ChemAxon website. You will be asked to fill in a form with contact details and send it to us. After receiving your request, our sales team will contact you and send you information about where to download the Plexus Suite application.
Configuration
In order to access your databases through Plexus Suite, you will need to configure an Instant JChem schema for each database connection before the server part of the application is started. If Plexus Suite does not have an existing schema, you can create one in the Instant JChem desktop application (IJC) and then configure it for use with Plexus Suite.
Preparing an Instant JChem project
-
Create a new project or open an existing one in IJC. You can choose from an empty project, a project with an existing database or a project with already imported demo data.
-
Set up the desired security configuration for the project. Please note that a project with the Default (anonymous) security policy cannot be used in Plexus Suite.
A detailed description can be found in the relevant part of the Instant JChem user documentation. -
Create the necessary user accounts and assign the appropriate user roles to them. The details for managing user accounts can be found in the Instant JChem User Guide.
-
Add your chemical data to the project and design any database views (tables and forms) you will need for browsing the data in Plexus. Make sure that these database views are accessible for every user with the appropriate user role. A more detailed description about sharing database items is available here.
-
Connect to the schema as administrator and in the Schema Settings dialog select the Remember username and Remember password options.
-
Disconnect the schema.
-
Close the IJC project.
Configuring a database connection
A database connection is described in a schema configuration (.ijs) file. In order to connect to a database from Plexus Suite, each .ijs file has to be put
-
either in its default location, in the ${HOME}/.chemaxon/plexus-suite folder in UNIX systems (or in the %USERPROFILE%\chemaxon\plexus-suite\ folder in a Windows system);
-
or in a location specified in the ijc.schemas.dir property of the webapp/WEB-INF/classes/nps.properties file packed in the downloaded .war file.
Please note that before version 15.11.16, the default configuration directory was ${HOME}/.instantjchem/ijcWebServer/ (or %USERPROFILE%\.instantjchem\ijcWebServer\ on Windows). From 15.11.16, the default directory has become ${HOME}/.chemaxon/plexus-suite/. While Plexus Suite can still work with the old configuration, it is recommended that you migrate your configuration files to this new location.
If neither the old nor the new configuration folder exists, Plexus will create it at its current default location.
Please note that the .ijs file for an already existing Instant JChem project can be found in the .config folder of the Instant JChem project directory.
Even if using a Derby database, the .ijs file must contain the URL to the database. This information can be found in the Instant JChem desktop application: in the Projects window right-click on the schema's node and select Schema settings.
For a detailed description, please, check the Instant JChem user documentation.
The schema configuration file has to contain the ijc.username and ijc.password properties (as well as the database.username and database.password properties if necessary). In addition, the ijc username and password has to belong to a user account which has administrator role assigned to it in Instant JChem.
Please be aware that the admin user specified in the .ijs configuration file has to be kept solely for the internal operations of the Plexus Connect server and it cannot be used as a "standard user".
Logging in with this user account either into Plexus or into Instant JChem has to be avoided since it can cause problems in the behavior of the backend part of Connect.
As there are differences between use cases of Plexus Suite, it is useful to apply some connection pool settings in schema configuration. These settings have to be saved for each schema in its respective .ijs file and the same
properties as for Instant JChem
are available. Please note that the default settings for maximum active connection is set to 6, which might become a performance limitation for organisations with high number of concurrent users who have to share the defined number of connections.
Every deployed schema should have the same security setting because the user login details are used for every schema in the Plexus directory. Since 15.12.7.0 version the server attempts to authenticate the user against the first schema and in case it fails, no other attempts are made. This behavior can be changed in the nps.properties file using the multiple.schemas.auth property. Setting this property to true leads to the user login details being used for authentication in all schemas available. The nps.properties file can be found in the WEB-INF/classes/ directory in the downloaded .war file.
You should use different user accounts for connecting to your database with the Plexus web application and with the Instant JChem desktop application. Starting the Plexus server with user "A" defined in the .ijs file and later connecting to the database with the same user from Instant JChem results in the server producing runtime errors.
Maximizing the number of simultaneous queries
Another property can be added to the schema configuration (.ijs) file to set the maximum number of queries which can run simultaneously on the server side. The default value is five simultaneous queries. You change this value by adding the following line to your .ijs file (replace the text in italics with the actual number of parallel queries enabled):
<entry key = "server.max.queries">maximum number of simultaneously running queries</entry>
When the number of parallel queries exceeds this value, the subsequent queries will be waiting in a queue on the server side.
Running Plexus Suite
The downloaded executable .war file can be deployed to a servlet container or it can run standalone.
Deploy the web application
The downloaded .war file has to be deployed into a web server with a servlet container. For the exact deployment steps please consult the documentation of your chosen servlet container, for example, Eclipse Jetty or Apache Tomcat. Use HTTPS in order to safely access your database without sending passwords unencrypted.
The recommended properties at the deployment are the following:
-Xmx8048m -XX:+UseConcMarkSweepGC -XX:+CMSClassUnloadingEnabled
The Plexus Suite application is working and tested with https protocol.
If reverse proxy is used with SSL configuration, please make sure these headers are forwarded properly:
X-Forwarded-PortX-Forwarded-Proto
The bundled, embedded Jetty is already configured for accepting these.
In the case of Tomcat, RemoteIpValve configuration is required.
Running Plexus Suite standalone
If you want to run Plexus Suite in a standalone mode, you have to use the single executable .war file in the following way:
-
The downloaded executable .war file (plexus-suite-XXX.war) contains the whole application. The basic approach to launch it is:
java -Xmx8048m -XX:+UseConcMarkSweepGC -XX:+CMSClassUnloadingEnabled -jar plexus-suite-XXX.war
-
The command above will create a new "webapp" folder in the system's temporary folder containing the application. To change the location of this directory, the tempDir system property has to be passed to the java command:
java -Xmx8048m -XX:+UseConcMarkSweepGC -XX:+CMSClassUnloadingEnabled -DtempDir=/some/custom/path/connect-webapp-exe -jar plexus-suite-XXX.war
-
By default, the application runs on port 8080. To change this, the port system property might be passed to the java command:
java -Xmx8048m -XX:+UseConcMarkSweepGC -XX:+CMSClassUnloadingEnabled -DtempDir=/some/custom/path/connect-webapp-exe -Dport=9000 -jar plexus-suite-XXX.war
Configuring Server Logging
The sever side of Plexus Suite uses Logback as a logging framework. By default, the server is configured with the logback.groovy file bundled with the application, abd it logs messages into the logs directory located in the same directory from which the server has been started.
To change the logging configuration, the logback.configurationFile switch can be used to provide a customized Logback configuration file. Instead of creating your own configuration file from scratch, the one bundled with the application might be used as well. It can be found in:
-
plexus-suite-<version>.war/WEB-INF/classes/logback.groovy in the case of the executable WAR file, or in
-
WEB-INF/classes/logback.groovy in the case of the deployed application.
For customization, follow these steps:
-
Locate and copy-paste the bundled logback.groovy file, e.g., to $HOME/ps-logback-custom.groovy;
-
Tweak it to your need. For example, in line logger("jdbc.sqltiming", OFF), change OFF to INFO to turn on SQL logging;
-
Start the server using the logback.configurationFile parameter: java -Dlogback.configurationFile=$HOME/ps-logback-custom.groovy -jar plexus-suite-<version>.war;
-
Be sure to specify the logback.configurationFile before -jar...;
-
Be sure to use the absolute path for the Logback file, and not the relative one.
-
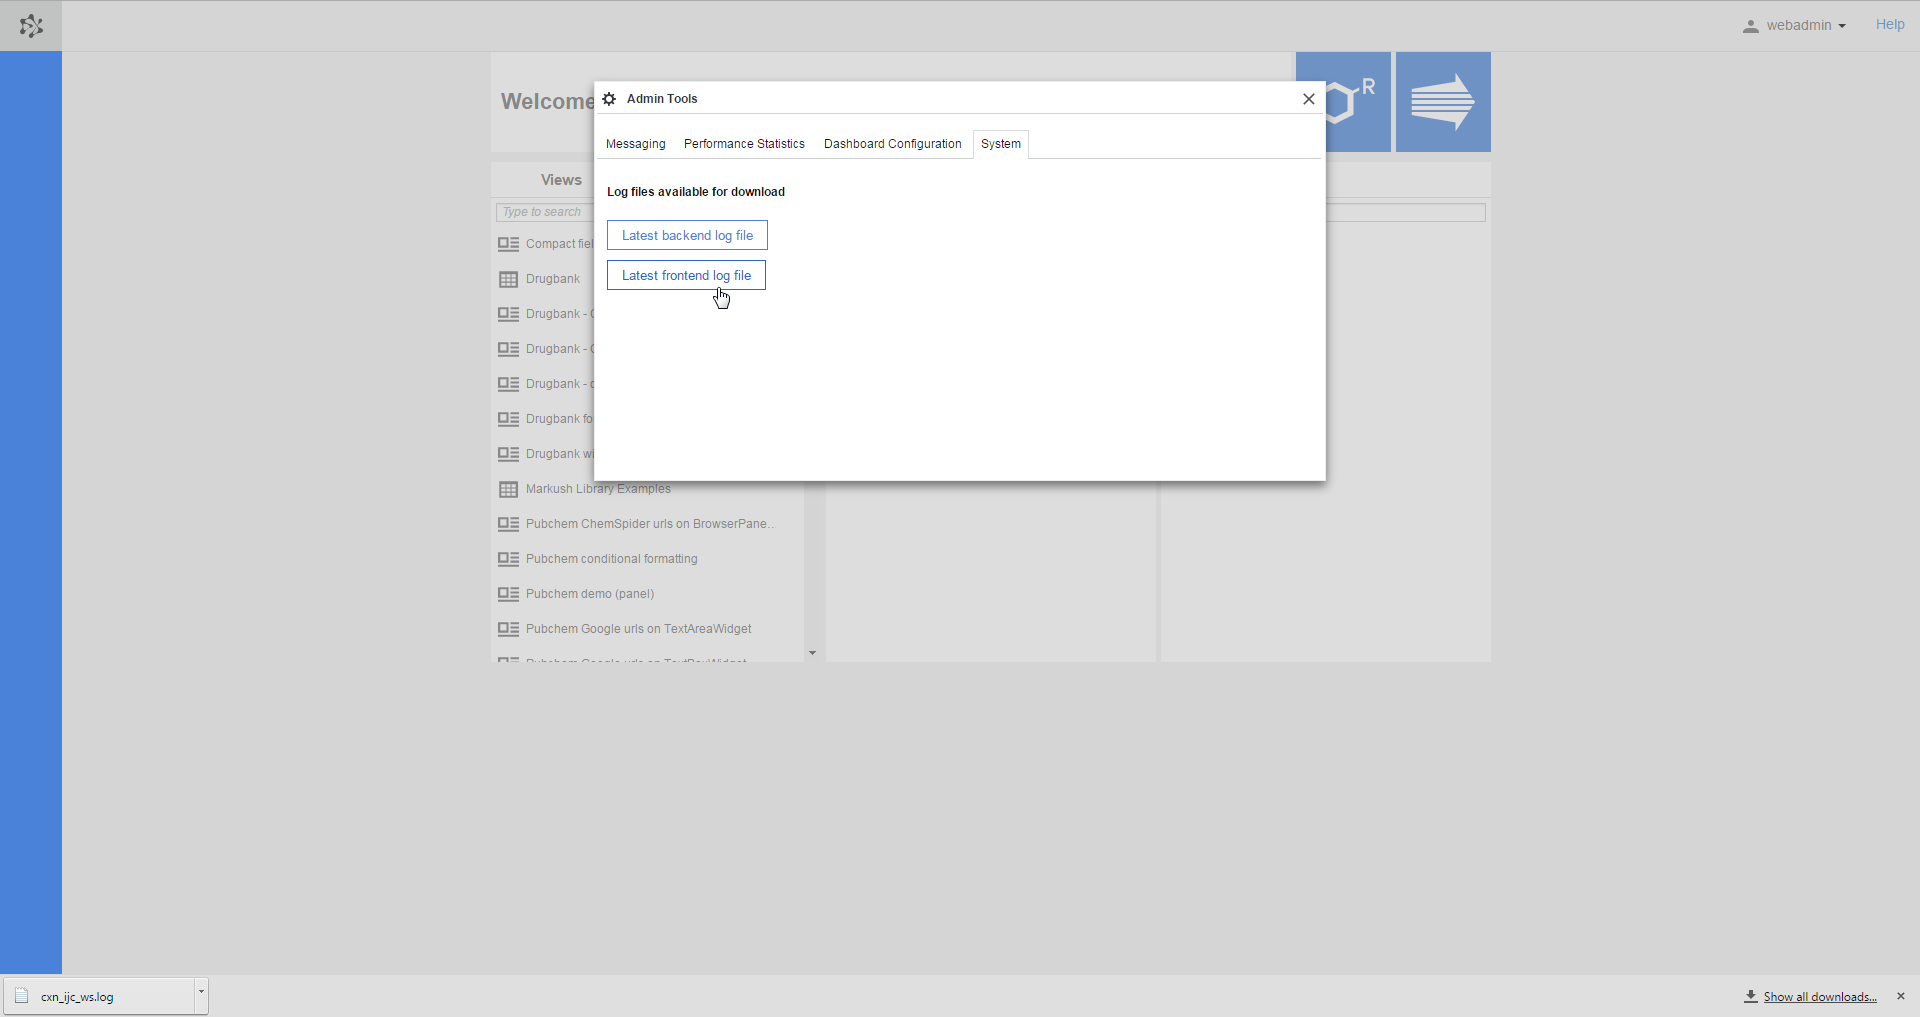
Getting the log files for the Plexus backend and frontend
Admin users can download the log files for the Plexus backend and frontend, respectively from the System tab of Admin Tools dialog (User account > Admin tools > System).
In order to help administrators in finding the log files, the location of log file directory is included in the standard output of the Plexus Suite backend. This means that the information about where to find the log files is printed
-
to the console when the executable WAR file is used;
-
into the catalina.out file in the case of Tomcat (and similarly for other application containers).
Need more help with installation? Check out our tutorial videos about installing and configuring Plexus Suite using either Tomcat or the bundled Jetty.