Step-by-step example - displaying atom properties
Let's suppose we have our own calculation that assigns numbers to every atom as a result, plus some molecular values or other information we would like to display with MarvinSpace.
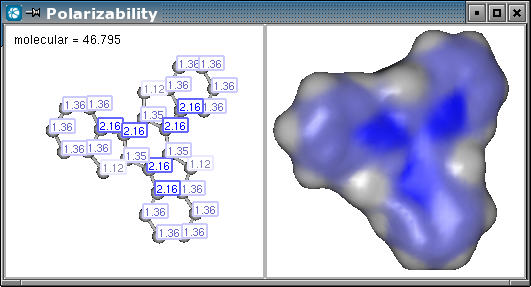
In this step-by-step example our goal will be to reproduce the result that can be seen on the folowing image:
So we would like to:
-
have two cells, the first will contain the molecule with labels showing our result values, and the second will contain the same molecule with a molecular surface that is colored according our calculation,
-
manually set the coloring of the surface,
-
set the colors of the labels and the background,
-
create our own Popup menu with actions.
Creating a JFrame that contains MarvinSpace with two cells
We have a molecule and values for each atom of the molecule.
public JFrame createSpaceFrame(Molecule mol, ArrayList resultValues) throws Exception {
Let MarvinSpace install the necessary native libraries. We will use the MSpaceEasyclass to easily configure MarvinSpace. First, we need 1 row and 2 columns.
chemaxon.marvin.space.MSpaceInstaller.load(false);chemaxon.marvin.space.MSpaceEasy mspace = new chemaxon.marvin.space.MSpaceEasy(1, 2);
Create the frame that contains the MarvinSpace canvas.
JFrame frame = new JFrame();frame.setDefaultCloseOperation(JFrame.DISPOSE_ON_CLOSE);mspace.addCanvas( frame.getContentPane() );mspace.setSize( 800, 600 );
We would like synchronous control of the cells.
mspace.setProperty("SynchronousMode", "true");
We put the molecule to the first cell and create labels from the result values.
chemaxon.marvin.space.MoleculeComponent mc1 = mspace.addMoleculeTo( mol, 0 );mspace.getEventHandler().createAtomLabels(mc1, resultValues);
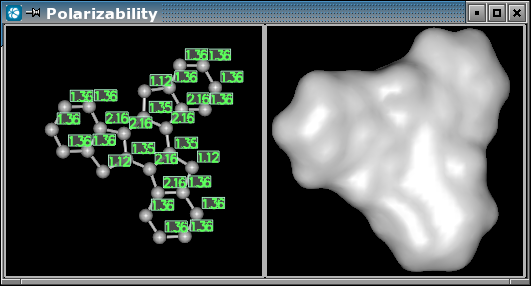
Then put the same molecule to the second cell, and have its Connolly surface calculated.
chemaxon.marvin.space.MoleculeComponent mc2 = mspace.addMoleculeTo(mol, 1);mspace.computeSurface( mc2 );
We are finished with the first step, the result can be seen on the image.
frame.pack();return frame;}
Manually set the coloring of the surface
We should keep the component that represents the molecular surface.
chemaxon.marvin.space.MolecularSurfaceComponent msc = mspace.computeSurface( mc2 );
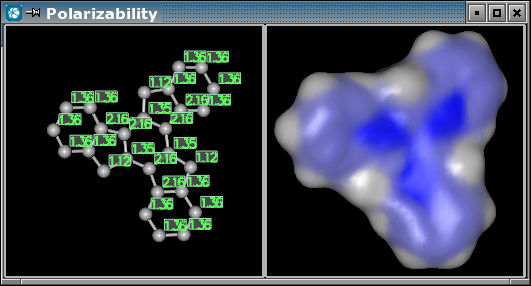
We choose our own colors to color the molecular surface. In this example we would like to color areas that correspond to values near to zero with gray, and areas that correspond to higher values with blue. We also choose a color between gray and blue as a breakpoint in the homogenous color flow, so that we can distinguish higher values from lesser values. Say we have the value range 0 - 2.16. With two colors it is a simple linear coloring. But with adding an extra color that hardly differs from gray results in a range of colors mainly between 1.08 and 2.16.
byte[][] paletteColors = new byte[][] { {89,89,89}, {69,69,89}, {0,0,127} };msc.setPalette( paletteColors );
We can pass the atomic values and have the surface colored by them according to the previously set colors.
msc.setAtomPropertyList( resultValues );msc.setDrawProperty( "Surface.ColorType", "AtomProperty" );
Display settings

Setting the color of the background:
mspace.setProperty( "BackgroundColor", "#ffffff" );
Label property settings that applies to all labels of the scene:
mspace.setProperty( "Label.Draw2D", "true" );mspace.setProperty( "Label.ForegroundColor", "#000000" );mspace.setProperty( "Label.BackgroundColor", "#ffffff" );mspace.setProperty( "Label.Size", "small" );
Although we might want certain labels to have individual settings, just as the upper left label in our example. In this case property settings can be disabled.
label.ignoreDrawProperties( true );label.setBorderColorMode(Label.BORDER_MODE_NONE);label.setBackgroundColor( Color.white );label.setForegroundColor( Color.black );
Coloring the labels
We should keep the labels that were created to each atom.
chemaxon.marvin.space.monitor.Label[] labels = mspace.getEventHandler().createAtomLabels(mc1, resultValues);
The following property setting is unnecessary, because it would take effect just after we set the color to each label, so we put this in comment.
//mspace.setProperty( "Label.ForegroundColor", "#000000" );
We can color each label to the same color that is the color of the atom on the molecular surface. To do so, we get the color palette from the surface, and we can get the color to each atom.
chemaxon.marvin.space.util.Palette palette = msc.getPalette();
for(int i=0; i<labels.length; i++) {
    float[] c = palette.getColor( Double.parseDouble( labels[i].getText() ) );
    labels[i].setBorderColorMode(Label.BORDER_MODE_BRIGHTER_FOREGROUND);
    labels[i].setForegroundColor( new Color(c[0], c[1], c[2]) );
}