Markush structures
A Markush structure is a description of compound classes by generic notations. They are often used for patent claims and for combinatorial libraries.
R-groups, atom lists, position variation and repeating units with repetition ranges are commonly used features in the representation of Markush structures.
R-groups
An R-group can describe a set of derivatives in one single structure (substitution variation).
Create an R-group
-
Draw the root structure and place some R atoms from the Periodic Table dialog window or from the popup menu or by typing a corresponding label such as "R1" on the keyboard.
-
Draw the variable R-group ligands and select those substituting the R1 atom. If you type "R1" now, the selected groups will be marked with "R1".
To add attachment points for the R-definitions, you can use menu Atom > R-group Attachment from the menu (or R-group Attachment from the popup menu), or alternatively, when you draw the R-definitions and the mouse cursor still shows "R1", clicking on an atom of the definition will toggle the attachment point on that atom. (Please note that divalent R-groups must have two attachment points defined.).
To change the order of the attachment point select an the attachment point and set the new number using the R-group Attachment Order option from the contextual menu (or Atom > R-group Attachment Order menu item).
Add R-logic
You can define additional conditions, such as occurrence, rest H, and if-then expressions to R-groups in the R-logic dialog window.
To do this, select menu option Structure > R-logic. After setting the conditions in the R-logic dialog window, press the OK button to apply the changes.

R-logic can be visualized by switching on the View > Advanced > R-logic menu option.
R-groups can be formatted as all other atom labels. For more details click here.
Please note that the R-logic is not applicable for R0.
How to draw R-groups - Step by step example
-
Draw the root structure.


Move the cursor to the atom where you would like to place the R-group. (In this example, we place R-groups in place of the terminal carbon atoms.)
When the atom is highlighted (blue circle around the atom label), type 'R1' (or the other required R-label) on the keyboard.
Alternative solution is selecting the R-label from R-group sub-menu of the popup menu by pressing right mouse button over the atom.
You can replace selected atoms by R-labels using the list either on the Advanced tab of the Periodic Table or in the Atom > R-group menu item.
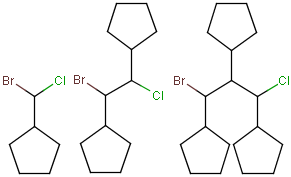
Draw an alternative ligand with an R-group connection:
Move the cursor to an empty place on the canvas (take care that nothing is selected) then type the next R-group label (R2 in this case). The "in hand" object changes to the ID of the R-group (R2). (In this example, we add a ligand to terminal oxygen atom.)
Click the terminal oxygen, then drag the mouse. You will see that the new bond is displayed and its orientation follows the cursor. Release the mouse button when the bond stands in the right direction.

-
Draw new fragments separately from the root structure, which will belong to one of the two R-group definitions.
(In this example, we draw the fragments for the first R-group definition to the right side and the second R-group definition will be placed below the root structure.)
-
Define the R-group definitions.
To do this, select those fragments that the first R-group should contain (on the right side). After selection, type the first R-group ID (R1) on the keyboard. The ID and equal sign (R1=) will be displayed beside the selected set and the "in hand" object will be the R1-label. -
Define attachment points on R-group members
Click with the left mouse button on atoms where you would like to place the attachment points. Repeat this operation on the other two members in the R1-definition. (In this example, at the third molecule, we select the left oxygen atom for attachment.) Alternatively, you can define R-group attachment points via the popup menu by selecting the R-group attachment option on an atom of an R-group definition.

Create the R2-definition by repeating the last two steps on the two remaining fragments.

In case of one attachment point, the connections are not numbered, only marked by a wavy line on the substituent side.
In case of more than one attachment point, the connections are marked by numbers on the root structure (the so called ligand order). Connection points on the substituents are marked with a wavy line, and the order is indicated by numbers (except for the first one).

The ligand order on a bond can be changed using the Bond > Ligand order menu item. Simply select the bond in question and go to this menu option (also available upon mouse-over in the context menu). Selecting another ligand order option in the offered list will transpose the two affected ligand order numbers. The example below demonstrates a case where we want to change ligand order on a bond which connects two R-groups.

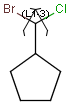
Atom List / NOT List
MarvinSketch allows you to add Atom List and NOT lists query atoms to your molecule.
An Atom List is a user-defined list of elements included in a structure.
A NOT List is a query atom that allows you to define a list of elements that should not be included in the structure.
Atom List and NOT list can be edited using the Atom label editor tool. For more details click here.
How to create an Atom List
-
Overwrite an atom
1.Move your mouse over the appropriate atom of a molecule or make selections on one or multiple atoms.
2.Type chemical symbols separated by commas, the Atom List replaces the selected atoms. -
Creating a list on the canvas
1.Move your mouse over the canvas.
2.Type the atoms you wish to add to the Atom List separated by commas (e.g., au,pt,ag). Backspace can be used to delete errors.
The Atom List is displayed on the upper left corner of the canvas and concurrently at the tip of the pointer (e.g., L[Au,Pt,Ag]).
3 Click on the query atom you want to add this Atom List. -
You can add Atom Lists to your molecule through the Periodic Table. To add an Atom List to the molecule
1.Select the Atom List button.
2.Select the elements you wish to include in the list.
3.Move the mouse into the canvas and click to add a Query atom representing this atom list.
How to create a NOT List
-
Overwrite an atom
1.Move your mouse over the appropriate atom of a molecule or make selections on one or multiple atoms.
2.Type an exclamation mark first, then start typing chemical symbols separated by commas, the Atom List replaces the selected atoms. -
Creating a list on the canvas
1.Move your mouse over the canvas.
2.Type an exclamation mark first, then type the atoms you wish to add to the NOT Atom List separated by commas (e.g., au,pt,ag). Backspace can be used to delete errors.
The Atom List is displayed on the upper left corner of the canvas and concurrently at the tip of the pointer (e.g., ~L![A[Au,Pt,Ag]).
3 Click on the query atom you want to add this NOT Atom List. -
You can add NOT Atom Lists to your molecule through the Periodic Table.
1.Select the NOT List button in the Periodic Table,
2.Select the elements you wish to include in the list.
3.Move the mouse into the canvas and click to add a Query atom representing this atom list.
Position variation
You can create a variable point of attachment (postion variation) to represent a variable connection point to a group of atoms.
The representation is similar to the above mentioned multi-center bonds.
For example:

The alternative attachment points are displayed with grey shadow. If you move the cursor to the center (the bond ending in the ring) the represented atoms are highlighted (blue circle around the atom labels).
How to draw Position Variation:
-
Draw the structure that includes the position variation.
-
Select the alternative connection point atoms.
-
Choose "Structure/Add/Position variation bond" from the main menu or "Add/Position variation bond" from the contextual menu. The alternative attachment points are highlighted by a grey shadow and a bond will be drawn in the center.
-
Edit the bond if required. The atoms are displayed with grey shadow and bond length will be increased.
-
Repeat step 2-4 to draw further position variation bonds.
Homology groups
'Built-in' Homology groups can be found in the 'Special Nodes' section of the Periodic Table's Advanced tab, as a drop-down list, starting with "Alkyl".
More details of some other Query features and Homology groups can be found in the Query Guide.
Add a homology group
The simplest way is to insert homology groups is creating a pseudo atom with the homology group name using the Atom Label Editor tool.
Alternatively, homology groups can be inserted from the Periodic Table's Advanced tab.

-
Open the Periodic Table (toolbar or from the Atom menu), choose the Advanced tab.
-
In the Special nodes section, choose the homology group from the dropdown list.
-
The homology group stays at the mouse pointer, you can click the atom(s) on the canvas. You don't need to close the Periodic Table to continue drawing.
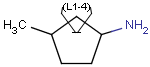
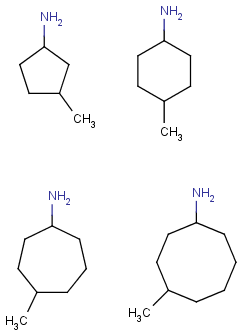
Editing the homology group properties in MarvinSketch
Select the homology group and right-click. Choose Edit Properties... Set the group properties in the dialog box.

Here is an example of the property dialog window for a cycloalkyl group:

By default, the atom and homology group properties are not shown. You can switch it on by checking the View > Advanced > Atom Properties menu.
Frequency variation
Repeating units with repetition range
A sequence of ranges to specify the repetition can also be used in a special group called repeating unit with repetition ranges.
For example:
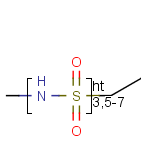
Here the repetition range is "3,5-7". The repetition count for the included structure can be: 3,5,6 or 7.
Syntax of the repetition ranges
The repetition ranges consist of ranges and/or numbers separated by commas. E.g 3, 5-7
To draw a repeating unit with repetition ranges
-
Draw the structure.
-
Click the Group tool on the toolbar, and select the structure to be included in the range.
-
In the "Create Group" dialog window choose the type "Repeating unit with repetition ranges" from the "Type" list.
-
Set the repetition ranges.
-
Click OK.
Link nodes
You can draw link nodes using the contextual popup menu in two ways:
-
Right-click on the atom to open the popup menu.
-
Select the required repetition number from the Link node submenu. Marvin finds out the outer (non-repeating) bonds for you.
-
Select the atom you would like to be the link node and two neighboring bonds for outer (non-repeating) bonds.
-
Right-click anywhere on the canvas to bring up the popup menu.
-
Select the required repetition number from the Link node submenu.
The Link Node submenu can be reach fro the Atom menu as well.
If it is not possible to create a link node for the specified configuration (for example at ring fusions) an error message is thrown.
Outer (non-repeating) bonds will be denoted by brackets crossing them, and the repetition numbers will be put on the atom.
All portion of the molecule connected to the link atom through non-outer bonds are supposed to repeat together with the atom.
See examples below.
|
Molecule with link node |
Meaning |
|
|
|
|
|
|
|
|
|


To edit a link node repetition number or change outer bonds, repeat the drawing steps above.
To make a link atom ordinary atom again, select Off from the Link node submenu or more simply, it can be overwritten.