IJC tutorial: Reaction enumeration, analysis and visualization
Overview
This tutorial will introduce you to the process of reaction enumeration in Instant JChem starting from a set of suitable reactants. It will guide you through the process of setting up a reaction, customizing the enumeration process and the output. It will also give a step by step guidance to the post processing of the results, including property calculations and visualization of the data.
Contents:
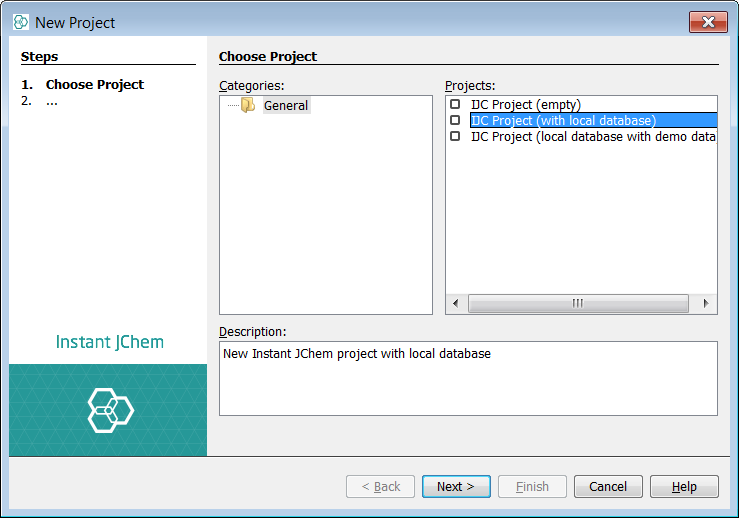
Create new project
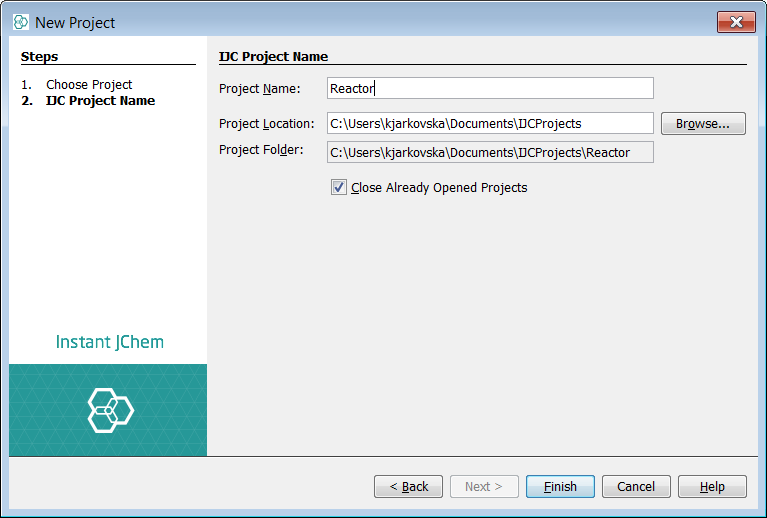
First create a new project container. Use File -> New Project... menu entry or appropriate icon in the toolbar (shortcut - Ctrl+Shift+N). Create a new project and choose IJC Project (with local database).
Setting up a reaction
Let's start with the setup of a single reaction step, assuming that there are suitable reactants loaded in the database. This can be achieved through the File -> Import File menu. The following mrv files can be used as input reactants for the Bischler-Mohlau reaction example used in this tutorial:
Follow the steps below to run the reaction:
-
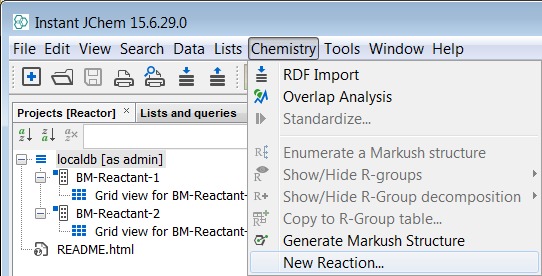
Go to Chemistry -> New Reaction...
-
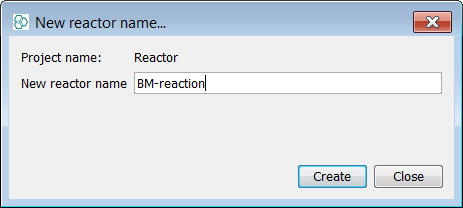
Give your new reaction configuration a name in the dialogue (e.g. "BM-reaction") and click Create.
-
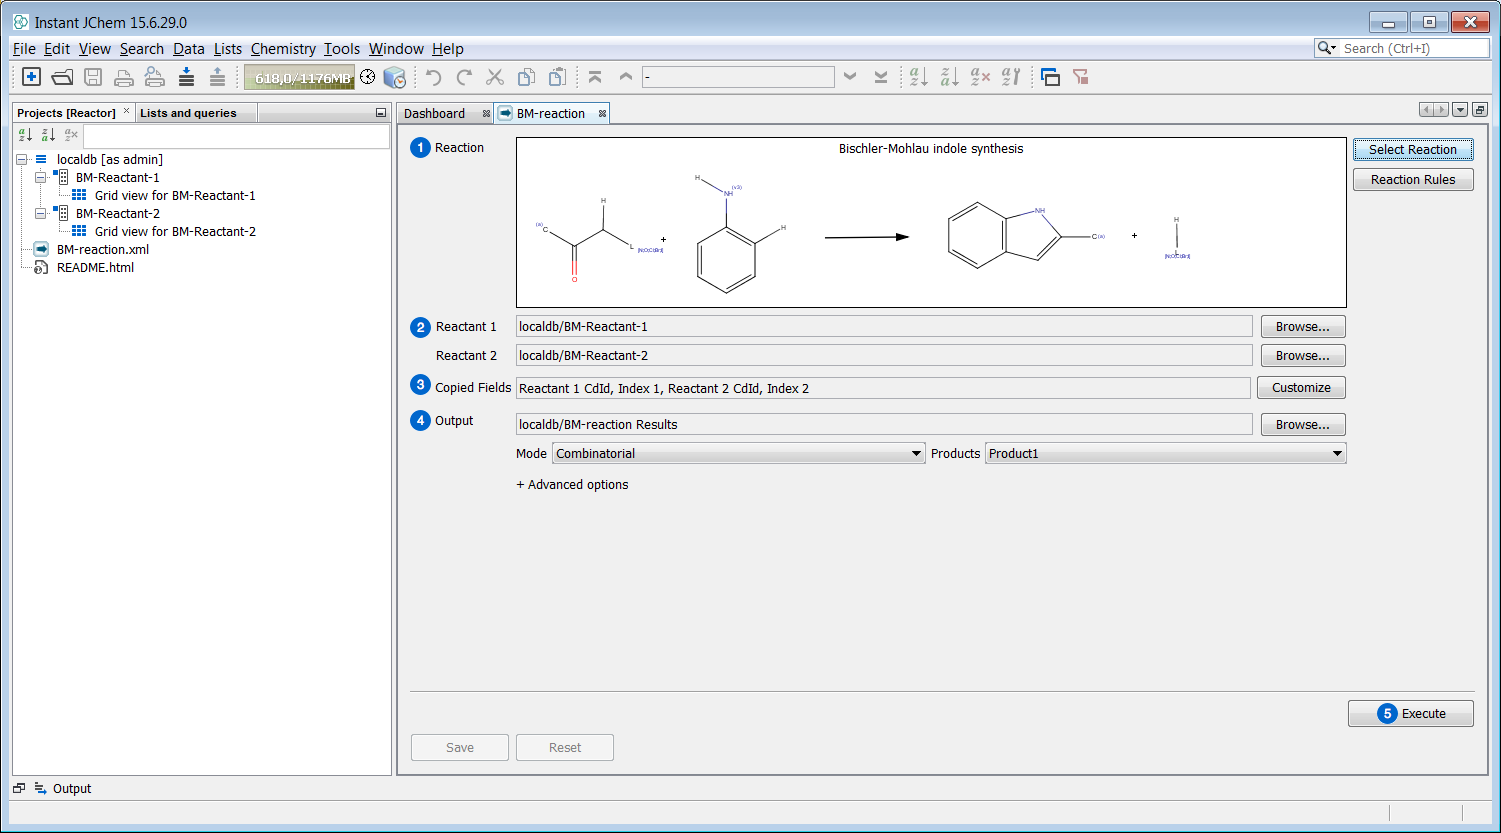
Instant JChem now creates the reaction configuration xml file within the project directory and opens it in a dialog.
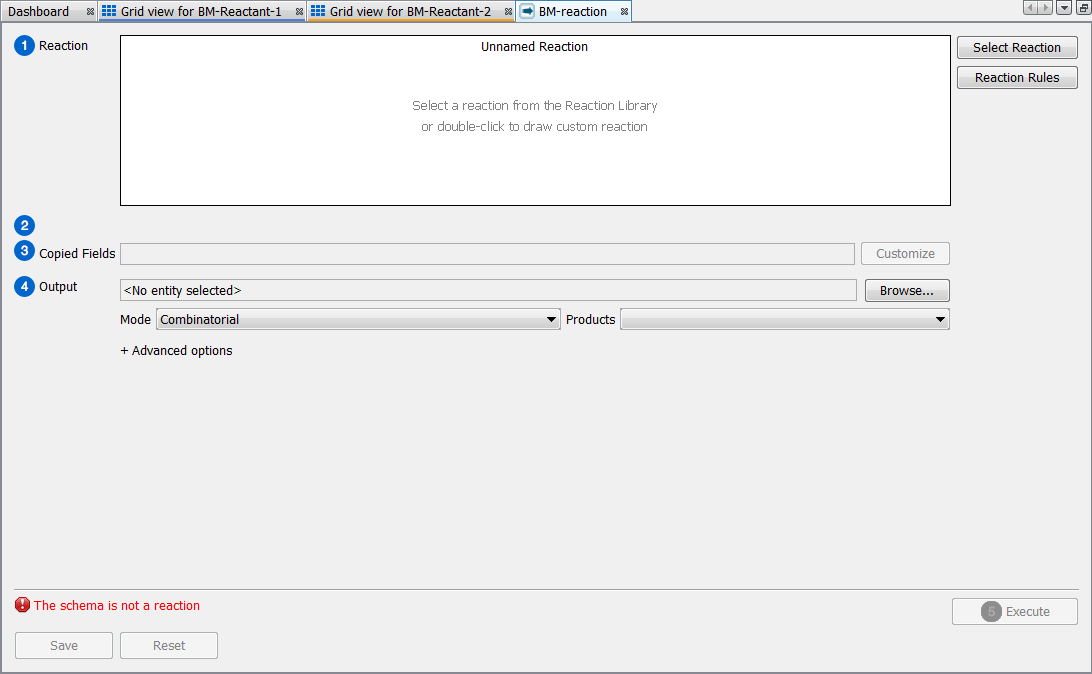
The main Reactor configuration dialogue in Instant JChem
-
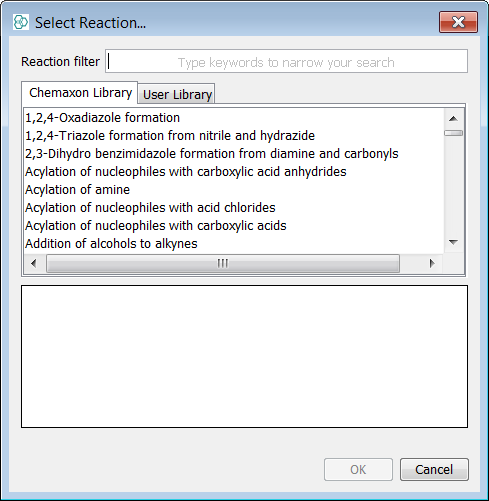
Selecting the Bischler-Mohlau reaction by clicking on the Select Reaction button
-
The Bischler-Mohlau reaction can be found in the old reaction library downloadable from ChemAxon's website
-
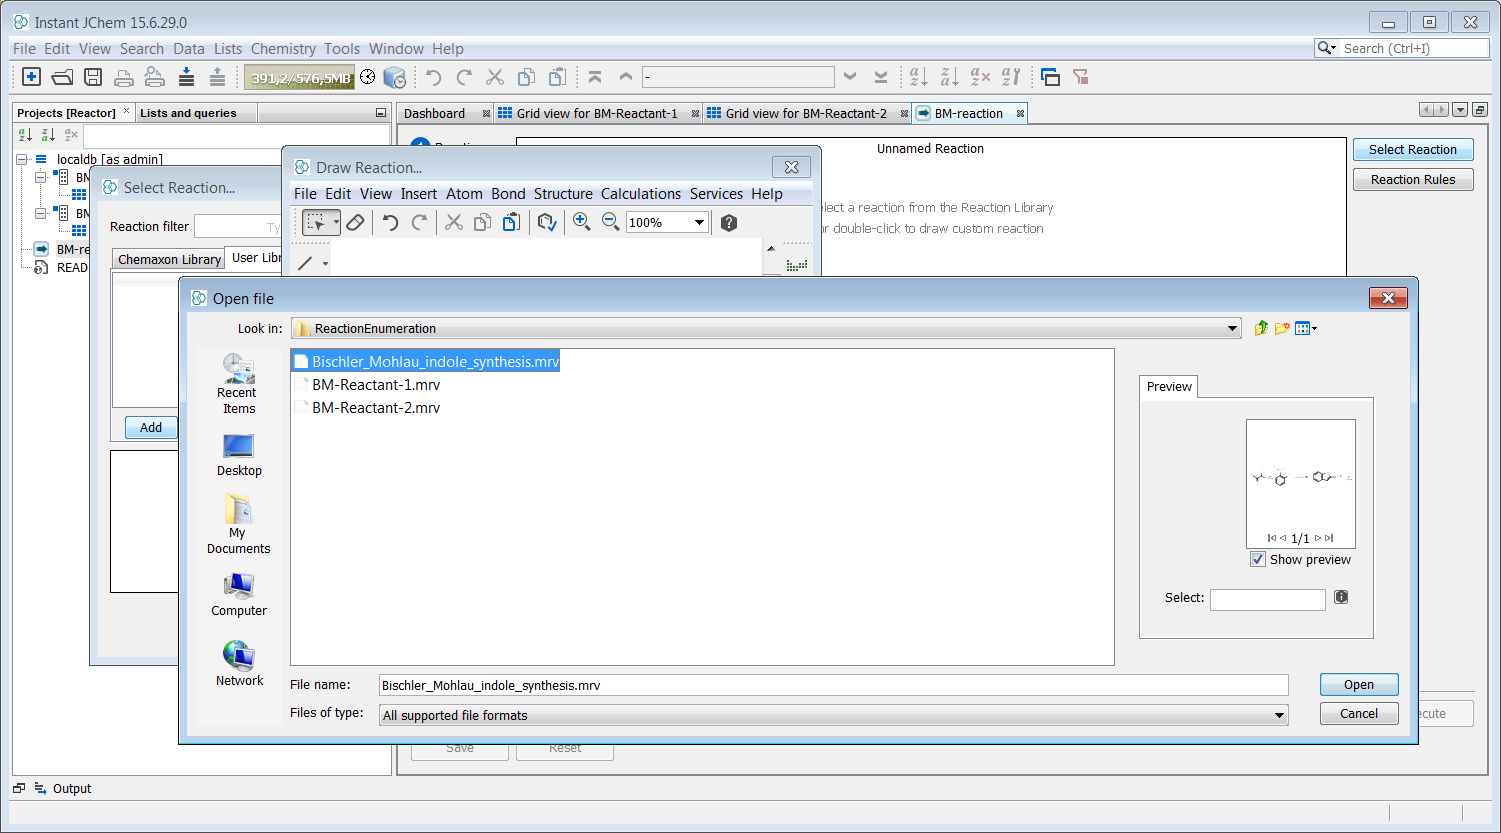
Extract the relevant Marvin file from the archive and import it to the User Library byt selecting User Library tab, open the Draw Reaction window by clicking Add and open the Bischler_Mohlau_indole_synthesis.mrv file
-
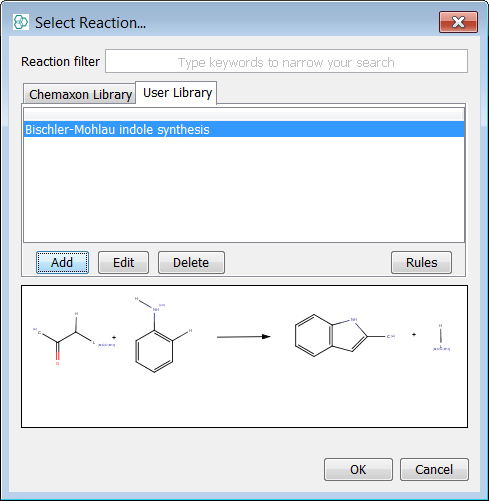
Select the reaction by clicking OK
-
-
Choose the input reactant tables by clicking on Browse for Reactant 1 and Reactant 2, respectively
-
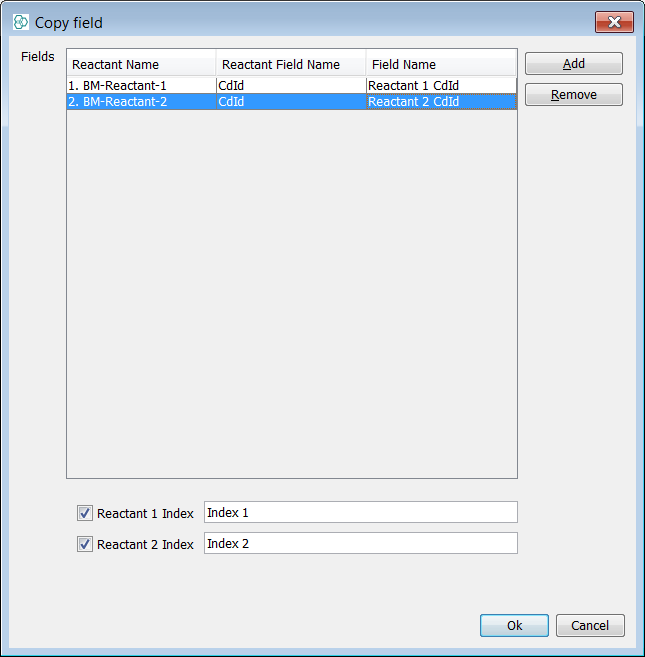
Click the Customize button next to the Copied Fields line and select the desired fields to be copied from the input tables to the output
-
Select the compound ID-s of both reactants to be copied to the output
-
Name the new fields in the output "Reactant 1 CdId" and "Reactant 2 CdId", respectively
-
In the Copy Field dialogue select Reactant 1 Index and Reactant 2 Index to be copied to the output, then click OK
-
-
Create an output table for the products by clicking on Browse... next to the Output setup line. In the dialogue select the schema and then click New. Give the output table a suitable name (e.g. accept the default one) and click OK
-
Choose Combinatorial Mode and Product 1 as output in the Product drop-down menu
-
Save the configuration by clicking on Save
-
Click on Execute to run the enumeration process
-
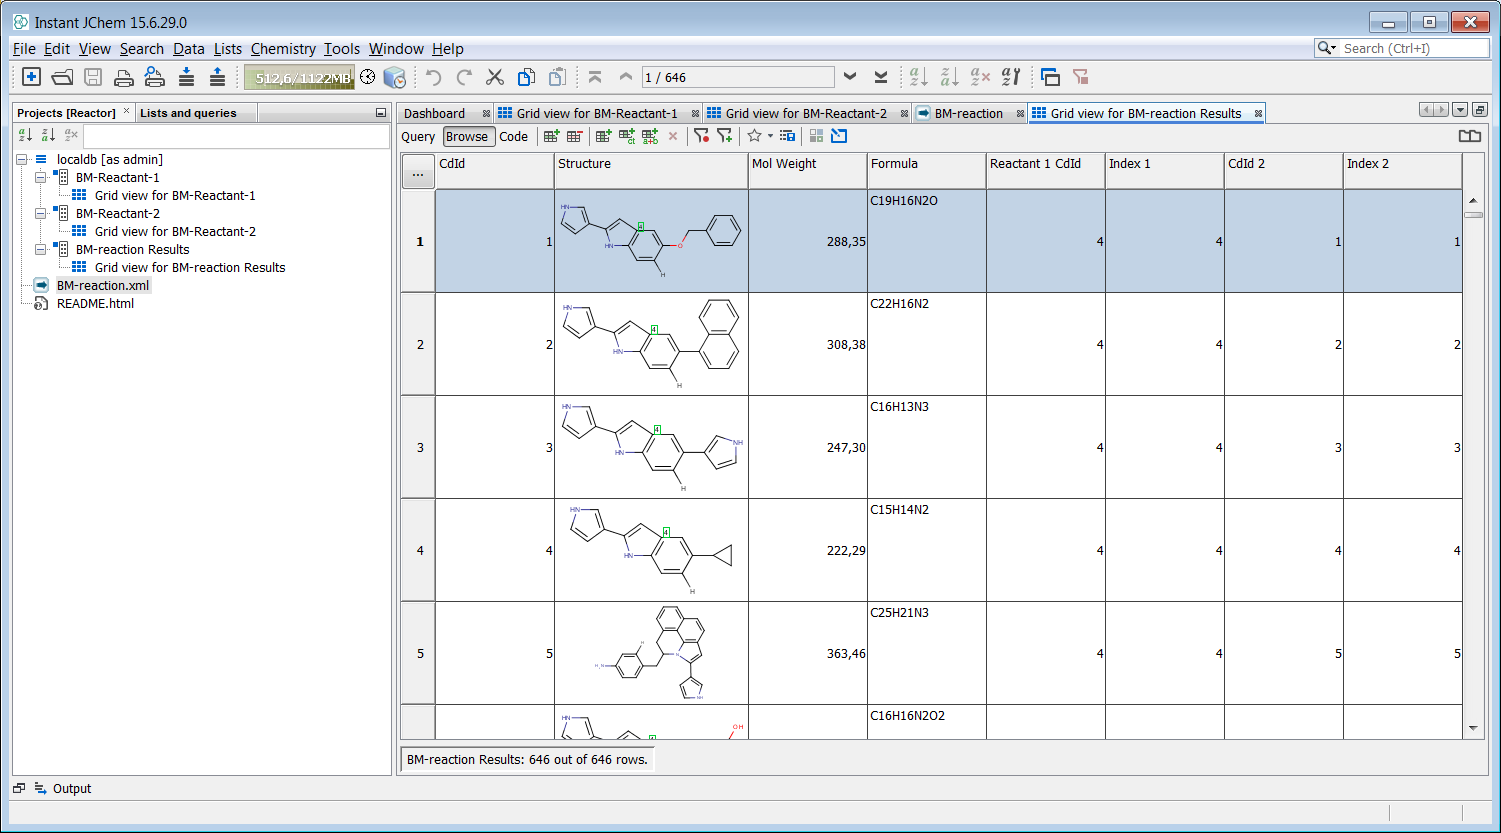
After the enumeration process has finished, the default grid view containing the product molecules and the corresponding fields is shown.
A detailed user guide of the Reactor integration in Instant JChem can be found here.
Displaying reactants and products
In this section you will learn how to visualize the results of the reaction enumeration along with the input reactants. It will be shown, how to set up a relationship between the products table and the reactant tables. The tutorial will also guide you through the steps of creating an appropriate form view to visualize your results.
Setting up a relationship between the reactants and the products
-
Open the Schema Editor: right-click on the schema header and select Edit Schema from the drop-down menu.
-
Create a relationship between the product table and the first reactant table:
-
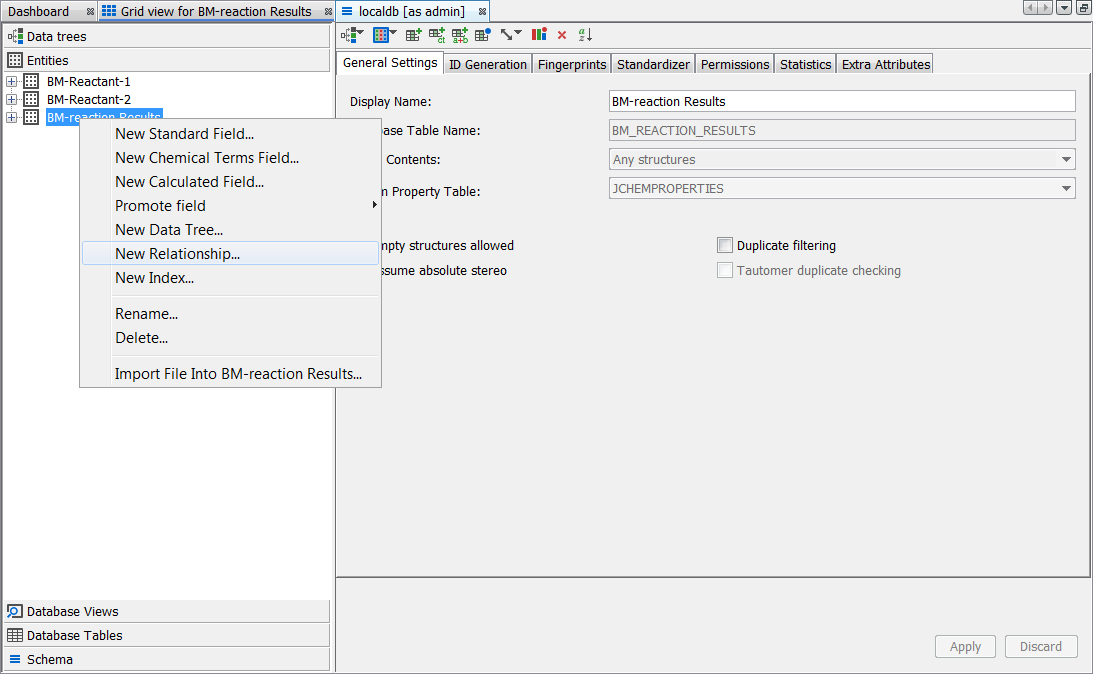
Navigate to "Entities" tab within the Schema Editor
-
Right-click on the products table of the reaction and select New Relationship...
-
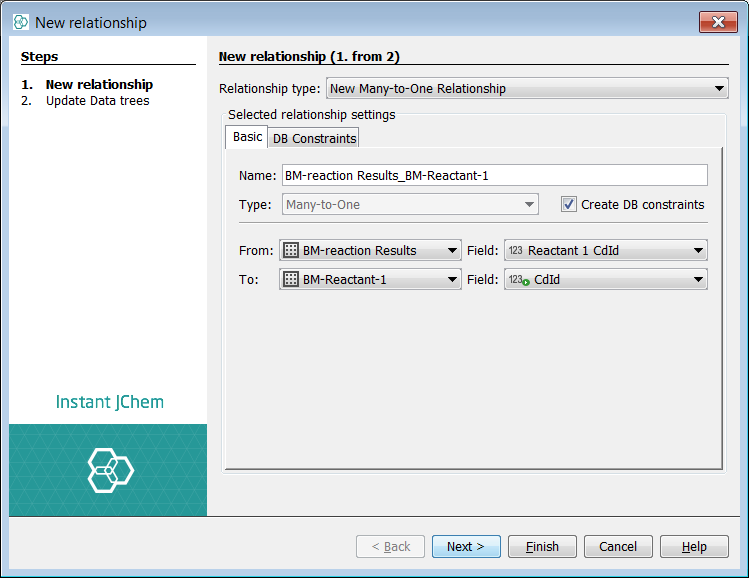
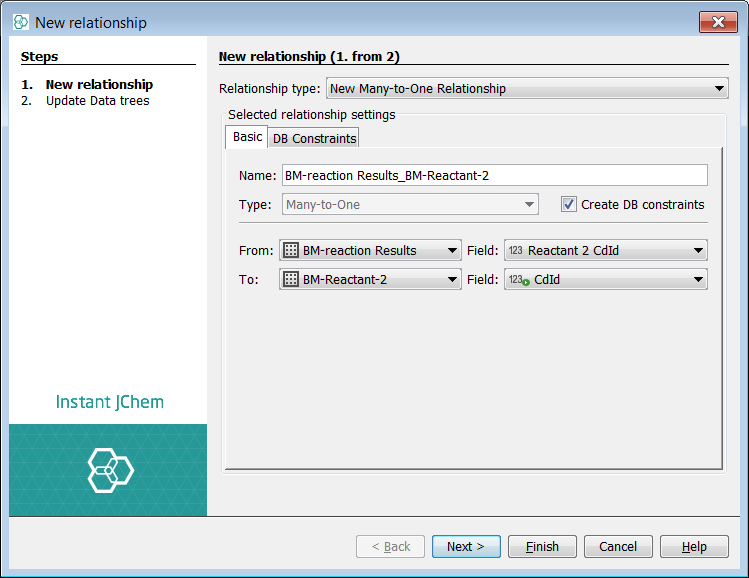
Select "New Many-to-One Relationship" from the relationship type drop-down menu
-
The "From" table must be the output table, containing the results; for this table the Field must be set to "Reactant 1 CdId"
-
The "To" table must be the one containing molecules for reactant 1; for this table the Field must be set to "CdId"
-
Click Finish
-
-
Create another relationship between the product table and the second reactant table following the above steps (using the corresponding values of the second reactant table instead of the first one)
-
-
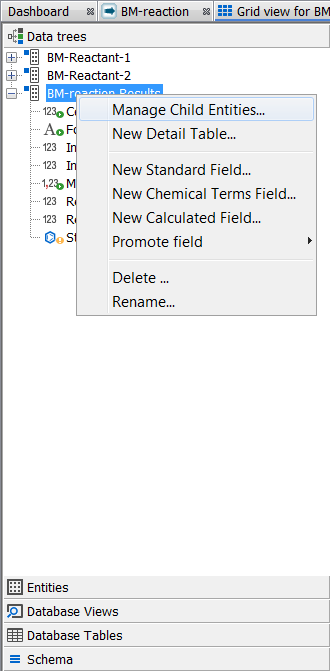
Include the child entities in the data tree:
-
Navigate to "Data trees" tab within the Schema Editor
-
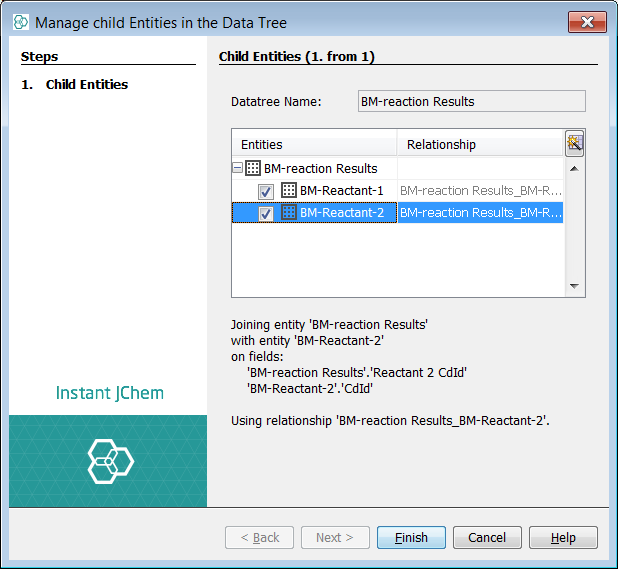
Right-click on the products table and select Manage Child Entities...
-
In the drop-down menu select the Relationship for which you would like to create the new edge. Create edges for both new relations.
-
Ensure the checkboxes next to both child entities are selected and click Finish
You can skip this part if you had included the entities in the data tree during the creation of the relationship, by clicking Next and selecting the entity checkbox in the Update Data Tree dialog.
-
-
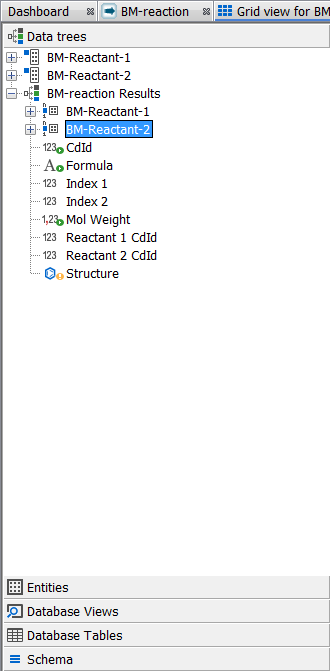
The resulting data tree in the schema editor should look as shown below
Creating a form view
-
In the Project Window right-click on the data tree containing the products and select New View...
-
Set the View type to "Empty Form View" in the dialogue and click Finish
-
Go to Design mode by clicking on the Design button in the upper left corner of the Form View
-
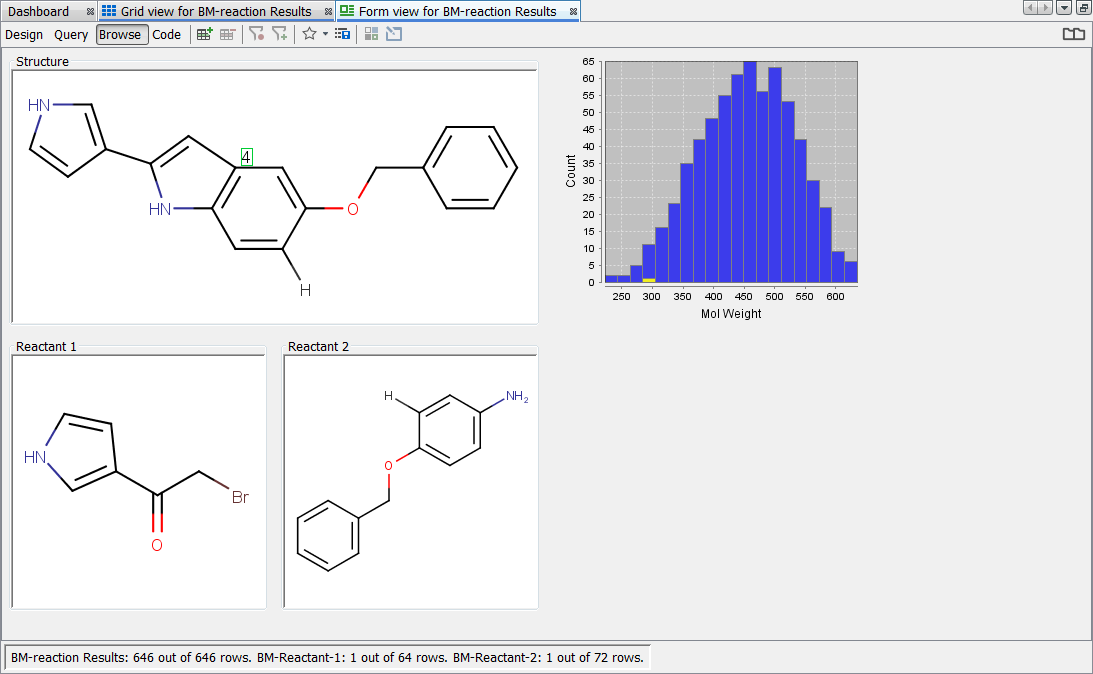
Add three Molecule panes to the form through the corresponding button in the top toolbar, or through the r-click drop-down menu. Resize and reposition them according to your needs
-
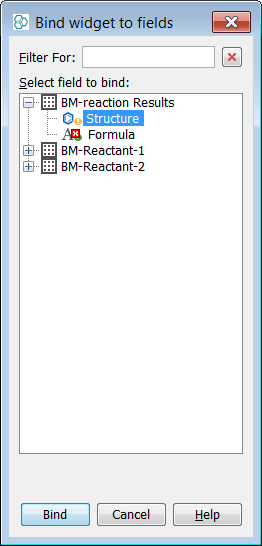
Bind the result structure to the results structure and the two reactant structures to the relevant reactant structures by using the "Bind widget to field" menu item in the right-click menu of the widgets
-
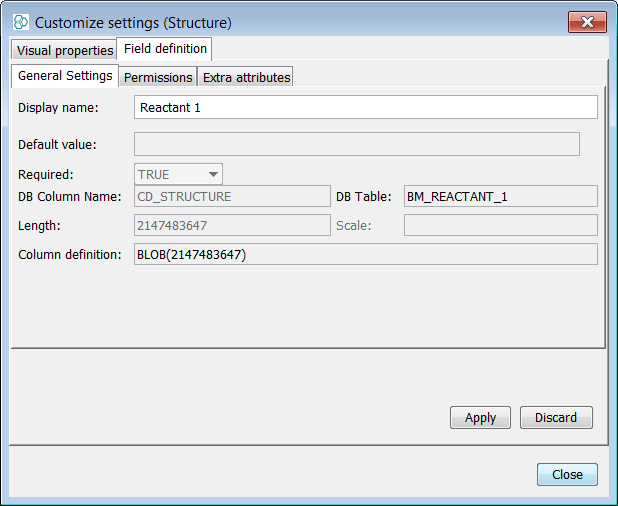
Rename the two reactant molecule panes to "Reactant 1" and "Reactant 2", respectively. It can be done in the Customize Widget Settings right click menu
-
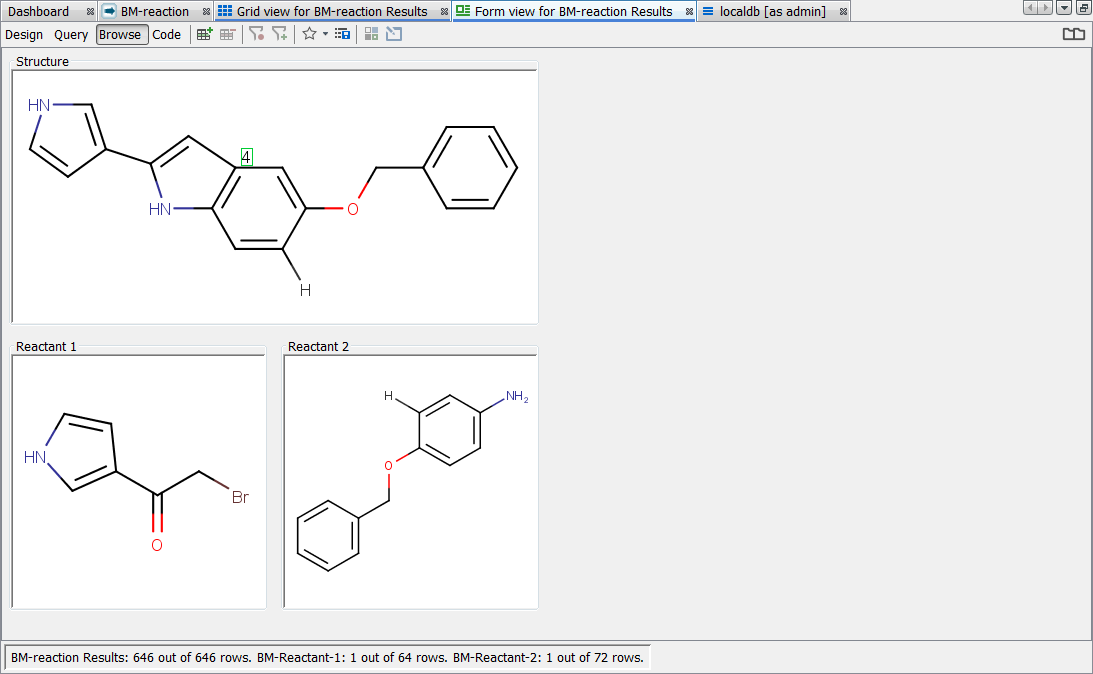
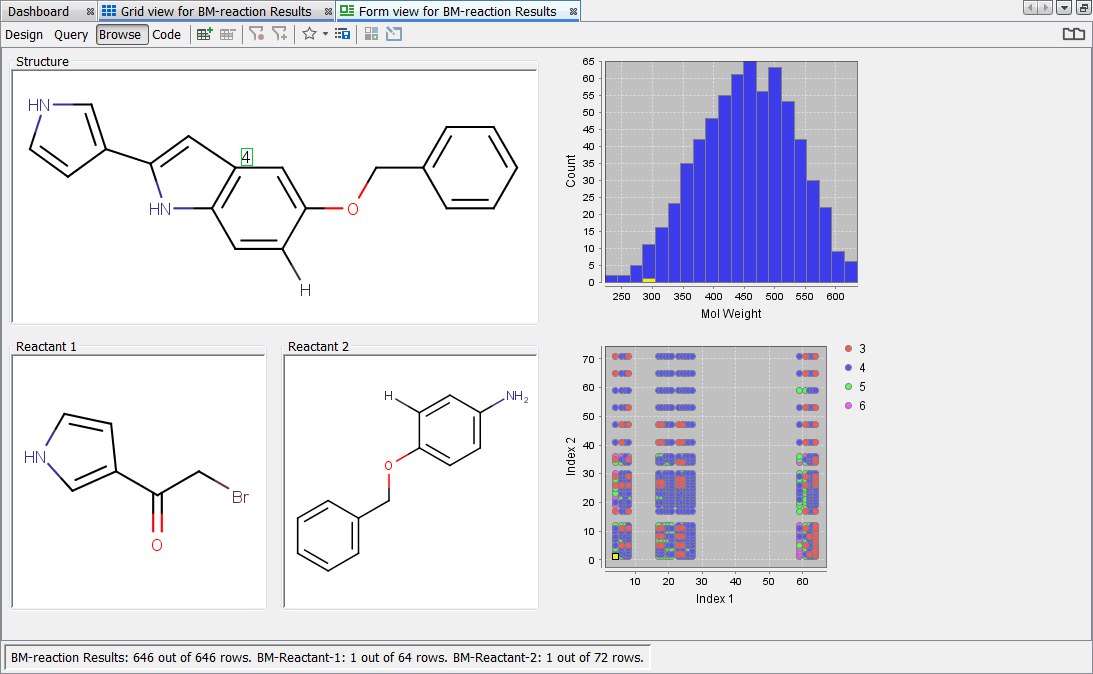
Click on Browse in the top left corner of the view to see the result of the above steps
Characterizing and analyzing the products
This section describes how to calculate certain properties of the products and how to visualize them. The description includes the prediction of single physico-chemical properties.
Calculating properties of the products
In this sub-section the calculation of simple and complex properties will be shown. To add a new calculated property to the table containing the results follow the steps below:
-
Go back to grid view of the products table
-
Click the New Chemical Terms Field... button
 on the top toolbar in Browse mode or add it through the ... button menu
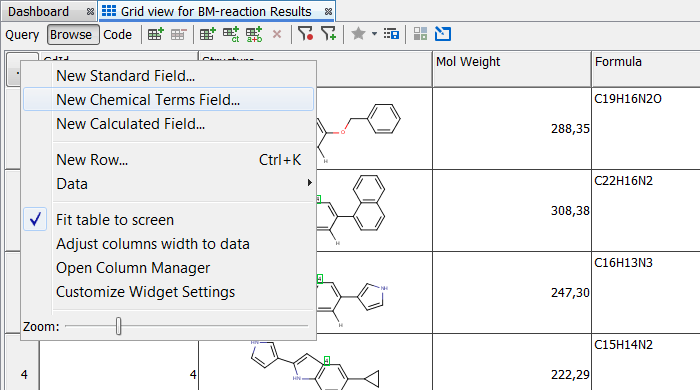
-
Select logD from the favourites and adjust the pH argument of the chemical terms function in the editor. Click Finish
-
Add a new Chemical Terms Field and select Lead likeness from the favourites.
-
Try to edit the complex expression predicting Lead likeness
-
Click Finish
-
Add a new Chemical Terms Field
-
Use the following expression in the editor to give a custom score to the structures:
(mass <=400) +(logP <=4) +(donorCount <=5) +(acceptorCount <=9) +(rotatableBondCount() >=5) +(largestRingSystemSize() <50) -
Set the field Name to Score
-
Set the field Type to Integer
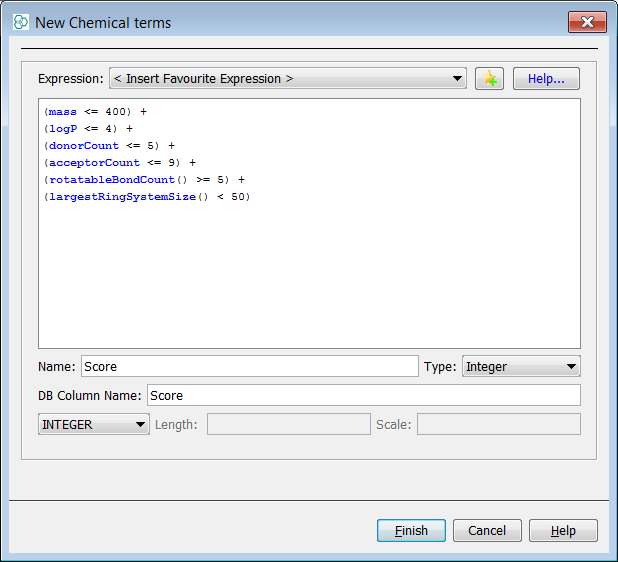
-
Click Finish
Visualizing properties
Using the copied and the calculated property fields this section will show how this data can be viewed in Instant JChem using the Chart Widgets.
-
Open the Form View of the products
-
Go to Design mode
-
Right-click on the form and select Histogram

-
Select MolWeight as the Value to Bin and set the number of bins to 20 in the Histogram Customization dialog
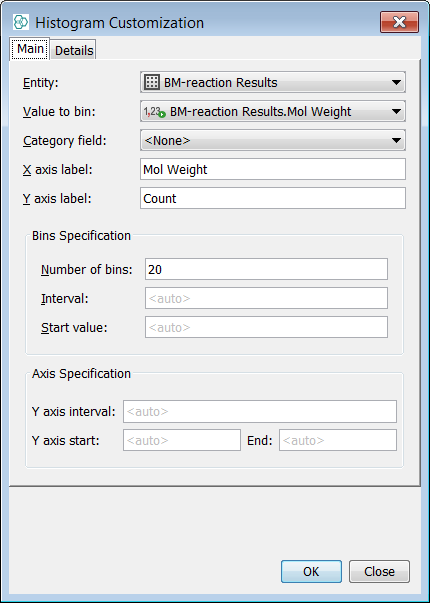
-
Click OK; resize and reposition the chart widget. Switch back to Browse mode to see the result.
To create a synthesis matrix-like plot (i.e. a scatter plot showing which Reactant 1 molecules react with which Reactant 2 molecules) follow the steps below.
-
Go back to Design mode
-
Using the above steps add a new Scatter Plot
-
Use Index 1 as X field, Index 2 as Y field in the Main tab of Scatter plot Customization window

-
Use the Score as Category field in the Data Points tab of Scatter plot Customization window

-
Using Score as the Category field will automatically color the scatter plot according to the values in this field:
Conclusions
Congratulations! You have just created and analyzed a library of synthetically available compounds. In this tutorial you have learned:
-
How to set up and run a virtual reaction in Instant JChem using Reactor.
-
How to create a relational database using existing tables.
-
How to calculate simple and complex properties of the compounds in your library.
-
How to create form views to visualize your results, including structures and charts.