IJC tutorial: Lists and Queries Management
Overview
This tutorial will explain how to manage queries and lists in Instant JChem. Queries might be relatively simple that use one or two conditions from one entity, but also more complicated which can be build using the query builder and the operator AND and OR operators in combination with detail fields. Executing queries and the associated details are discussed in a separate tutorial.
You can start with the built-in example demo project to try these concepts and functionality. Alternatively you can import the NCI data into a JCHEM structure-based entity.
Contents:
Create the demo Project
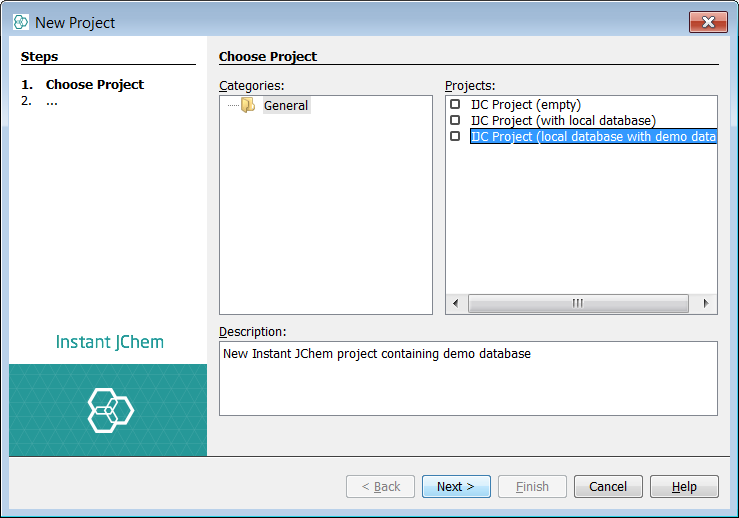
First create a new project container. Use the File -> New Project... menu entry or the appropriate icon in the toolbar (shortcut Ctrl+Shift+N). Create a new project and choose "IJC Project (local database with demo data)". You will notice that even though no explicit policy is applied, you are connected as the implicit user admin.
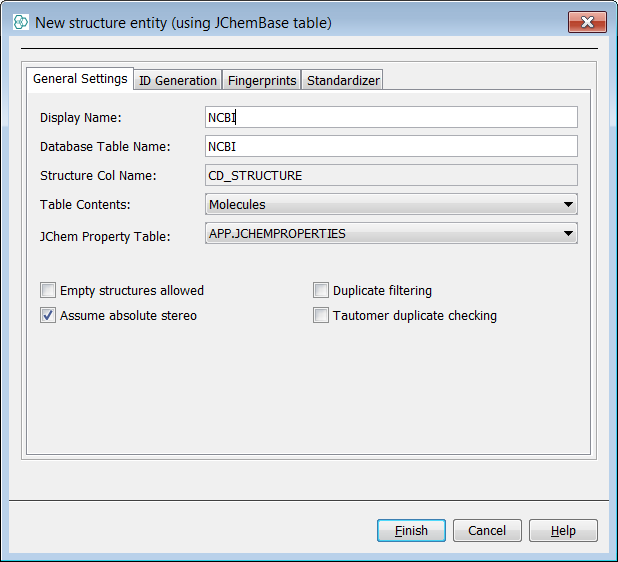
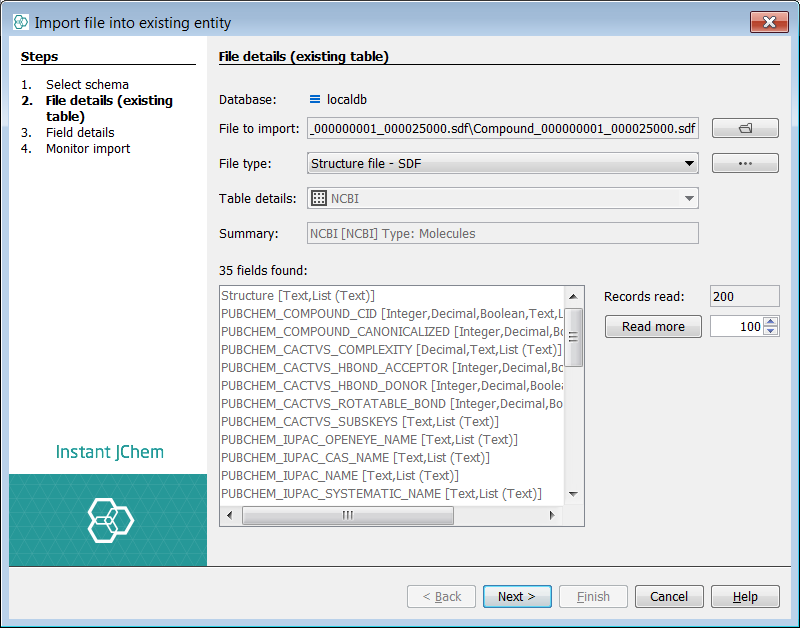
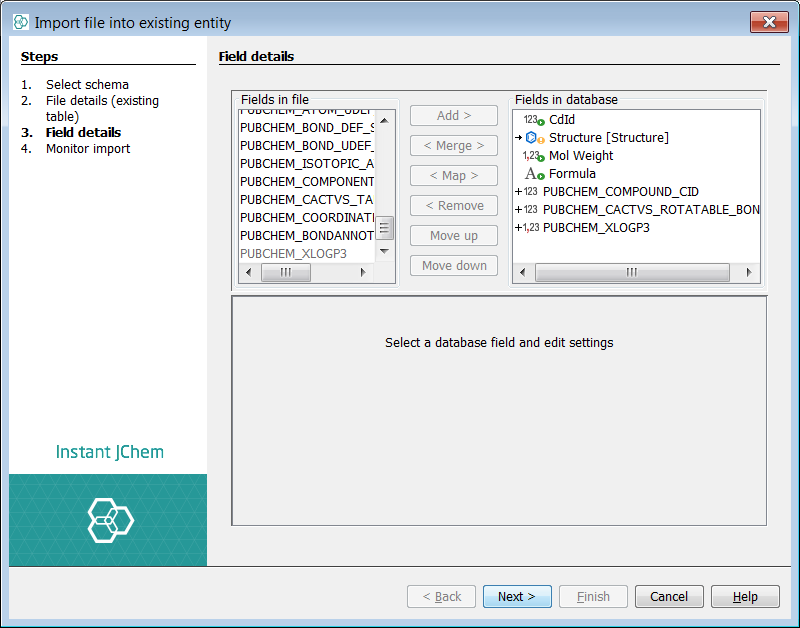
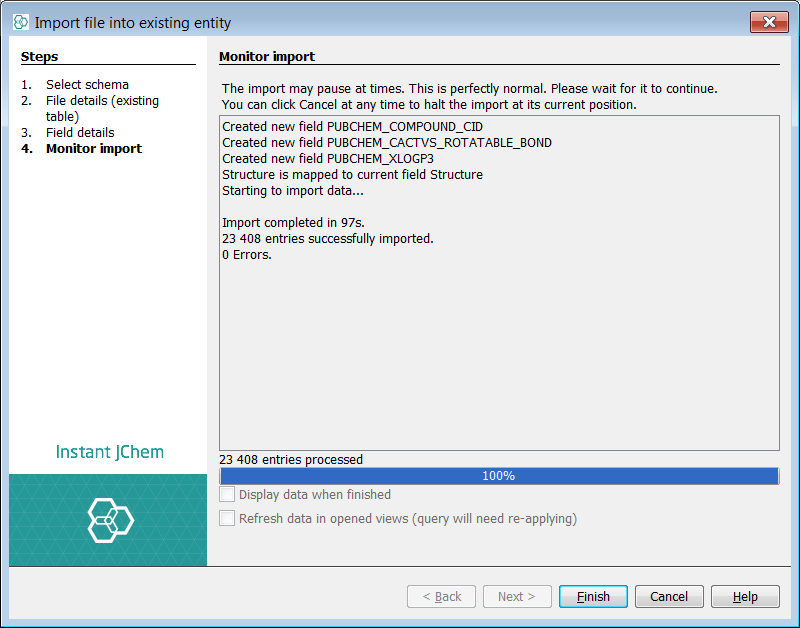
You can create other structure-based entities in this schema for the purposes of practice by right-clicking on the schema node and choosing " New Data Tree and structure entity (table)..." . We have used the first of the NCBI datasets, that can be found here . During the second import step, we have selected only three fields to import except for the structure - PUBCHEM_COMPOUND_ID, PUNCHEM_CACTVS_ROTATABLE_BONDS and PUBCHEM_XLOGP3. We will have a total of 23 408 entries in the NCBI entity.
Temporary Queries and Lists
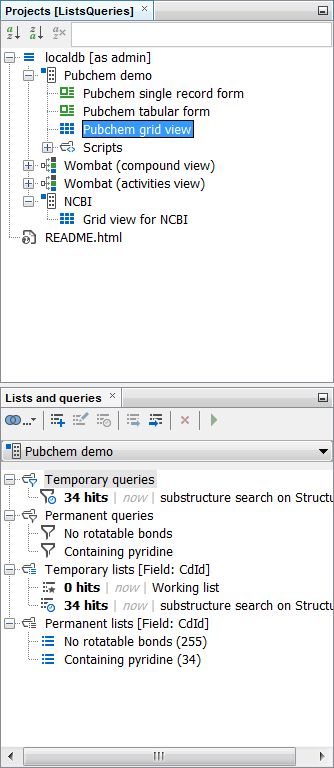
First run a Substructure search for the pyridine query against the Pubchem demo data.

If you switch to the Lists and Queries panel, you can see a new temporary query, accompanied by a new temporary list, has been created. You can rearrange the windows by dragging and dropping using the named tab. You can notice that the number of hits corresponds to the “Containing pyridine” permanent list included in the demo data (and that is good as we searched for pyridine!).
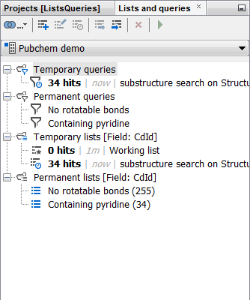
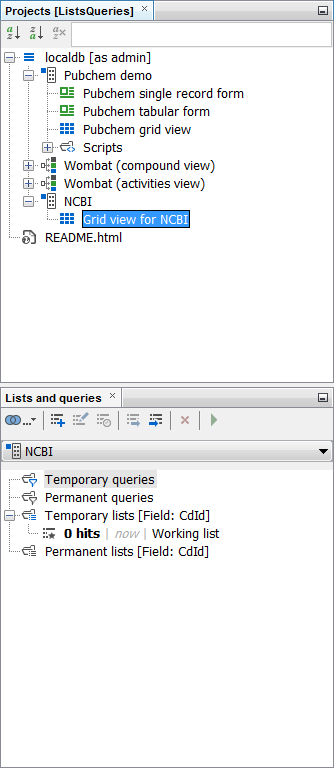
Let’s now close the Pubchem gridview and open the NCBI entity gridview. Now you can see there are neither temporary nor permanent lists or queries in the Lists and queries window, as this window shows only the lists and queries for the selected data tree.
Permanent Queries and Lists and their Management
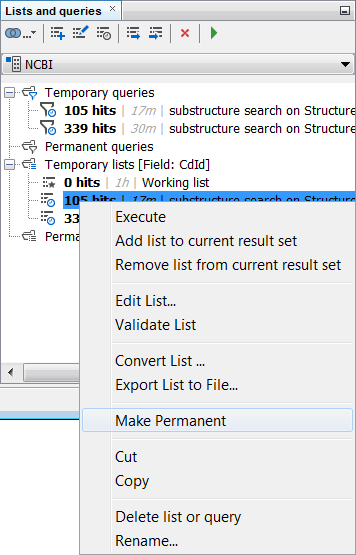
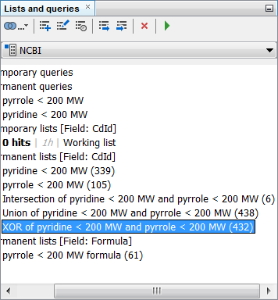
Let’s start with creating some temporary queries for the NCBI data tree. First, we can run a Substructure search for pyridine and add a condition of molecular weight below 200. A new temporary query and temporary list have been created for 339 hits.

Now we can modify the structure to that of pyrrole and run the search again. We can notice a another temporary list and query have been created, now with 105 hits.

You can try to double-click on the pyridine temporary list and see that it appeared in the grid view. By double-clicking the second one you can return back to your last hit list.
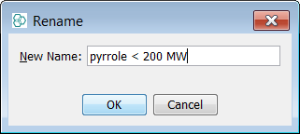
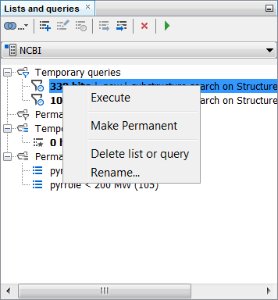
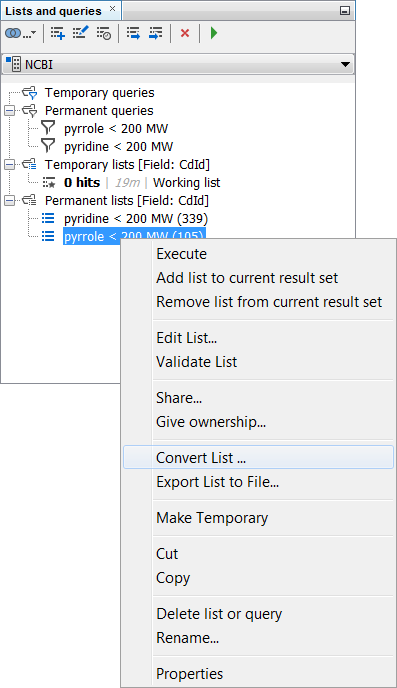
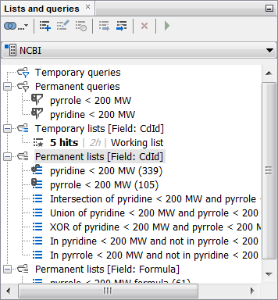
We will make the lists permanent by selecting the list and choosing the Make Permanent option in its right-click menu. Subsequently, we will rename them to “pyridine < 200 MW” and “pyrrole < 200 MW” using the right-click menu Rename … option. An advantage of the permanent lists and queries when using the local Derby database is that if you make an archive of your project and send it to a colleague, the permanent lists and queries will be included in the project.
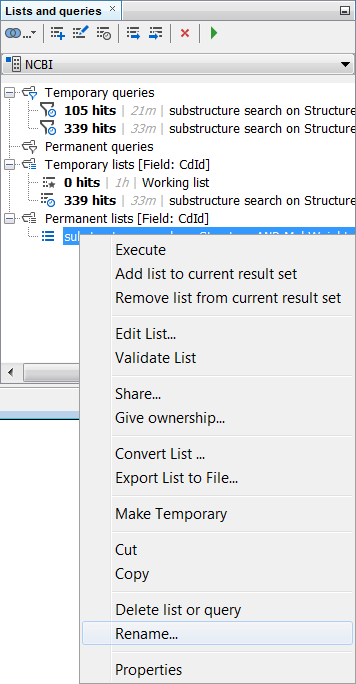
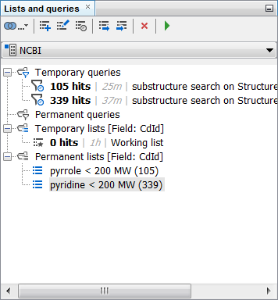
The queries can be handled in a very similar way, just the number of options is much more limited. We will make both temporary queries permanent by choosing the Make Permanent option in the right-click menu. Subsequently, we will rename them to “pyridine < 200 MW” and “pyrrole < 200 MW” using the right-click menu Rename … option to match with the corresponding lists.
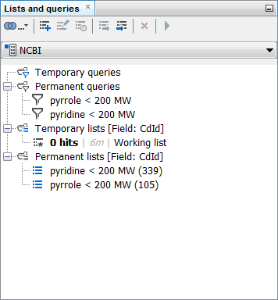
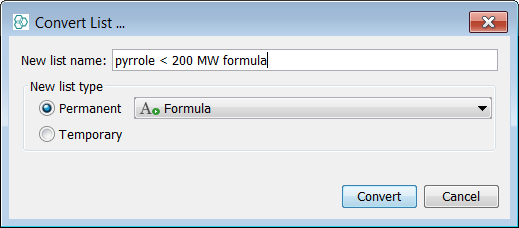
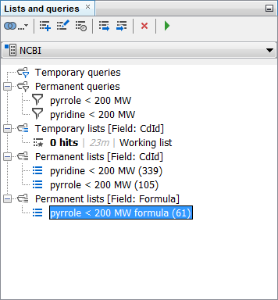
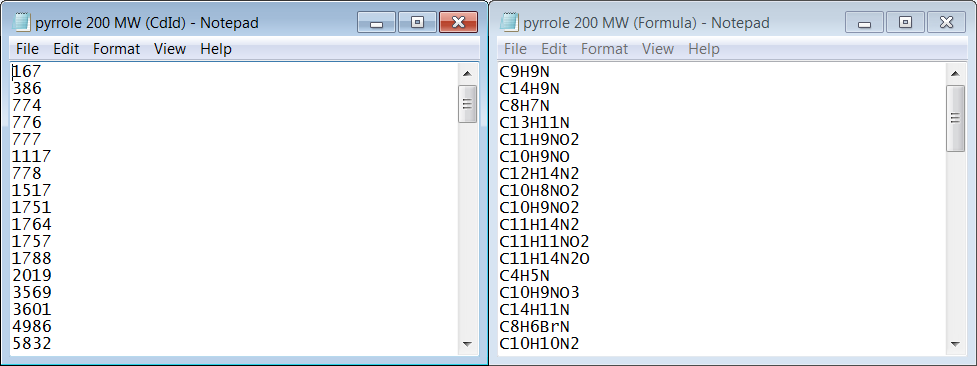
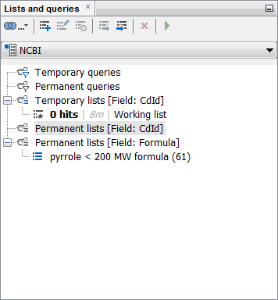
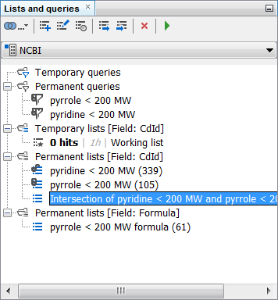
In the lists and queries window, you can notice the [Field: CdId] text in the list groups description. This means, that the list is saved as the CdId numbers of the respective rows. There is the possibility to change the field used to save the list. You can do so by by selecting the Convert List … option in the right-click menu. We will convert the “pyrrole < 200 MW” list based on the CdId field to one based on Formula. You can notice a new list is created in a new list group based on formula. You can notice that the converted list contains fewer records than the original one - 61 versus 105. This means that the original list contained duplicate structures or isomers (the value in formula field was not unique for each of the records).
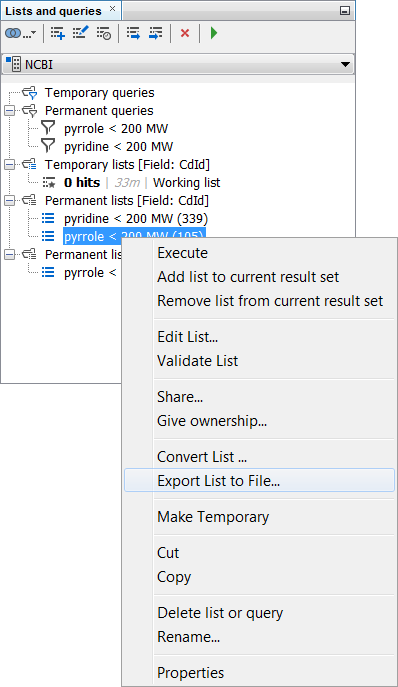
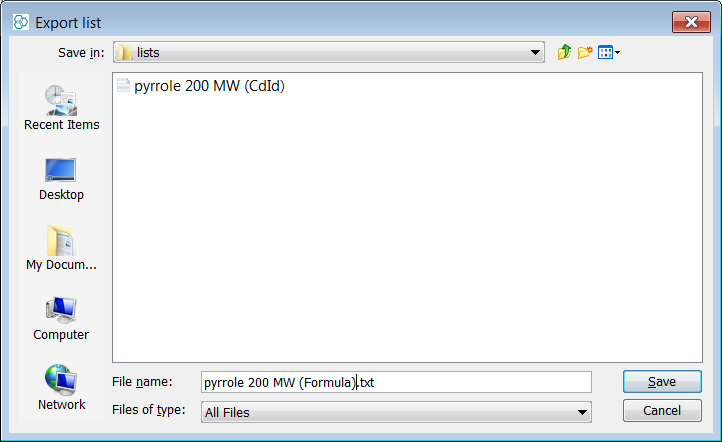
The lists can also be exported to a text file. You can do so by selecting Export List to File … option in the right-click menu. Keep in mind that only the list of values in the field of choice is saved in the list and not all the records in the database. We will save the lists “pyrrole < 200 MW” based on both CdId and Formula fields.
Sharing of permanent Queries and Lists
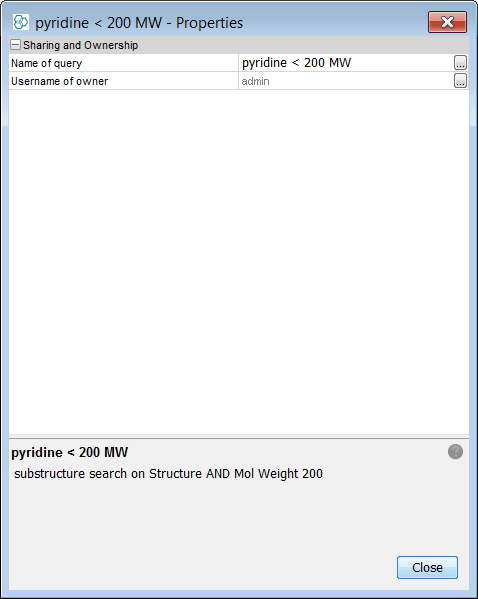
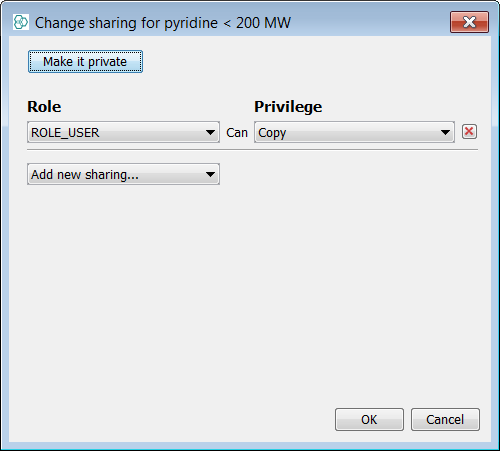
If you select the Properties option in the right-click menu of a query, you can see the name of the query, the query settings and the username of its owner. By default, the queries (similar to views) are created for the owner with the possibility for other users to copy them. The sharing options wizard can be accessed using the Share… right-click menu option.
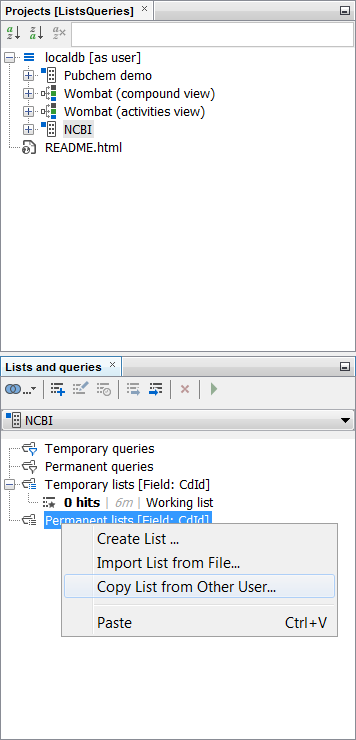
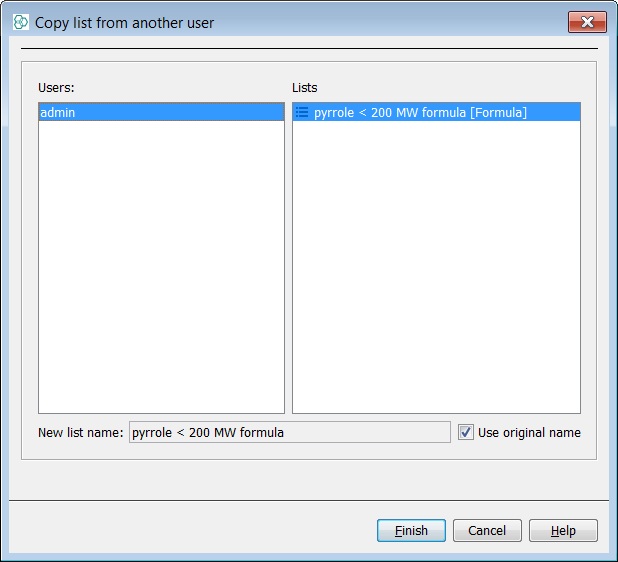
Instant JChem also allows the transfer of lists and queries between different users. One user can create a list and transfer its ownership to a different user. For that, we will need to set up security in our project. We will do so using the schema editor and the security settings. For this tutorial we will use the “Username/password using simple text file” option. You can go through the details on setting the security policy in this tutorial. Now you can try to reconnect to the schema as the user. If you select the NCBI data tree, you can notice there are no permanent lists or queries to be seen, as according to the sharing options we have set the user can only copy one of the permanent list and can not see any of them directly. You can copy the Formula field based permanent list by selecting the Copy List from Other User… option in the right-click menu. In the new window, you have only one list to select. After clicking Finish, you can notice a new list appeared in the lists and queries window.
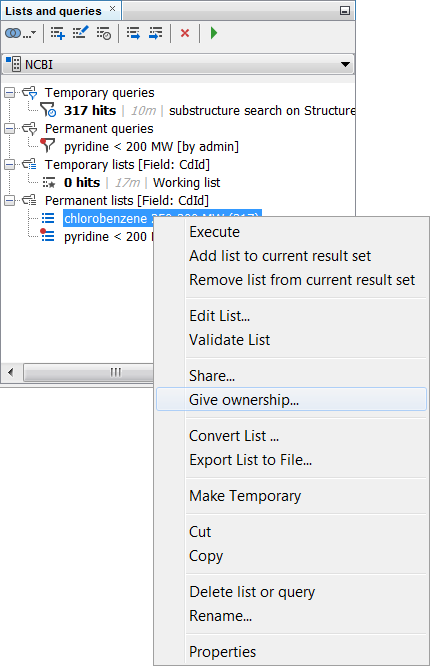
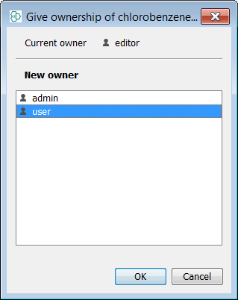
Now, we will reconnect to the schema under the editor username. You can notice the editor, unlike the user, can see the pyridine list and query directly, as the admin user set the sharing privilege to read. These readable items are marked with a red dot in the icon. We will need to create a new grid view for the editor. Now, we will run a new query, for chlorobenzene and molecular weight between 250 and 300. We will rename the new temporary list to “chlorobenzene 250-300 MW” and make it permanent. Now, we will give ownership of this list to the user by selecting the Give ownership… option in the right-click menu and choosing the user in the newly opened window. After confirmation, the new list disappears from the view, but it is available to copy from the new owner (as the default sharing option was not changed).

Logical Operations on Lists
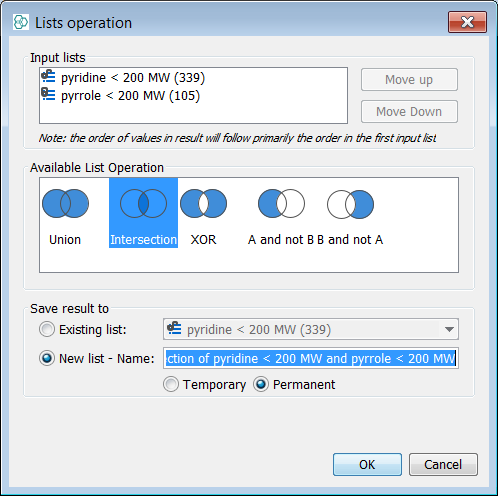
Different lists can be combined in Instant JChem using logical operations. We will now re-connect to the schema as admin and use the pyridine and pyrrole list for these operations. We will start with the intersection operation. We will select both “pyridine < 200 MW” and “pyrrole < 200 MW” lists and choose the
Intersection
option in the ![]() button dropdown menu. A new window opens, where you can confirm the chosen operation and select where the results will be saved to. Let’s keep the default settings as they are usually sufficient and confirm the operation. You can notice a new permanent list was created and contains the molecules present in both “pyridine < 200 MW” and “pyrrole < 200 MW” lists.
button dropdown menu. A new window opens, where you can confirm the chosen operation and select where the results will be saved to. Let’s keep the default settings as they are usually sufficient and confirm the operation. You can notice a new permanent list was created and contains the molecules present in both “pyridine < 200 MW” and “pyrrole < 200 MW” lists.
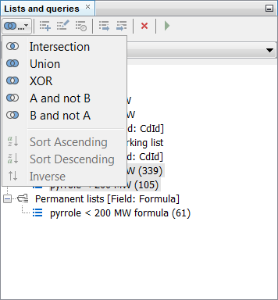
Similarly, we will create the Union and XOR of the “pyridine < 200 MW” and “pyrrole < 200 MW” lists and save them as new permanent lists. Now you can see the relations between the newly created lists. The Union shows the results that are present in at least one of the selected lists, while the Intersection provides only the results present in all of them. The XOR function shows only the results present in one of the selected lists. In our case, you can see that the “pyridine < 200 MW” list contains 339 hits, while the “pyrrole < 200 MW” list contains only 105 results. Their intersection has only 6 results, union 438 and XOR 432 hits. If you add 105 to 339, you will get 444 in total, subtracting the 6 duplicated hits results in 438 (as contain union). Subtracting the 6 again results in 432 as shown in XOR list.
The two remaining operations are A and not B and B and not A. These operations shows only the results present in one of the lists and not in the other one. The A and B are selected based on order of selection of the list. In our case, these operations lead to 333 and 99 hits in the lists for “pyridine and not pyrrole < 200 MW” and “pyrrole and not pyridine < 200 MW” respectively.
While the three logical operations mentioned previously (intersection, union and XOR) work with different numbers of lists, the “A and not B” and “B and not A” are usable only with 2 lists. When combining more lists, more subsequent operations are necessary.
Using Search Domains
An interesting function for narrowing the number of hits is the use of search domain. It allows to restrict a query on a specific list including both permanent lists and the temporary result set of currently performed query. Let’s try some searches.
First, we will search for chlorine containing compounds in the whole database. Such search will provide more than 4,000 hits.

Now, we will search for pyridine or pyrrole containing compounds with molecular weight below 200 Da. The easy way how to do it is to use the union list as the search domain. You can select it in the domain drop down menu. Running the same query against only the union list results in only 23 hits.

Using the Cherry Picking Functions
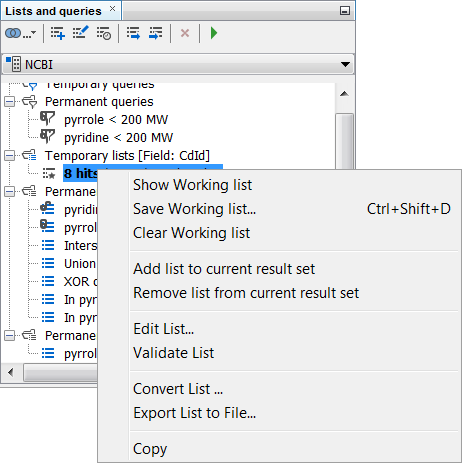
Sometimes you want to simply select the compounds of interest manually. You can do so in Instant JChem by using the working list functionality. You can notice in previous screenshots of lists and queries window that there is one temporary list containing no hits and marked as working list. You can add the results in it manually using the star menu in grid view toolbar. Pressing the star directly will add the currently selected row into the working list, while the arrow shows you the dropdown menu. Let’s add some data into the working list, we will select first five hits from the intersection permanent list. After doing so, you can see that the rows added to the working list are highlighted by a golden stripe at the row number. Also, the number of hits in the working list is updated in the lists and queries window.
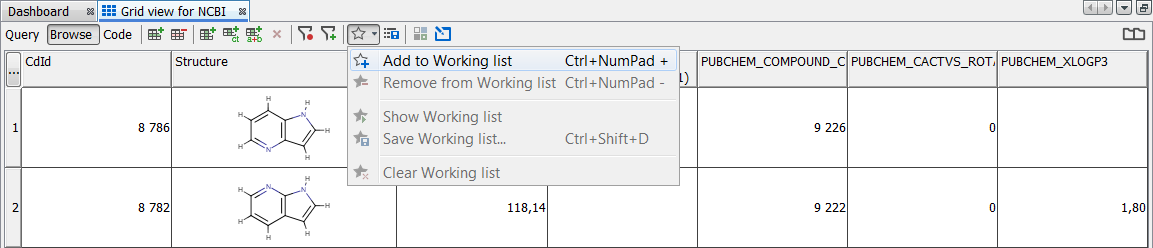
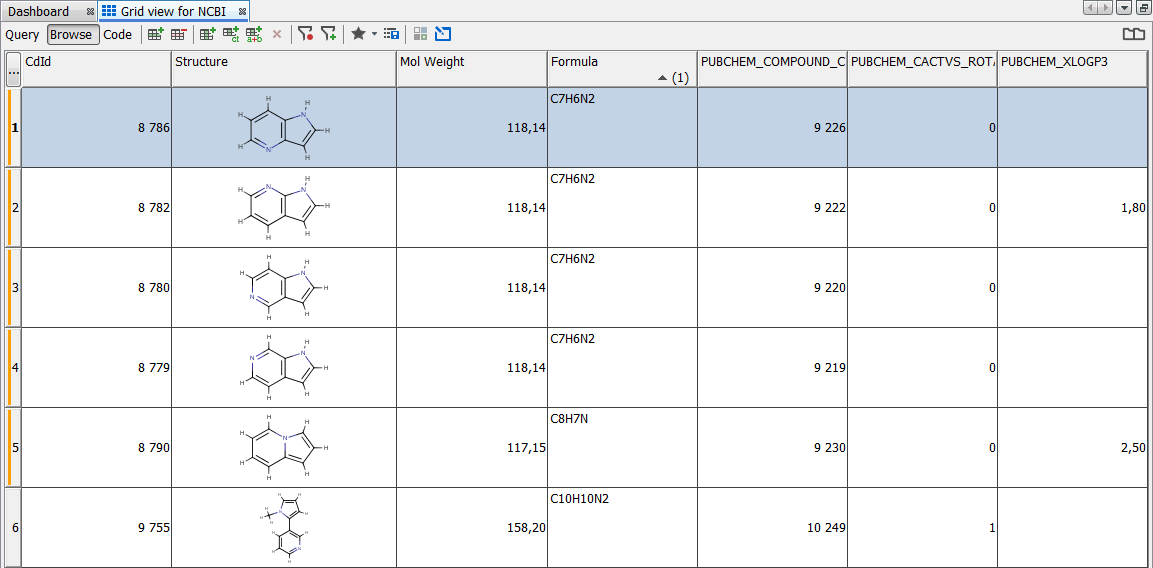
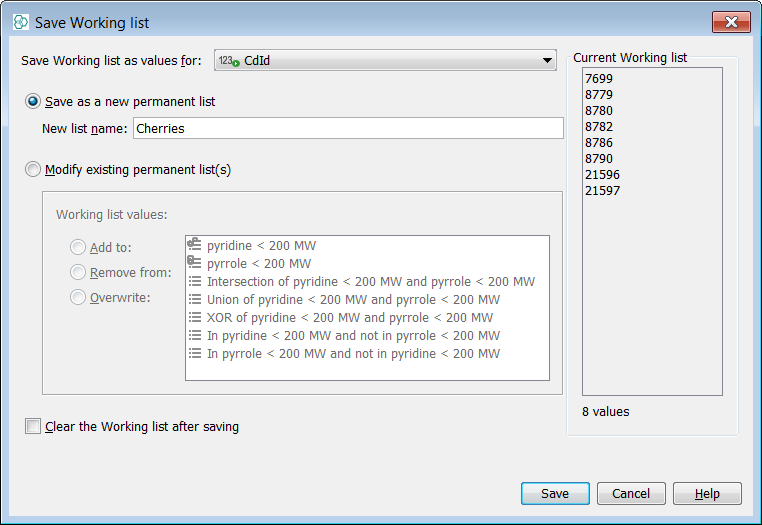
Now, we will add some more compounds to the working list. Let’s choose the XOR list and add first three hits to the working list. After doing so, you can notice that the working list contains now 8 hits. Using this approach, you can add to the working list any compound of interest from any of the lists, or directly from the gridview without using the lists to pre-select the hits. Then you can open the working list similarly to other lists, save it to a permanent list, or export similarly to other lists. When choosing the Save Working list… option, you can select how the working list will be saved. We will set the name to Cherries and other options will be left default. If you do not check the Clear the Working list after saving checkbox, you will keep the compounds in the temporary working list as well as in the newly created permanent list.
List and Query options
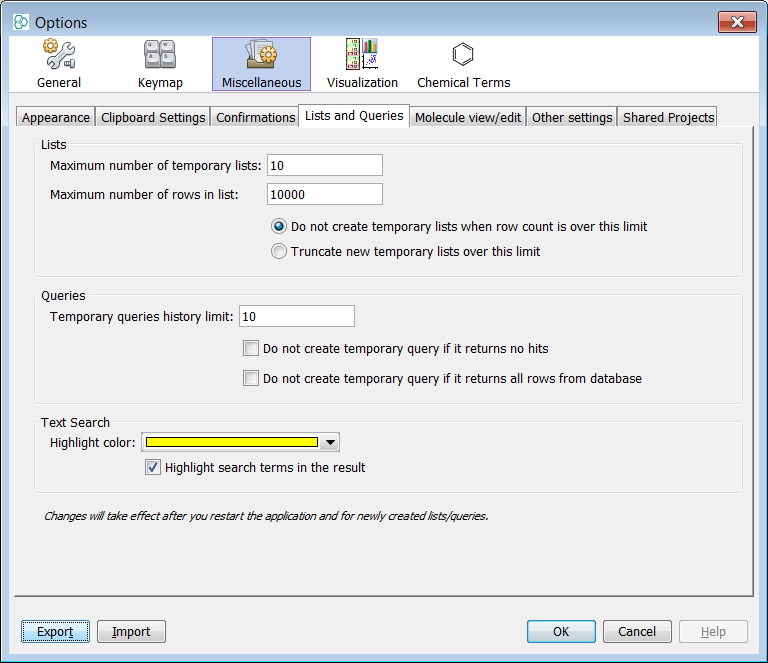
By default, there are limitations on the number of rows in the list (10,000) and also the number of temporary lists (10). These values are selected to provide the optimal performance on most computers, but it may be of advantage or ever necessary for some use cases to change them. You can access these settings through the Tools > Options > Miscellaneous > Lists and Queries . Here you can also set how to proceed when the newly created list would contain more than 10,000 rows. By default, no new list is created but you can decide to truncate the list to the limit.
The number of temporary queries is also limited and you can decide not to create a new query if it contains either no hits, or all rows in the database.
Congratulations
Congratulations! You have just learned the basics of lists and queries management by learning to
-
Create the demo Project.
-
Handle Temporary Queries and Lists.
-
Convert and handle Permanent Queries and Lists and manage them
-
Share permanent Queries and Lists.
-
Use the logical operations on lists.
-
Use the search domains.
-
Use the Cherry picking functions.
-
Understand and change the options for Lists and Queries.