Extending IJC functionality - module install into Java Web Start
Here we show how to extend Java Web Start distribution of IJC with a custom module. As a sample module we will use our MyAddField example module.
1. Build the module
$ cd api-examples-suite$ cd addfield $ antwhen the module is successfully built we need the following two files:
api-examples-suite/build/cluster/modules/com-im-ijc-examples-addfield.jarapi-examples-suite/build/cluster/config/Modules/com-im-ijc-examples-addfield.xml2. Unzip IJC java web start distribution
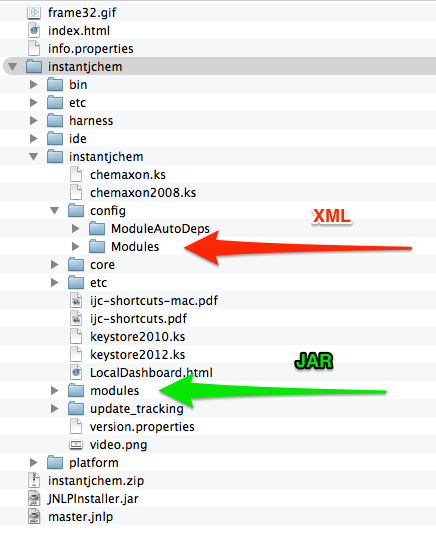
$ unzip ijcinst-jws.zip$ cd ijcinst-jws$ unzip instantjchem.zipThe whole folder should look like this:

3. Copy the module’s files to IJC JWS distribution
As it is indicated in the previous screenshot, copy the files from the built module into the distribution folder:
-
JAR file into instantjchem/instantjchem/modules/
-
XML file into instantjchem/instantjchem/config/Modules/
4. ZIP the instanjchem folder
Now everything is in the place and we can zip the IJC folder. You can use any ZIP utility od command line:
Delete or backup the old zip:
$ rm instantjchem.zip
Create the new one which includes the module files :
$ zip -r instantjchem.zip instantjchem
5. Update the Java Web Start files
In the last step we have to update CRC32 of a new instantjchem.zip in the info.properties configuration. It is recommended to update file size and creation time but it is not mandatory (just some warnings are displayed). However, if you choose, you can find the creation time on Windows with stat -c %Y and on Unix systems with stat -r
To find out the CRC32, you can use some windows utility such as this one, or command line:
$ crc32 instantjchem.zip 893d789aUpdate the CRC32 in instantjchem.zip :
# zip file with InstantJChem = file size, timestamp, crc32instantjchem.zip=216959352,1409579282000,893d789a6. Deploy the IJC distribution
Now the distribution is ready to use with the new module